Tuesday, May 18, 2021

Swap Cards

 I was recently in an new catalog swap with a few of my NC Demo friends.  It was great to see some of the stamp sets used that I don't have.  Of course, it also makes me want to get some of those stamps!  It's funny - you can look at the stamp sets in the catalog and not think much of them until you see them used in real life!  Broadens your horizon!

Here are a few of the cards I received.


I love the designer paper used on this card and it goes wonderful with the new In Color, Evening Evergreen!  I think this stamp set could be the replacement for Lovely As A Tree.


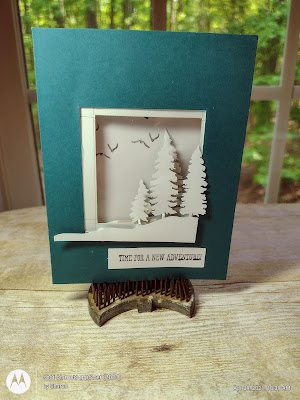
On this card, you can see a few of the snippets of the designer paper on the bottom.  I love how she die cut 2 trees and just a peek of the Evergreen is showing like a shadow.  This card and the one above are both from the Beauty of the Earth suite (pg 10-11).


Again another card that gives us a peek at some designer paper and a new In Color.  This time she used Hand Penned (pg. 131) and Soft Succulent.


This is a stamp set that I did not like when I saw it in the catalog.  My sister and I both gave it a thumbs down.  UNTIL we saw this card and the next one!  OMG .... this is just beautiful.  The Fresh Freesia card with the Soft Succulent is just wonderful!


Another great card using Simply Elegant suite (pg 68-69.)  And this bundle comes with a PUNCH and not a die!!  Another reason to put it on your list!


Isn't this slimline card beautiful?!!  I love that Pansy Petals suite (pg 28-29) with the new In Color, Polished Pink.  I like the size of this slimline card.  It is cut at 7" x 8" and scored at 4" on the 8" side so it  makes a 4" x 8" card.

Well, my husband made it the Pawleys Island.  He found a gas station somewhere just past the NC / SC border and topped off his tank.  Then when he got to the beach, he found another gas station and filled up so he should be good to go to return on Thursday!  I'm enjoying a little bit of  "alone time."  Sunday I spent just about the whole day working on some swap cards for the July Quarterly in Hendersonville.  Ashley is  going to come down that weekend since it is my mom's 93rd birthday so she will go to the Quarterly with Marianne and me.  Today I played Hand & Foot with my friends.  Ashley signed me up to receive a couple of free meals through Hello Fresh and another one.  So, last night I had Caribbean Tilapia.  It was delicious and not something Sonny would eat!  I did a Peruvian Chicken before he went out of town.  He ate it and said it wasn't too bad!  He is just a "meat and potatoes" king of guy - drives me nuts!  I have another one lined up for tomorrow that is a pork dish using couscous which I know he would turn his nose up at!

I've got to share the picture of Miss Abigail.  I got to see her on Mother's Day.  She is a cutie!!


I think she is going to have red hair!  Both of her grandparents (Marianne and Greg), Harrison and Derek (her dad) have red hair.

This is some of my family on Mother's Day - my two sisters, mom, brother, nephew and great niece.

Friday, May 14, 2021

Get your Gas!

Isn't this gasoline shortage crazy!  Sonny filled his truck up on Tuesday & paid $3.05 for high test since they were out of regular gas.  On Wednesday, we had some errands to do in Mooresville and in Cornelius.  I had about a quarter of a tank & we were going to fill up on the way home.  Well, every gas station we passed from Cornelius to our house had bags around the pumps because they were out of gas!  We had about given up but found a gas station finally that had gas ($2.89).  Funny but it was the closest gas station to our house!  Our state is now in a state of emergency.  I hope things get better by next week.  Sonny is going on a golf outing at Pawleys Island in SC - leaving tomorrow through next Thursday.  He has enough gas to get him there.  Let's hope he finds gas to get home!

I have more Paper Pumpkin cards to share with you.  I just love the bright colors in this month's kit.


On this card, the white label die piece in the center is what holds this card together.  The label is from a retired Stampin' Up die set.  I stamped the popsicles with Black Memento ink and then using the ink I squeezed out of the stamp pad and my Aqua Brush, I colored them with Bermuda Bay, Bumblebee, Magenta and Old Olive ink.  I found an old bottle of Shimmery Mist.  It wouldn't spray anymore so I just used the straw piece inside and dabbed the white splotches on the popsicles.  The striped pieces are from the envelope liner.  The inside green piece is from Artistry Blooms DSP (retired).


This was a simple one to make.  I cut the popsicle card apart.  It was already colored.  I just used the Bermuda Bay Blend pen to go around the edges of the popsicle, tied a ribbon around the stick & attached the sentiment.  The white layer was embossed with Seaside.


Sammie wanted to see what I was doing!  What a helper she is - ha ha!

Another easy card.  The sun and the rainbow are stickers that came in the kit.  I sprinkled a few sequins around and added the striped envelope liner.


I stamped "happy birthday" all over the card with Gorgeous Grape, Lemon Lime, and Magenta Madness.  The stamping was done with full strength ink and I also did 2nd and 3rd generation ink.  I colored the popsicles with watercolor pencils (on watercolor paper.)  I spread Shimmery Glossy Accents & they are so shiny!


Wednesday, May 12, 2021

April Paper Pumpkin 2011


More cool pictures from April's Paper Pumpkin Kit.


Another slimline card.  I did some masking on this card to stamp the popsicles all the way across.  I used the Blends to color the popsicles.

This was a sponging card.  I uses the negative from a circle punched piece of cardstock and inked the circles using the Blending Brushes.  You could also use a sponge.

I colored a strip of watercolor paper with different inks using the aqua pen, ink, and water splashed on.  I stamped the popsicles and cut them out.  Each of them is coated with Glossy Accents (which SU doesn't carry anymore.)  They are really shiny in real life!


Monday, May 10, 2021

Birthday Cards from May Paper Pumpkin

 I am working on my new catalog order and trying to decide which stamp set(s) I will get.  There are so many beautiful ones to choose from!!  I think I am leaning towards the Pansy Patch, Hand Penned and Artistically Inked.  Decisions, decisions!!  Plus .... I am loving the Designer Paper that is in the catalog!!

Ok - I have mentioned that I was going through some medical issues.  Well, I think I am done and the outcome is good.  It started out a little over a month ago when I had discovered blood in my urine (for 3 days.)  So a trip to the doctor.  I never had any pain or discomfort.  I ended up going to a urologist.  I had CT scan, Ultrasound, and last week the dr. took a look at my bladder.  Turns out that I have kidney stones in both kidneys.  They are fairly small so for now we are not going to do anything.  The urologist said if it was him, he'd just wait since they are small versus having two surgeries to break them up.  He will see me again in a year and do another CT scan.  So that makes me happy.  I have heard some horror stories about how painful it is to pass them.  Just hoping mine aren't big enough to hurt me if they decide to pass!

Now on to better topics!!  I have made several cards with the April Paper Pumpkin kit.  It is one of the best ones Stampin' Up has done.  

I used the Blender Pen in Just Jade to make stripes on the background.  The white piece is die cut with Scalloped Contours Dies.

I really like making the slimline cards.  I used my Stampamajig to line up the "happy birthdays"

I stamped the popsicles with Memento Black Ink onto Rococo Rose, Pineapple Punch, Coastal Cabana, and Lemon Lime cardstock and fussy cut them.  I stamped the middles pieces in the same colors, cut them out and adhered them to the popsicles.

I found the DSP that is adhered on the left in my stash.  I do believe it is about 13 years old & from Stampin Up!!  I don't know what you call this type of fold but the side with the DSP is glued down and the card opens there.  I used my Blends to color the drink and watermelon.  I had some wood grain DSP in my stash and used it to make a table.

This popsicle is one of the stickers in the kit.  I tied a Bumblebee ribbon around the stick.

Tuesday, May 4, 2021

It's time!!

 I love the launch of a new catalog! While many Stampin' Up! demonstrators have been living for more than a month with our 2021 Annual Catalog, we've only been able to order a select few things from the catalog. Today we are all excited to share its wonders with the rest of the world. What fun! There are SO MANY amazing products inside these pages, and I'm certain you'll wish for a "one of everything, please" button.

A little bit about the gorgeous cover of this catalog...

The projects on the front of this year's Annual Catalog showcase papers, stamps, and accessories from the Expressions in Ink Suite. This suite is one of my favorites in the new catalog, but demonstrators haven't been able to order it until today.


Stampin' Up! used to call the catalog The Idea Book and that's really what it is.  Most of the pages have several cards and each can inspire you with layout, color combos and techniques.  You can copy them exactly, of course, but often I use them as a jumping off point to try out new ideas. 

  • There are 10 suites. The suites in this catalog are pared down to make them more affordable. There are none with 2 stamp sets or 2 sets of dies. Each suite this year has just now one bundle, Designer Series Paper, and one other item. The savings for the suites have always been the 10% you save on the bundles. And you can always add the extras!
  • Speaking of bundles, there are 29 new bundles in this catalog and 5 that carried over from other catalogs, so you have a lot of opportunity to save! The bundles are listed with the stamps and there's another listing of the bundles with punches on pages 147-148 and  with dies are on pages 157-161.
  • The Accessories Index is still there! Yay!!!
  • Color coding at the edges of the pages to help you find the sections of the catalog: All Occasion, Birthday, Love, Thanks, & Support, Holidays, Artistic Expression, and the Accessories & More.
  • You may be dismayed that the Fine Tip Glue Pen is not in the catalog. Not to worry! You will still be able to purchase it online.
  • There really aren't any kits in this catalog. Stampin' Up! will have a new line of all-inclusive kits online. I have only seen hints about these, but this new line is mentioned on page 9. And of course, if you're in North America, we still have Paper Pumpkin Kits.
  • If your wish list is as long as mine, get your pen and paper out and start filling it up!

Thursday, April 29, 2021

Here's To You Paper Pumpkin

It's beginning to feel like spring!  Yesterday's temps were in the 80s and I today it is predicted to be 86!  I'm so ready for the warm weather.  When I went to visit Ashley a couple of weeks ago, I took spring clothes and ended up having to wear some of Ashley's sweaters!  It even got close to freezing one night.  I am ready for short sleeves and capris!  Of course, I don't know if I will fit into my spring clothes from last year.  Due to this pandemic, I have put on about 10 unwanted pounds.  Dessert and goodies every day is not good!!!!  I am starting to count my WW points again and get this weight off.

I have been having a bit of a health scare.  Before I went to Ashley's, I noticed blood in my urine for 3 days.  I went to the doctor and they did a urine test which came out negative.  Next I had a renal ultrasound which showed kidney stones in both kidneys.  So, I went to a Urologist.  He had me do a CT scan a couple of days ago.  I will be going back to the urologist next week to go over the results.  All I do know is that it is not cancer according to the nurse who called me yesterday.  I didn't think cancer was an issue but you never know.  I just had two friends who were diagnosed with cancer.

I have been trying to finish up my Paper Pumpkin cards from last month during all this craziness.  Here are a few cards I have made.


I used the stars mask that came in the Paper Pumpkin kit.  I sponged the stars with Magenta ink and used the Stitched Stars Dies to die cut a few Coastal Cabana and Magenta stars.


I made a frame from one of the cards.
I fussy cut the flowers, yellow field and trees before adhering them to the card with dimensionals.


The background is one of the envelope liners.  I fussy cut the piece with the clouds and adhered it to the card with dimensionals.


This was a simple one.  I just adhered the panel to a piece of Tranquil Tide which was adhered to a white card.  I tied a piece of twine around the card and adhered the die cut trees that were included in the kit with dimensionals.


I had a scrap of the floral piece (which was an envelope liner) that I adhered to a piece of Petal Pink.  I stamped the flowers in the background and adhered the sunset piece with dimensionals after wrapping a piece of twine around it.


I sponged white craft ink using the star mask that was in the kit on to the 3 1/2" x 4 3/4" Crumb Cake cardstock.  That piece was layered onto a piece of Tranquil Tide and then onto the Crumb Cake card.  The trees die cut piece and the sentiment was adhered and it was done!  Easy!


I sponged a sunset (a little too dark!) onto a 3 1/2" square of white cardstock.  I used another of the masks to sponge the mountains.  I stamped the trees in the background with Pear Pizazz ink.  The stamped square is adhered to a square of Pear Pizazz.   After wrapping a piece of twine, I adhered the piece to the card with dimensionals.  


I wanted to show both sides of the trees - winter and spring!  This is the front of the card.


And this is the card when it is open!


Sunday, April 25, 2021

Pleased As Punch / NC Demo Blog Hop


Welcome to the NC Demos Blog Hop!  We are happy to share our punch-y projects with you this month.  You might have just come from Jo Anne's blog.  Great project, huh?  She always wow's us!

It's always fun to think about our theme and figure out what we will use ... in this case what punch we'll use!  Our monthly NC Demos Blog Hop is featuring PUNCHES.  I love punches!  Don't get me wrong - I like my dies too but it is so much easier to just punch out an image than having to run dies through the Big Shot.  

I decided to use the Rectangular Postage Punch for my two cards.  I don't think I have used that punch since Christmas!!  The good news is that it will be in the new catalog.  Another punch I used (and use all the time!!) is the Banners Pick A Punch.  I used it to "flag" the ends of the sentiment.


  • For this card, begin with a white card base cut at 8 1/2" x 5 1/2" and scored at 4 1/4"  
  • To the front, add a piece of Terracotta Tile cut at 4 1/8" x 5 3/8"
  • Emboss a piece of Petal Pink (4" x 5 1/4") with an embossing folder.  (I used Tasteful Textures.)
  • Using a Blender Brush (or a dauber or sponge), lightly add a bit of Terracotta Tile ink over the Petal Pink card stock.   Adhere this piece to the card.
  • Using the Rectangular Postage Punch, punch out 3 stamps from white card stock.
  • Cut three pieces of Fine Art Floral DSP 1 1/8" x 1 3/4" and glue them to the punched white stamps.  Attach this piece to the white cardstock cut at 4 5/8" x 2 3/8"
  • Stamp the sentiment (from Free As A Bird) on 1/2" white card stock strip using Terracotta Tile ink.  
  • Flag the ends with the Banners Pick A Punch.
  • Add the sentiment to the card front.


My second card is a bit different.  Again I used the Rectangle Postage Punch.

  • Begin with a Pool Party card base cut at 8 1/2" x 5 1/2" and scored at 4 1/4"  
  • Tie a piece of Coastal Cabana Sheer Ribbon around the next two layers before adhering them onto the Pool Party card.
  • To the front of the card, adhere  a piece of white card stock measuring 4" x 5 1/4"
  • Next, layer a piece of Fine Art Floral DSP (5" x 3 3/4") to the white card stock.
  • Stamp the bird from Free As A Bird; use Stampin' Blends to color the bird; use the Rectangular Postage Punch to punch out the bird.
  • Die cut a large and a small Stitched Nested Label.  
  • Stamp the sentiment on the small label; cut one side; adhere to the bottom right.
  • Die cut some leaves from the Free As A Bird dies and adhere to the large label.  Adhere to the top left.
  • Attach the Rectangular Postage Punch with dimensionals.

Thank you for letting me share my cards with you.  Please stop by and see Laurie Meier's post


Amy Austin-Kinler
Jo Anne Hewins
Sharon Maranich  (you are here)
Laurie Meier
Tracie Evans Langley


Monday, April 12, 2021


I'm sad that the Umbrella Punch is being retired!  I pulled out some retired DSP (Pleased As Punch), stamped the umbrellas with Memento Black Ink and punched out several of them.  I scattered rain drops (again using the black ink) all over the card front before adhering the umbrellas on the page.  The sentiment is from Comfort and Hope and the labels are from the die set, Stitched So Sweetly.  I adhered a few colored Dew Drops (non SU) on the card.  


I'm happy that the Stitched Triangles Die will not be retiring!!  This was a fun and easy card to make.  I just found some retired DSP in browns and blues and die cut a bunch of triangles all different sizes.  Then I just played around arranging them on my card.  The funny thing is after I got everything done on the card, I adhered the triangle layer upside down!  Oh well, it really didn't matter.

I will be flying to visit my daughter tomorrow!  I can't wait.  We have no plans but will have fun I'm sure.  She will be working most of the time and I will probably be working in her yard while she is gone.  I'm sure Bogey (her cat) will keep me company!


Thursday, April 8, 2021

A Few Cards to Share

I found a couple more cards that I made using the Pierced Blooms dies.


I love these colors - Magenta Madness, Basic Black and Just Jade!  That Magenta flower just pops off the page!


This card also uses the Pierced Blooms but is much more subtle than the magenta flower above.  I used the Stitched Rectangle dies to create the two "windows."  These colors are Petal Pink, Emerald Envy (retired) and Calypso Coral.


For this card, I copied a card made by one of the NC demos.  The folds are unique with the flower from Art Gallery popped up on dimensionals.  I put a little bit of Gilded Leafing in the center of the flower using Heat and Stick Powder.


This card highlights the Artistry Blooms DSP (which will be retiring soon.)  I colored the birds with Stampin' Blends and fussy cut them from Birds and Branches stamp set; stamped the tree limbs with Early Espresso and added a little but of Gilded Leafing.

I'm sorry I've been MIA lately.  I've been wrapped up in a health issue and trying hard to do my exercises daily!  I was dismissed from PT 2 weeks ago and yesterday got released from the ortho doc.  Next week, I am flying out to visit Ashley for a week!  I'm dreading sitting in the airport and plane with that danged mask on but it will be worth it!  Hope the weather will be good while I'm there.  I'm sure I'll be helping her in the yard!

I received my new SU catalog in the mail this week and have been looking it over!  I have to be honest, there are a lot of floral sets in the new catalog.  Truthfully, I have plenty of florals so that might save me some money.  There were a lot of stamps from the catalog and mini catalog that did not go away so that helps a lot too.  I love the cover of the catalog using Expressions In Ink DSP - that will probably be my first thing to order, along with the new In Color inks and refills.  If you are a customer of mine, you will receive a catalog in the mail in May.

Thursday, April 1, 2021

Paper Pumpkin Here's To You

HAPPY APRIL FOOL'S DAY to you!  No fooling - I have a blog post for you!

This month's Paper Pumpkin is great.  We got some free goodies in this month's kit - stencils (mountains, clouds, starburst & stars) and a sponge which I cut into 5 pieces.  The stencils have been a challenge for me.  I still need to work on them!  I think the elements in this kit work well for masculine cards.  Another good think in the kit is envelope liners along with kraft envelopes.  Usually the liners are already in the envelope and in order to use them as an element on the card, you have to cut the envelope apart.  


This background is from one of the envelope liners.  I had scraps left over from it which I fussy cut three of them to make candles and popped them up with dimensionals.  The sentiment came from a retired stamp and die set, Broadway Birthday.


This card was on one of the cards that was in the kit.  I cut the "scene" out and matted it onto Bumblebee cardstock.  I stamped and fussy cut the trees in the bottom left.


I die cut the scenery piece with a die from the Layered Circles.  I die cut (with scalloped Circle Die) a piece of white and matted the scenery piece on it.  I used another piece of the envelope liner and tore it along the bottom before attaching it to a piece of Calypso Coral.  The ribbon I used is the very last on the spool of a piece of Grapefruit Grove.


More floral paper from the envelope liners and a scenery square.


Another envelope liner.  I used the Layered Circles dies and stamped the flowers with Calypso Coral.


Here’s a sneak peek at what Stampin’ Up has designed for April’s Paper Pumpkin kit, it’s one that can be shared with the family! This entertaining and ‘SO COOL’ kit can be shared with your children or grandchildren providing lots of summer fun! What’s even better? This kit has been designed to coordinate with the Sweet Ice Cream Bundle featured in the Spring Mini for added enjoyment and projects!  You need to order by April 10 to get the April kit.