Tuesday, February 28, 2017

February Stamp Club Cards

I just realized I never shared my February club cards.  So ..... here they are!

I love the new embossing folders - celebrate and Happy.  They deboss the cardstock and when you put ink on top of the debossed letters, they appear like magic!  For this card, we used some retired DSP from a birthday stack.  (I have lots!)


Everyone enjoyed making this lighthouse scene and were amazed that it really wasn't that difficult.  The lighthouse was stamped with Cherry Cobbler and Smoky Slate and then masked to stamp the water and sand.  You know, I love this lighthouse stamp!


For this card, I used the Stylish Stems Framelits Dies (pg 42 of Occasions catalog) and put a 2 1/2" square of Falling in Love DSP behind the flower.  We stamped the scallops on the side in Mint Macaron and Blushing Bride with the Sale-a-Bration set, Delicate Details.


And we did 2 calendar pages this month - for February and March.

The background on the February calendar are the hearts from Perpetual Birthday Calendar (stamped in Red) as well as a single heart from Work of Art (stamped in Blushing Bride).


The March calendar uses the Owl Punch - which I have not used in a long time!  I made his "arms" by punching out a small heart and cutting it in half.  I could not find a branch stamp, so I drew my own!


Sunday, February 26, 2017

NC Blog Hop Favorite Occasions!

Welcome to the February 2017 NC Demos Blog Hop - whew!  That was a mouthful!  This month we are concentrating of Favorite Occasions.  We are using stamps from the Occasions Catalog with an emphasis on a Spring Holiday or event.


If you follow my blog, you might know that I am obsessed with the High Tide stamp set.  I have made several cards using the beautiful lighthouse stamp.  You can see them HERE and HERE and I still have others I haven't posted yet!  But I thought this card would be perfect for this year's anniversary card for my hubbie!  What do you think?  We will be celebrating 44 years of marriage on April 7.  (How did that happen?  Seems like we were just dating a few years ago!)


Not only do I have an anniversary card to share, but there are several birthdays coming up so I thought it would be great to catch up on some birthday cards so they will be ready to go when I need them!

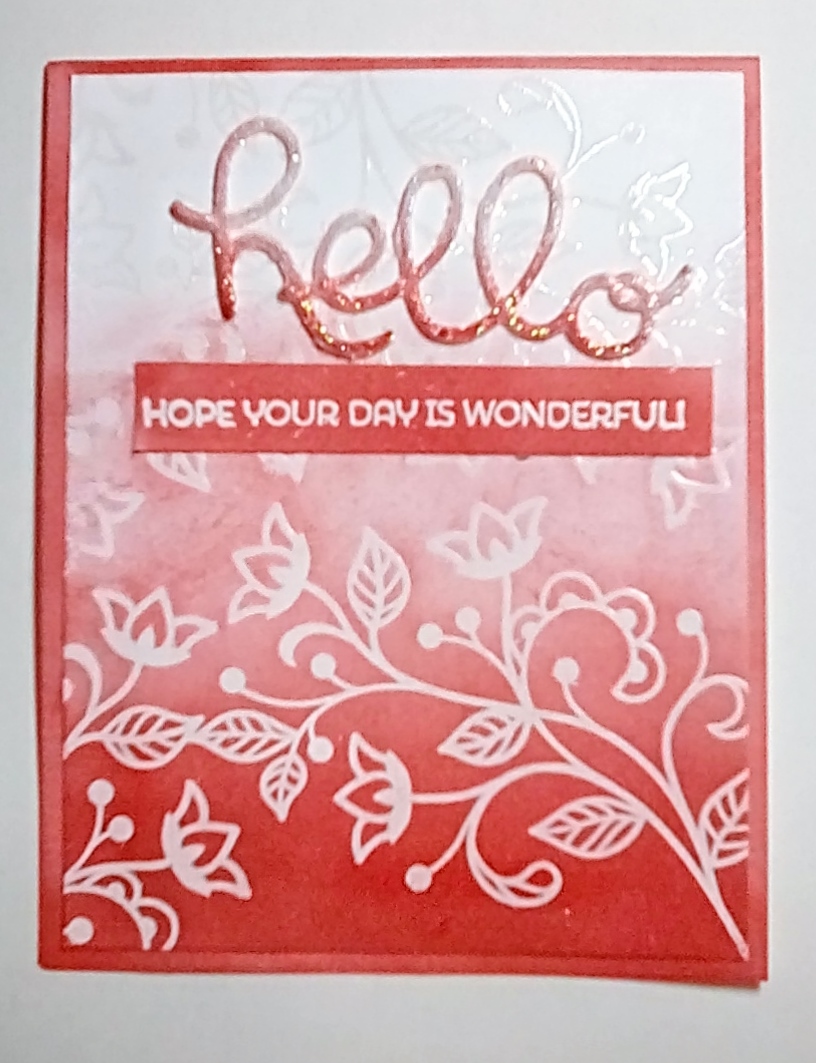
This card uses the "celebrate" embossing folder from the Occasions catalog along with "you" from Hello You Framelits.  The stripes running down and the "swish" are from Gorgeous Grunge.  I stamped them in Bermuda Bay, Peekaboo Peach, Rich Razzleberry and Watermelon Wonder.  This was a really easy card to make.


Here is another stamp set that I have been having fun using.  It is in the Occasions catalog and is called Crazy Cake.  There are so many variations that you can put together using this stamp set.  It is a two-step stamp set but since it is photopolymer, it is easy to line up.  I love two-step stamps and that is what got me hooked on Stampin' Up 12 years ago.  (I just passed my 12 year demonstrator anniversary on Feb. 16!) The cute little frog popping up from the cake is from the hostess set, Love you Lots.  I don't normally get the hostess sets but I got this one right away and have used it so much! The sentiment is from Sunshine Sayings.  I stamped each cake part onto white cardstock (except the one on the bottom which is stamped onto Sweet Sugarplum cs), cut them out and popped them up with dimensionals.  That made it easy to line up the frog and the stars directly onto the card.  The colors I used are Rich Razzleberry, Sweet Sugarplum, Marina Mist, and Perfect Plum.


Here is another card using the Crazy Cake stamp set.  These cake pieces were stamped directly on the white cardstock panel using Tempting Turquoise, Cucumber Crush, Peekaboo Peach and Denim. Unfortunately, I could not find the flame for the candles in the set.  It is really teeny tiny and probably got stuck to something and will never be found again.  But I found a candle flame in the set, Sprinkles of Life that that worked.  The sprinkles on the sides of the turquoise card are also from the Sprinkles of Life set.


Here is one last card using Crazy Cake to show that you don't have to use all the parts of the cake.  I stamped you're from Watercolor Words (just mask off the "the best")  I love the color combo of Dapper Denim and Emerald Envy.   (This layout was cased from Brian King.)


I hope you enjoyed my anniversary and birthday cards and they will inspire you to make a few of your own.

Enjoy the blog hop and hop right along to the see what Laurie Meier has prepared for you.


Debra Ballance-Byrd -
Tamra Davis 

Jo Anne Hewins 
Michelle Irinyl 
Melissa Kerman 
Tracie Evans Langley -
Sharon Maranich (You are here)
Laurie Meier 
Lisa Tedder
Frances Wagner -


Monday, February 20, 2017

Hexagon Embossing Folder

This weekend, I played around with the new thick embossing folder - Hexagons Dynamic Textured Impressions Folder (pg 46, Occasions catalog.)  If you are like most, you have a hard time making masculine cards.  Well, this first card does it.  It is a technique that one of NC demos has been doing and I thought I'd give it a try.  I did mine a bit differently than she does though.

I took a piece of Aluminum Foil and rubbed some Staz-On ink all over it.  Next, I adhered the piece of Aluminum Foil to black cardstock and ran it through the embossing folder.  Next step was to rub VersaMark on the Foil and sprinkle on some embossing powder - whatever color you desire!  I decided on copper.  There is such a glare on the piece, it is hard to see it well but I hope you get the idea.  Next I adhered the panel to a piece of Basic Gray cardstock that I had stamped with one of the grunge stamps from Touches of Textures (in Basic Gray ink.)  I adhered the whole piece to black cardstock.  I stamped the sentiment (retired) in Versa-Mark and embossed it with copper also onto black cardstock.  Don't forget to rub the piece first with the Embossing Buddy!  I mounted the sentiment piece onto Basic Gray and used dimensionals to pop it up.


My next card is a bit simpler!  I rubbed Early Espresso ink onto the embossing folder and embossed a piece of Tip Top Taupe.  The Espresso ink goes into the crevices of the embossing folder giving the illusion of chicken wire!  I stamped the chick with Staz-On ink and used the watercolor pencils to color him (on shimmery paper).  Everything is matted onto red cardstock.


Hope you enjoy these cards and will make some of your own!

Thursday, February 16, 2017

High Tide Watercolor

I promised I would be back and share a few more High Tide cards - just didn't think it would take me all week!  I've had a pretty busy week.  Monday was bridge.  Tuesday was my day at home and I worked on getting my cards ready for Stamp Club.  Wednesday I took mom to get her hair done and afterwards to the Christian Women's luncheon.  They had a speaker who was a survivor from the Miracle on the Hudson.  He was really interesting!  We are having another speaker next month at our Newcomer's meeting.  It will be interesting to hear their prospective.   Wednesday night Sonny and I joined the Catawbans for a Valentine dinner at Linebergers.  I ate way too much on Wednesday!!


This first card uses the Sunburst Framelit for the card.  I also used a couple of pieces from it for the light coming out of the light house.  I used watercolor paper that I spritzed with water and reinkers for the background.  The light house and ground pieces were stamped on scraps of watercolor paper and cut out.


This next card also uses watercolor paper.  I used my aqua painter and ink to paint the background.  The lighthouse is stamped directly on the paper


Another watercolor card below.  I masked the edges before painting the ink on with my aqua painter. With this set, it is so easy to make a background and just stamp the images.


As you know the groundhog saw his shadow in Pennsylvania earlier this month.  Well, Sammie sure wishes he hadn't!  She does not like the cold.  I was looking for her on Tuesday and found her in our guest room (her favorite place).  She had crawled under the covers.  She stayed there most of the day!


Monday, February 13, 2017

High Tide - Wow!

This weekend the weather was spectacular!!  I think we broke records both days with high's in the upper 70s.  I loved it.  I'm guessing this beautiful weather is south of us too.  Ashley is on her annual Rock Boat Cruise with her friends and I am sure they are having a great time.  This year, she is doing back to back cruises!  When they return next week, I think they have a day in Tampa before heading out on a Train (musical group) Cruise.  Oh to be young again!!

My daughter in law posted a wonderful picture of her youngest daughter on Facebook.  I just have to share with you!  She is dressed and ready to go to the Tim Tebow Foundation's Night to Shine Prom!  It is put on annually for special needs teenagers 14 and up.  It is hard to believe she is so grown up.  I have not seen Cassidy in about eight years and she is now 16!!  I know she had a blast!

Image may contain: 1 person, standing

Image may contain: 2 people, people smiling, people standing, shoes and outdoor
My son with Cassidy
Every time I think I've found my favorite stamp set in the Occasions catalog, another one beckons me to it.  This time it is High Tide!  I absolutely love this stamp set!  I've had it for a couple of weeks and wasn't so sure I could do it justice.  See, I really like lighthouses.  I don't know what it is about them but I like to go off the beaten path to find an old lighthouse.  I've been to Cape Hatteras here in NC and also to Peggy's Cove Lighthouse in Nova Scotia just to name a couple.

This first card is my favorite I think.  A lot of sponging went into it!  First I made a mask for the sun and the lighthouse before I started adding color.  The colors that I used were Crushed Curry, Perfect Plum, Tangerine Tango.  For the water I sponged Marina Mist and added a little craft White for the ripples.  The lighthouse is stamped in Smoky Slate and Cherry Cobbler.  This is a two-step stamp.  I stamped the rocks with Smoky Slate.  Then I stamped them again with Versamark and heat embossed with clear embossing powder to give the illusion that the rocks were wet.  I also stamped them a third time with White just for some added dimension.


After looking at a lot of images of lighthouses, I discovered that most of them are white.  But that is the thing about stamping - you can make them any color you want!!  Below are some color combinations that I tried.


My next lighthouse card also had sponging - on the sky and the water.  I used the negative mask to sponge the sun.  It's hard to see, but I pulled some of the Crushed Curry down into the water to make a reflection.  The lighthouse was stamped in Smoky Slate and Cherry Cobbler but I added a little touch to this one.  I used an old Blender Pen and the craft White Refill ink to paint the white areas on the lighthouse.  Instead of rocks I stamped grass around the lighthouse.


This card is a lot like the last one except - NO sponging!  I used a piece of DSP from the Serene Scenery Stack (pg 174).  I love this paper.  This was going to be my card for Stamp Club this month but I have used up most of the DSP (which is very unusual for me!)  I painted the white areas with the white craft ink like I did in the card above.


This next card will be the card for Stamp Club this month.  No sponging - just stamping so it should be ok.


Another thing I love about this stamp set is the sentiments.  Make sure you check out this set in the Occasions catalog on page 25.  I'll have more High Tides to share with you later in the week that are water colored.  There are so many possibilities with this set!

Saturday, February 11, 2017

Valentine Cards

Since it is almost Valentine's Day, thought I'd share a few of the cards I made for the occasion.  You have a couple of days to get your Valentine cards made.  I hope these will give you some inspiration!!

This first card I made using the Jars of Love stamp set, one of my favorites from the Annual Catalog.  I stamped the jars onto the DSP which is retired.  I think it was a Valentine pack from last year.  I punched little heart flowers with a small heart punch that is now retired also.  Pretty simple but different, don't you think?


This is my Valentine Grunge card.  I stamped the vertical lines in Smoky Slate from Gorgeous Grunge.  The little hearts scattered around are from Perpetual Birthday Calendar, which is a set I tend to use a lot for it's backgrounds.  You should check it out.  I stamped the hearts in Melon Mambo and Smoky Slate.  The "Love" heart is from last month's Paper Pumpkin kit.


This card was an easy one to make.  The DSP is a piece I found in my paper stash.  I die cut the heart and "love" from Sunshine Wishes Thinlits. I found a heart button in my button jar and thread the black thread through it and tied it around the white card.  Easy peasy!


I hope these cards are a help to you as you make your Valentines.

Wednesday, February 8, 2017

Tasty Treats - so many options!

I had fun today playing with the Sale-a-Bration set, Tasty Trucks.  This set wasn't originally on my list but it grew on me.  It is a really cute stamp set!  Food trucks seem to be the "it" thing now-a-days. When Ashley was in Texas, there was a B-B-Q food truck not far from her and we enjoyed picking up some BBQ for lunch or dinner and taking it home to enjoy pool side.  Now that she is in Hawaii, there are shrimp trucks that are the "norm" there.


I still had the Love You Lots (hostess) set on my desk so decided to have a little fun with the trucks and the animals.  See, the frog is serving the elephant an ice cream cone!  I colored them with my Copic markers and did a little doodling on the sides.


This one is a taco truck - those are tacos waiting to be eaten in the window.  Again, I used copics to color the truck and found that they matched the Calypson Coral striped DSP.  I cut strips of Pacific Point for the sides of the DSP.  For this truck, I cut the window part on a scrap of white and used dimensionals to pop it up.  I also used the Owl Punch for the tires.  Love that sentiment - "Let's taco 'bout how awesome you are"

These next images are to show you different things you can do with this stamp set.  It doesn't have to have a food window!  I just masked the part where the window should be when I stamped it onto the white card stock.  I tried to duplicate the UPS symbol (not real well!) and the US Post Office logo.  These are just stamped on Whisper White card stock.  To use them, I will just fussy cut them and put them on a card.


This is one of the Shrimp Trucks in Oahu - the most famous one.  It is over on the North Shore.  Ashley and I had the shrimp plate when I was there this summer.  But, when we were there in December, the line was crazy long so we opted to eat at another shrimp truck and it was just as good!


If you are a fan of Hawaii 5-0, you might recognize this food truck.  It is the one they use on the TV show.  Now if I could just find it AND Steve McGarrett (heart throb) on my next trip to Hawaii!! Ashley has a neighbor who gets called occasionally to be an extra on the show.  I am hoping that will lead to something (for me!)


Hope you enjoyed my trucks today!!

Sunday, February 5, 2017

Fantastic Birthday!

It's Super Bowl Sunday.  Sure wish my team was playing but hopefully, next year.  I'm pulling for Atlanta since I am just NOT a fan of Brady or Belichek!!  I'm watching the game now and it's half-time and Lady GaGa is performing!  I'd prefer a country singer at half time but I guess I got my fix watching Luke Bryan sing the National Anthem tonight!  I'm loving the score as of now!  (Sorry if you are a New England fan.)  So far, there have only been a couple of commercials that have stood out for me - one being the one with Terry Bradshaw in it.

I had fun today making this card.  It's a CASE from Pinterest (my favorite source for CASEing cards!)   I can't tell you how long it took me though!! I definitely wouldn't do many of them.  Of course, it took me a couple of tries.  I worked up from the bottom and when I stamped the lady bugs on my first try, I rocked my stamp plus had it too far down.  So, try again on a new slate.  The card is a big one and fits into a legal envelope.  


The stamp set is Crazy Cake and is in the Occasions Catalog.  I also used a hostess set that I love called "Love You Lots."  My Stamp-a-ma-jig was a big help getting the animals positioned the way I wanted them.  I also did a lot of masking - mostly just putting sticky notes over the sides of the cake layers when I was stamping the animals.  After I got the card stamped, I just did some doodling on the card.  The Crazy Cake stamp is a fun set.  It provides a great building block for cakes, backgrounds, and birthday celebrations.

Well, time to get back to the game.  Hoping for an Atlanta WIN!

Wednesday, February 1, 2017

Ombre Background

Happy February!  January sure flew by fast!  Of course, since I was gone the first two weeks, maybe that is why I think so.  Below are two calendars that I received for Christmas.  The top one was made by my sister, Marianne and the second one was made by my friend and neighbor, Gayle.  I love them both and love having my own calendars to look at.  I always make calendars for every one else and never for myself!


I attended the Newcomers Coffee today.  It was good to see everyone again.  I missed the January meeting and I usually go to the coffee's each month.  I am going to be the photographer again this year (last year though!) and I was busy today taking pictures of the new officer installation.  I finished the memory book for the outgoing president and got it back from the printer in time to give it to Sandy today.  I hope she will enjoy it!

I made a card this afternoon after seeing a video about ombre backgrounds by Jennifer McGuire.  I just had to try it before I forgot!


I used the Flourishing Phrases stamp set for the background stamp.  I stamped it with VersaMark ink; sprinkled Clear Embossing Powder all over and heat set it.  Next I took a large dauber and rubbed Watermelon Wonder ink all over the bottom of the card until I got it as dark as I wanted it.  I used a Blender Brush (like a big paintbrush) to get the lighter Watermelon ink on the rest of the card.  You could also use a sponge but just go lightly.  When you get the background the way you like it, take a clean cloth (or paper towel) and rub the ink off the Versa-marked background.  For "hello" I used a piece of thin white craft foam (from HL, M's, etc.).  First I adhered a piece of Stick It adhesive sheets (found them in my stash and I have never used them!) to both sides of the craft foam.  Take the protective cover off one side and adhere a piece of white card stock.  Die cut "hello" (SU Hello You thinlits) on the card stock side of the foam.  Before removing it from the negative, ink it with the Watermelon ink - darker on the bottom.  To get the sparkle, tap the VersaMark ink pad on the die cut, sprinkle Dazzling Diamonds embossing powder on and heat set.  (Or you can do like me - I forgot to do that step before adhering "hello" to the card.  So I used a VersaMark Pen and went over the die cut while on the card.  Then embossed and heat set.)  Stamp the sentiment (from Cottage Greetings) on a strip of white card stock, emboss with clear and heat set.  Rub your dauber with Watermelon ink over the strip.  The ombre panel is on a white card.  I daubed Watermelon ink all around the edges of the white card so it would all match!

Try it and see what you can do with this technique!