Here are a few sample cards from the Peace & Joy Bundle. You can find the bundle on page 18 of the Holiday Mini Catalog.
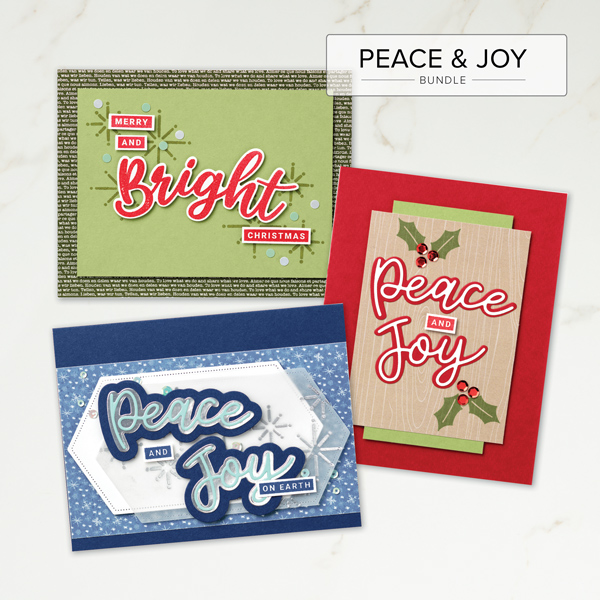

Here are a few sample cards from the Peace & Joy Bundle. You can find the bundle on page 18 of the Holiday Mini Catalog.
 I have been a Stampin' Up demonstrator since 2005. I enjoy sharing my love of card making with others.
Today’s card is not only simple to create but brings you back to simpler times on a warm sunny day …
I applied the sponging technique along with the Stampin’ Blends markers. It’s my vision of the perfect summer day …

I stamped my image with the Black Memento ink onto Watercolor Cardstock and then added the black horizon line. I watercolored Balmy Blue for my sky and water. I then highlighted the water with the Blends. The plants, chairs and deck were all done with the Stampin’ Blends. The Calypso Coral cardstock was embossed with Seaside embossing folder. (retired)
I have been a Stampin' Up demonstrator since 2005. I enjoy sharing my love of card making with others.
Oh! I'm so in love with this stamp set. It's one I didn't think I needed .... until I saw all the cute cards everyone was making with it! There are images of coffee, cookies, cocktails and chocolate with this set. I am not a coffee drinker but cocktails, chocolate and cookies .... well, I love them!
 I have been a Stampin' Up demonstrator since 2005. I enjoy sharing my love of card making with others.
Another card from the Sending Sunshine stamp set. I just love this stamp set. I am enjoying this type of scenery this week while at the beach having fun and getting sand in my toes! It's not Hawaii but the NC beaches are pretty too!

I used the Thick White Cardstock for the base of the card. The Whisper White piece is matted with Highland Heather. I found this piece of patterned paper in my stash and decided to use it for a mat for the scene. I used the Layering Squares Dies to die cut the frame and the scene. This was an easy card to make.
I have been a Stampin' Up demonstrator since 2005. I enjoy sharing my love of card making with others.
I’ve got a double z-fold card you’ll want to learn how to make! Making a Double Z-fold card is fun and since there are so many ways you can make them you will have the opportunity for a lot of variety! You can change the sizes of the z-fold card and even how the card opens up.


The Rich Razzleberry cardstock is 11 1/2" x 4 1/4"; scored at 3" & 6".
The Very Vanilla cardstock is 10 3/8" x 3 3/8"; scored at 4 3/8" & 7 3/8".
The patterned paper is retired - from a pack of Paisley Petals.
I stamped 3 feathers from Tasteful Touches onto Vanilla cardstock and colored them with the SU Blends (Daffodil and Rich Razzleberry) and adhered them to the front of the card. The sentiment (from Sending Sunshine) is stamped with Rich Razzleberry ink onto one of the Tasteful Labels dies. I stamped the feather images in the background of the Razzleberry card for a little dimension.
I have been a Stampin' Up demonstrator since 2005. I enjoy sharing my love of card making with others.
This is where you will find me this week! We are finally taking a break from COVID and hitting the surf! We have rented a condo for the week and scoped out golf courses for Sonny while Ashley and I hang out at the beach. I have packed a couple of casseroles that I had in the freezer, Ashley is bringing her chicken concoction for lunch and we have stocked up on chips, crackers, beer, water, and rum!!
 I have been a Stampin' Up demonstrator since 2005. I enjoy sharing my love of card making with others.
I borrowed the Seaside View stamp set from a friend and created a few cards using her stamp set. She just bought a condo at the beach and I thought this was the perfect stamp set for her!
I will be sitting in that Adirondack chair next week when I am at the beach!! Can't wait!


I did another Double Z Fold card - I started with smaller Sahara Sand Z Fold by scoring it at 4 1/2" & 7 1/2". I embossed the front fold with the Seaside Embossing Folder (retired).
On a panel of Whisper White cardstock, I stamped the larger image in black Memento ink. I colored the image using Balmy Blue, Calypso Coral, Crumb Cake, Just Jade and Night of Navy Stampin' Blends. I die cut the image using the 4th largest die from the Stitched Rectangle Dies and adhered it to the front of the Sahara Sand card base using dimensionals. I adhered a few gems to the front of the card.
I adhered a panel of retired designer paper to the back panel of the large Misty Moonlight card base (4 1/4" x 11" and scored at 3 7/8 and 5 1/8".) I adhered the small Sahara Sand card base to the larger Misty Moonlight card base with liquid glue.
On the inside, I stamped the sentiments from Seaside View on 2 different panels (3" x 2 3/4") of Whisper White cardstock. I stamped the Adirondack chair on one panel and the palm tree on the other panel in black ink. I colored the images with Stampin' Blends.
I have been a Stampin' Up demonstrator since 2005. I enjoy sharing my love of card making with others.
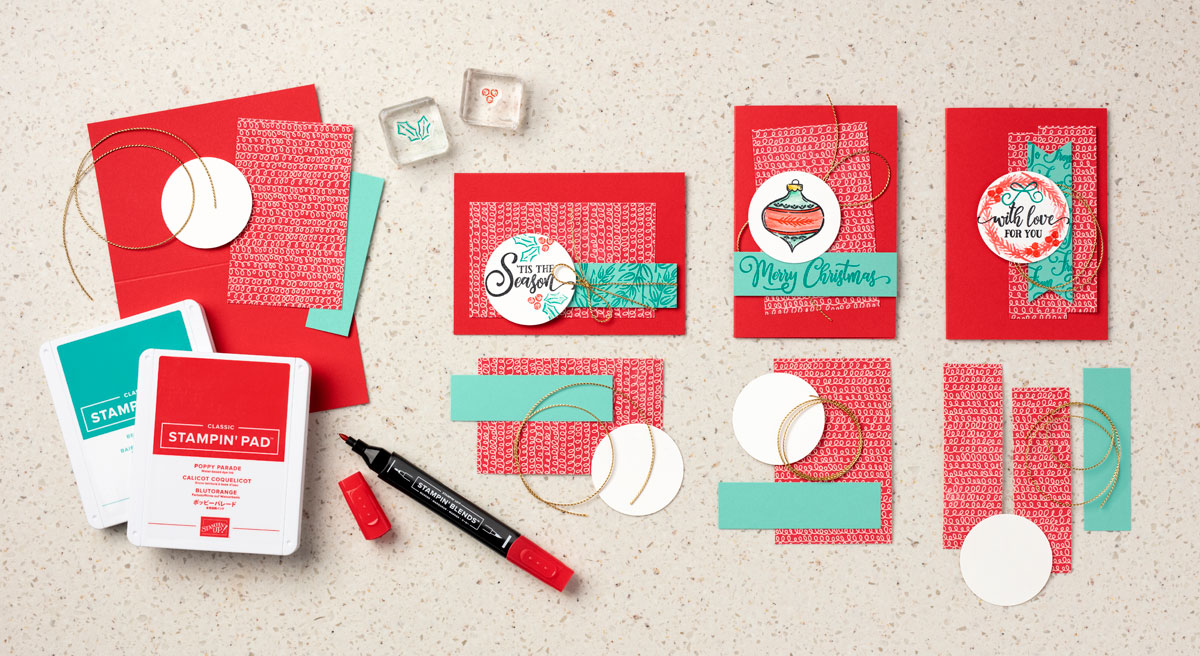
| ALL YOU CAN TAG BUFFET |
| It’s that time of year to get your tags and cards ready, because from now until the end of the year, you won’t be able to get enough (and neither will your customers)! The Tag Buffet Stamp Set is perfect for anyone, and you can share it at every party you have in the upcoming months. |
| And if you’re looking for a simple way to add variety to your projects, with just a few sheets of cardstock and your trusty Paper Trimmer, you can easily create three unique cards to highlight multiple stamps from this set. |
| For all of the cards above, we started with: |
|
| Ornament Card Stamp, color, layer, adhere. |
| ’Tis the Season Card No trimming necessary. Switch the orientation of the card, stamp different images, and tie a bow. |
| With Love Card Trim the Designer Series Paper into two 1-1/4" x 4" (3.2 x 10.2 cm) pieces and cut notches into the Coastal Cabana Cardstock. |
| What can you create with these same parts and pieces? |
I have been a Stampin' Up demonstrator since 2005. I enjoy sharing my love of card making with others.
There is so much you can do with the Lovely You stamp set. Plus when you purchase it as a bundle, you get a bonus of the Lovely Labels Pick a Punch! I love to use punches - quicker and easier sometimes than dies. The new Lovely Labels Pick a Punch is SIX punches in one! Two designs, three widths, any length. It's so convenient and versatile. See a few samples below.


 I have been a Stampin' Up demonstrator since 2005. I enjoy sharing my love of card making with others.


 I have been a Stampin' Up demonstrator since 2005. I enjoy sharing my love of card making with others.


 I have been a Stampin' Up demonstrator since 2005. I enjoy sharing my love of card making with others.


 I have been a Stampin' Up demonstrator since 2005. I enjoy sharing my love of card making with others.


 I have been a Stampin' Up demonstrator since 2005. I enjoy sharing my love of card making with others.


 I have been a Stampin' Up demonstrator since 2005. I enjoy sharing my love of card making with others.

 I have been a Stampin' Up demonstrator since 2005. I enjoy sharing my love of card making with others.

Here are some key features of our beautiful, new online store:


 I have been a Stampin' Up demonstrator since 2005. I enjoy sharing my love of card making with others.