Showing posts with label NC Blog Hop. Show all posts

Sunday, April 25, 2021

Pleased As Punch / NC Demo Blog Hop


Welcome to the NC Demos Blog Hop!  We are happy to share our punch-y projects with you this month.  You might have just come from Jo Anne's blog.  Great project, huh?  She always wow's us!

It's always fun to think about our theme and figure out what we will use ... in this case what punch we'll use!  Our monthly NC Demos Blog Hop is featuring PUNCHES.  I love punches!  Don't get me wrong - I like my dies too but it is so much easier to just punch out an image than having to run dies through the Big Shot.  

I decided to use the Rectangular Postage Punch for my two cards.  I don't think I have used that punch since Christmas!!  The good news is that it will be in the new catalog.  Another punch I used (and use all the time!!) is the Banners Pick A Punch.  I used it to "flag" the ends of the sentiment.


  • For this card, begin with a white card base cut at 8 1/2" x 5 1/2" and scored at 4 1/4"  
  • To the front, add a piece of Terracotta Tile cut at 4 1/8" x 5 3/8"
  • Emboss a piece of Petal Pink (4" x 5 1/4") with an embossing folder.  (I used Tasteful Textures.)
  • Using a Blender Brush (or a dauber or sponge), lightly add a bit of Terracotta Tile ink over the Petal Pink card stock.   Adhere this piece to the card.
  • Using the Rectangular Postage Punch, punch out 3 stamps from white card stock.
  • Cut three pieces of Fine Art Floral DSP 1 1/8" x 1 3/4" and glue them to the punched white stamps.  Attach this piece to the white cardstock cut at 4 5/8" x 2 3/8"
  • Stamp the sentiment (from Free As A Bird) on 1/2" white card stock strip using Terracotta Tile ink.  
  • Flag the ends with the Banners Pick A Punch.
  • Add the sentiment to the card front.


My second card is a bit different.  Again I used the Rectangle Postage Punch.

  • Begin with a Pool Party card base cut at 8 1/2" x 5 1/2" and scored at 4 1/4"  
  • Tie a piece of Coastal Cabana Sheer Ribbon around the next two layers before adhering them onto the Pool Party card.
  • To the front of the card, adhere  a piece of white card stock measuring 4" x 5 1/4"
  • Next, layer a piece of Fine Art Floral DSP (5" x 3 3/4") to the white card stock.
  • Stamp the bird from Free As A Bird; use Stampin' Blends to color the bird; use the Rectangular Postage Punch to punch out the bird.
  • Die cut a large and a small Stitched Nested Label.  
  • Stamp the sentiment on the small label; cut one side; adhere to the bottom right.
  • Die cut some leaves from the Free As A Bird dies and adhere to the large label.  Adhere to the top left.
  • Attach the Rectangular Postage Punch with dimensionals.

Thank you for letting me share my cards with you.  Please stop by and see Laurie Meier's post


Amy Austin-Kinler
Jo Anne Hewins
Sharon Maranich  (you are here)
Laurie Meier
Tracie Evans Langley


Sunday, February 28, 2021

Shake, Rattle & Roll!

Welcome to the February NC Demos Blog Hop.  This month we are making cards that .... shake, rattle and roll - meaning there should be movement with your project!   

Have you ever made a Flip-Flap card?  Well, that's what I've made for this Shake, Rattle & Roll blog hop for the NC demos.  I have two samples to share with you.

The first card I have made with this technique uses the adorable Woodland Wonder stamp set.  You can find this stamp in the current Mini Catalog on page 53.  This was my first time using this stamp set but I can tell I will be using it a lot!  The little creatures poking out of the tree are so cute!


Here is the card closed.  I used Granny Apple Green and Daffodil Delight for my card.  The DSP is Artistry Blooms.  I used SU's Blends to color the images.  I also used my Blending Brushes to blend Balmy Blue ink and Granny Apple Green ink on the image.  I love those Blending Brushes!!


When you pull the tab (Daffodil Delight), you get another cute woodland image hidden on the inside.  I used the Scalloped Tag Topper for the "mechanism" tab but you could also the Delightful Tag Topper.


This is the card open.  I put a small strip of the Artistry Blooms DSP at the bottom of the inside page.

Here are the measurements for my Woodland Wonder card above:

  • Granny Apple Green card base - standard card 8 1/2" x 11" and scored at 5 1/2"  
  • Daffodil Delight (mechanism) 6" x 2" / scored at 2" and 2 1/2"
  • Whisper White (inside of card) 5 1/4" x 4"
  • Daffodil Delight - 4 3/4" x 3 1/2"
  • Artistry Blooms DSP 4 5/8" x 3 3/8"
  • Granny Apple Green (door panel) 3 7/8" x 2 7/8"
  • DSP 3 3/4" x 2 3/4"
  • Granny Apple Green (hidden panel on right side) 3 7/8" x 2"
  • Whisper White 3 3/4" x 1 7/8"
  • Ribbon - approx 4"
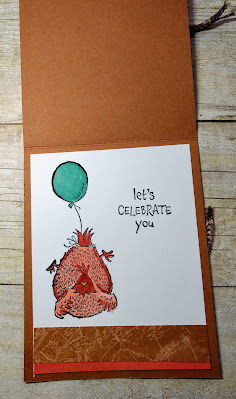
Here is another Flip Flap card I made to show that you can make this card in different sizes.


For this card, I used the Hey Chick Birthday stamp set and colored everything with Blends (Calypso Coral, Magenta and Daffodil.)  The card is Cinnamon Cider and the mat piece is Calypso Coral.  The Calypso Coral check DSP is retired.  I also used the Blending Brushes on the image - blue and cinnamon.


I used the Classic Label punch to punch the slot in the DSP that the tag fits through.  The square of DSP that the tag goes through is from World of Good (which I think is retired.)  I used the Layering Squares for the Calypso Coral  "door."


And this is the card fully opened.   

I loved making these cards and hope you will give it a try also.  I got my tutorial on-line by googling "flip flap card."  There are several tutorials on the web for this kind of card.  I used one by Terri Pocock from the UK.

Continue the blog hop and see what Tracie has made for us.  I'm sure it will be something great!

Enjoy all the other great Shake, Rattle and Roll projects!


Sharon Maranich (you are here)


Sunday, March 29, 2020

NC Demo's March Blog Hop - saying good bye to In Colors

Welcome to the NC Demo's March Blog Hop.  This month we were to use one of the out-going In Colors (Pineapple Punch, Call Me Clover, Blueberry Bushel, Lovely Lipstick, Grapefruit Grove.)  The card can ONLY use one of the retiring In Colors.  We can use Whisper White or Vanilla cardstock and black ink but all other ink and cardstock has to be the single retiring In Color.   I had to really put on my thinking cap for this one!  But then I remembered I still had my daughter's Sale-a-Bration stamp set, Rise and Shine!  The In Color I picked is actually one I hardly used - Call Me Clover.  I think I have only used it at Christmas time.  It was just a little too green for me!  But I like how it turned out on my tea mugs.  My favorite In Color in this set is actually Grapefruit Grove - I'm really going to miss that color!  


This stamp set is a Reversibles set, so some of the stamps are two-sided with an image on each side of the stamp for more creative options.  It can also be used for the tea drinker (me!) and the coffee drinker.  It's not too late for you to earn this Sale-a-Bration stamp set but you need to hurry.  Sale-a-Bration ends on March 31!!

I stamped the mugs in the background on Whisper White cardstock, stamping off on each of them so I would get a lighter color from the mug on the front.  I mounted that layer onto Call Me Clover which then was mounted onto Thick White Cardstock.  Next I layered a piece of vellum on top.  With black ink, I stamped the steam and the sentiment.  (I won't tell you how many times I had to stamp the vellum because I kept smearing the ink!  That happens with vellum.  So, on my third try, I decided to heat emboss the sentiment with clear powder!)  On scrap paper, I stamped the mug with the stars and heat embossed it with Clear Embossing Powder.  Next I fussy cut it out.  There are dies to match this stamp set but I don't have them.  It's not a big deal to cut the images out.  I made a tea bag tag and attached white twine from the bag to the cup.

How are you surviving the Coronavirus pandemic?  My daughter is an Infections Disease doctor so I was a little worried about her.  But she also works at the military medical school in Bethesda.  She is deemed to be an essential member of the university so will not be on the front line taking care of patients.  Instead she is having to find placements for around 400 students who were in other places around the globe and US doing field work or residencies.  Not to mention, the president of the university announced last week that they are going to graduate the 4th year students as of April 1.  Now what they will do with these graduates is another problem since they are not technically a doctor yet!   

During this pandemic, I have been busy in my craft room.  I have made a lot of cards in the past couple of weeks and predict that I will be making many more.  Luckily my Paper Pumpkin arrived about the time everything went crazy so I have made a lot of cards with the kit and put them in neighbors mailbox or paper tube to cheer them up. It was one of the best Paper Pumpkin kits we have had to date.  I've also been using Evernote to organize my stamps and dies.  It makes a searchable catalog and I can search my stamps and dies by using keywords. 

I hope you stay safe and healthy during this pandemic.  There will be a time after the pandemic when life returns to normal.    We can get through this if we work together and remember there is sunshine on the other end of this tunnel.

OK - enough depressing talk!!  I hope you will visit the rest of the demos and see what they came up with for the monochromatic masterpiece!

Amy Austin-KInler 
Jo Anne Hewins   
Tina Lesson
Ariel Matera
Tracy Marie Lewis
Libby Foreman 
Toni Campana
Frances Wagner
Tracie Evans Langley
Laurie Meier
Sue Root
Tamra Davis
Sharon Maranich - YOU ARE HERE
Sue Stapp
Nedine Depree

Stay safe!!

Sunday, February 24, 2019

Blog Hop - Keeping It in the Lines

Welcome to the North Carolina Demos February Blog Hop!  Whew - that's a mouthful!  So glad you are here and will get some ideas for your own card making from our cards.   If you have already visited Tracie's blog, I'm sure you enjoyed a wonderful project.  Tracie does great work!  I'm Sharon Maranich from the NC Piedmont area and I was born and raised in Charlotte.

This month's theme for the blog hop is your favorite coloring method.  Well, my favorite way to color is with the Stampin' Up Blends!  These markers make it so easy to blend colors and create beautiful works of art for all of your card making.  The colors, as the name suggests, blend beautifully, mainly because the colors are picked out and designed to blend with each other.  These blends take the guess work out and lessen the learning curve for coloring.  I love using the Color Lifter too.  It makes it easy to erase colors with it.  It is good for blending the dark and light colors.


For this card, I used the Dandelion Wishes stamp set.  I stamped the dandelions on the edges of the Basic Gray card stock with Versamark and used the white embossing powder to emboss them.  Next came the Pumpkin Pie Blends and I colored some of the flowers and all the little stems.  I used one of my favorite embossing folders - Subtle - to emboss both the Basic Gray card and stamped piece.  I matted the piece onto Pumpkin Pie card stock.  The sentiment was stamped on a Layering Circle die which was also matted onto a Pumpkin Pie circle.


This card uses the Love What You Do Photopolymer Stamp set.  I stamped the flowers and leaves along the edge with Memento Black ink on Very Vanilla card stock that was cut out with the Rectangle Stitched dies (my favorite!)  Next I colored the flowers with Bermuda Bay light and dark SU Blends.  I used the Well Written dies to cut out "miss" and the bird.  I actually die cut 2 of the "miss" - one is Bermuda Bay and the other in Night of Navy and staggered them just a little bit.  I matted the Vanilla piece onto Night of Navy and then onto the Bermuda Bay card.

There is a bit of a story behind the "miss" and "you"!  I bet most of you have experienced this before.  I was going to do both words with the Well Written dies and took them both off the magnet sheet and  put them onto my table.  Well, wouldn't you know it, when I got ready to die cut them, I couldn't find "you."  I looked everywhere and crawled around on the floor (picking up little bits of paper and the backs of the glue dots while I was down there!)  Finally I just gave up and stamped the "you" (from the Sale-a-Bration set, Part of My Story).  I was so upset because I had never even used the "you" die and now it was gone.  BUT .... when I turned my card over to put tape on the back and assemble the card, there was "you" stuck to the back of the vanilla card stock!  

OK - that's all for me today.  I hope you have been inspired to create your own masterpiece.  If you need help or want to add any of these supplies to your own stash, please let me know.  I'll be more than happy to help you on your stampin' journey!  Enjoy the remainder of the Blog Hop.  Next stop for the blog hop is Sue Root.  I'm sure she will have something amazing to share with you!  

We do this Blog Hop each month on the last weekend of the month.  So don't forget to join us at the end of March!


Happy Stampin'!  

Sharon


SHARON MARANICH - you are here!


Sunday, February 25, 2018

NC Blog Hop - Brusho

Welcome to the NC Blog Hop.  We are happy to share our projects with you.  We are all SICK of winter so we thought we'd make a few projects that will have us thinking of warmer days to come.  Although I really can't complain.  The past few days we have had record warm days here in the Charlotte / Lake Norman area and it is supposed to continue into next week.

I dusted off a stamp set that I haven't used in a while, Pocket Full of Sunshine.  This is a great stamp set for making masculine cards as well as card for the teenagers in your family.

I also used a new product (Brusho) that you can find in the Occasions catalog.  I actually got my Brusho several weeks ago but have not had the chance to play with it.  Today was the day!


Brusho is made up of watercolor ink crystals.  The perfect "canvas" for using them is either Watercolor Paper (which is what I used) or SU's Shimmery White card stock.  When you get your Brusho, do NOT take the lid off!  The powder is super fine and will go everywhere.  Simply grab a push pin, pierce the top and use the push pins for the seal on the bottles.  Each Brusho package includes 5 pots - Brillant Red, Gamboge (orange), Moss Green, Prussian Blue, and Yellow.

You can use Brusho in a variety of different strengths to achieve different washes.  Standard strength can be used a straight forward painting to add washes of color over a design.  More diluted Brusho is excellent for producing pale washes of color.  For extremely intense vibrant colors, only add a very small amount of water to the Brusho.

You can mix Brusho into infinite shades by varying the amount of water.  The colors are fully inter-mixable, making them easy to experiment with.  Try using a sponge or a soft brush to paint with.  Another method is Ink & Wash where you apply Brusho as a wash of paint to inked images to bring an element of color.  First though, make sure that your image has been stamped with waterproof ink!  You can also use Brusho with a mask and apply it either with a brush or with a spritzer.

Also try using Brusho as a Resist Technique!  Stamp your image in Versamark and emboss with any of SU's embossing powders.  Heat set the image; then use one of the following ways to add the Brusho:
  • Mix water with a bit of Brusho sprinkled on an acrylic block.  Paint over the image to form a background using an Aqua Painter.
  • Spritz watercolor paper with water and then sprinkle Brusho on and watch it spread (that is what I did with my card.)
  • Use an Aqua Painter to distribute color where you want it.
  • Allow to dry naturally or use the heat tool to speed it along.
Here is the first piece I made using Brusho.  I will use it later in making a card.


Have you been watching the Olympics?  I have so much respect for all the athletes participating!  We have watched them every night for the last two weeks.   After tonight's closing ceremony, I think we will go into Olympic withdrawal!!  My favorites this past week were the shoot-out for the girls hockey team to win Gold and the Curling event which netted the guys a Gold medal!  Here's a card I made for the Olympics also using Brusho.  This time I used my Aqua Painter to move the ink where I wanted it.


Brusho is a fun technique that is pretty easy to do!  Give it a try!

I hope you have enjoyed my Brusho card.  Now make sure you "hop" along to the next blog on the list.  I know Laurie has something special to share with you.


SHARON MARANICH (ME)

Sunday, November 26, 2017

Wise Men From Afar for NC Blog Hop

It's the end of the month which means .... NC Blog Hop!  I haven't had time to participate in the blog hops in the last couple of months so I thought I'd make an effort this month!  Our theme is anything Christmas or Hanukkah.

I borrowed this stamp set, Wise Men from Afar, from my downline, Debbie, and made this beautiful card.  Black isn't a color you usually associate with Christmas cards but this one is an exception.  What do you think?


I stamped the kings in Black Archival Ink on Very Vanilla cardstock and using the Big Shot and my favorite, Stitched Shapes framelits cut the oval out.  Next I cut out two of the largest scalloped ovals from Black and Champagne cardstock.  (You really only need half of the black oval.)  I cut a 3" x 5" piece of Vanilla cardstock and layered it onto Champagne Foil paper which was then adhered to the black card.  Stamp the sentiment with Black Archival ink.  The star is punched using the Starlight thinlets dies with a small rhinestone in the middle.

Hope you had a wonderful Thanksgiving and have now changed gears and are sliding into Christmas preparations.  We had a great Thanksgiving with my daughter in town (from Hawaii!) and my family that are local at my house for the Thanksgiving festivities.  Of course, we all ate too much.  But to top it off, yesterday we went to my sister's house where we ate more!  Ashley and I made gumbo and my sister made 2 different chilli's in the crock pot plus another crock pot full of chicken!  After all that, we sat outside around their fire pit and toasted marshmallows for smores!   Ashley leaves on Sunday for DC for work for a week before flying back to Oahu.

If you want to order this great Christmas stamp set or any of the other items Stampin' Up sales, now is the time!  Sunday, Nov. 26 is the last day for the Online Extravaganza special.  BUT Cyper Monday (Nov. 27), SHIPPING will be free for all Stampin' Up! orders.  This is a great offer and gives you another day to check off everything on your wish list with FREE shipping!


Hop along to the rest of the blogs from our NC group.  Sue is the next stop along the hop.

Tamra Davis -

Jo Anne Hewins -

Tracie Evans Langley -

Sharon Maranich -

Sue Root -

Sue Stapp -

Frances Wagner -


Sunday, August 27, 2017

NC Demos Blog Hop for August

It's the end of the month and time for another NC Demos Blog Hop!  Since the end of August is all about going back to school, we thought that would be a good theme for the month.

Since I don't have a small one going back to school, I decided to go "old school" and revisit an old technique that was popular when I started out with Stampin' Up way back in 2005.  Garden Collage was one of the first stamps that I bought and I still have it.  I don't know that I will ever get rid of it - I think it is rather timeless.  Here is the card I made back in 2005 using Garden Collage and the Crayon Resist technique.


I decided to use this retired stamp again and create a newer version of the card but still using the Crayon Resist technique.


Next I did the Crayon Resist technique on a current stamp in the catalog - Oh So Eclectic.  This highlights the technique better.


Have you tried the Crayon Resist technique lately?  If you've forgotten how (like I had!) here is a quick tutorial for you.

*  Stamp the image (flowers from Oh So Eclectic) randomly on Whisper White cardstock and use a marker to color them.  I just colored the centers leaving the edges white.
*  Use a white crayon to color any areas you want to remain white (the edges of the flowers).
*  Also use the crayon to color over the parts you colored with the markers to keep the ink off.
*  Next sponge all over your image with ink (Melon Mambo and Flirty Flamingo).
*  Take a paper towel and buff the image, removing the crayon marks.
*  Finish your card - I used the Cable Knit embossing folder for the Melon Mambo strip across the card.


Now follow along to Frances Wagner's blog and see what she has done this month.  I am sure it will be special!!  Here are members participating in the blog hop this month:

Tamra Davis
Jo Anne Hewins
Tracie Evans Langley
Sharon Maranich - you are here!
Frances Wagner
Christina Walker

Sunday, May 28, 2017

Saying Good Bye to Retiring Products - May Blog Hop

Welcome to the NC Demos Blog Hop!  Did you enjoy the projects that Tracie shared with you?  She always has great cards!  It's time to say good-bye to our favorite retiring products from the 2016-17 catalog, so our May theme is all about saying farewell before we concentrate on our new catalog which premiers on June 1.

My first share in my favorites is a card made with Gorgeous Grunge and a new stamp set, Lovely Friends.  This card literally took me about 5 minutes to make!  I think it took longer to decide on what colors to use (Pacific Point, Lemon Lime and Daffodil Delight) than to make the card! Seriously!


My next favorite stamp set that is retiring is Wetlands.  I love the sea oats and the little birds in the set.  In the card below, I stamped the birds onto a piece of card stock that I did the Marbeling Technique on using shaving cream.  We did that technique in April at my stamp club and my gals loved it!


This next card is also from Wetlands but using the goose this time.  I have not used him very much but I thought this makes a good masculine card.  There is a 2 1/2" piece of window sheet on the card and I masked off a 1 1/4" strip on the inside (that you can see through the window sheet) and sponged Mint Macaron and Crumb Cake.  (Mint Macaron is a color that I am going to sorely miss!!  I am hoping it will return in the future to our color line up.)  Next I stamped the grass in Old Olive.  I also stamped a bit of the grass on the outside of the card.


Here is the card open so you can see how I made it.  You just sandwich the window sheet between the 1/2" strip and the 2 1/2" piece of the card.  We are going to do a similar card in Stamp Club next month but I will be using the Seaside Shores fish that is carrying over to the new catalog.


Another thing I will miss is some of the DSP that we had in the retiring catalog.  I need to stop hoarding all the DSP and use it up during the year.  Don't know why I do that every year - it's not like I can't just order more if I need it!  The card below uses the stamps from Seaside Shore and the corresponding DSP, By the Shore.  I love this DSP and another great one is the paper stacks.   


When I went to my daughter's house last Christmas, I made her a collage frame to hang in her guest bathroom using the By the Shore DSP.  She lives in Hawaii so this was a perfect addition to her "beachy" bathroom!


Well, I hope you have enjoyed the projects I have shared with you.  I didn't mean to put so many on this page but I just couldn't stop!  There are a lot of favorites leaving us but also a lot of new favorites coming our way!!

I know you will enjoy the rest of the stops on the blog hop!  Just follow along below.  If you are going in order, Laurie Meier will be your next stop.


Sharon Maranich  - YOU ARE HERE

Sunday, April 30, 2017

April Blog Hop - Thankful for Mothers


Welcome to the April NC Blog Hop!  We are happy to share our Mother's Day projects with you.  Mother's Day is just around the corner - May 14.  I will be in New Orleans with my daughter on Mother's Day - wonder what we will do special!

Here are a few facts that I didn't know about Mothers Day -

In the US, Mother's Day is celebrated on the second Sunday of May.  In some countries, it was changed to dates that were significant to the majority religion or to historical dates.  In most Arab countries, Mother's Day is always celebrated on the 21st of March, which is the Spring equinox.  In the United Kingdom and Ireland, Mother's Day is celebrated on the fourth Sunday in Lent (Mothering Sunday).

Ok - now that you have learned a few facts, it's time to share my Mother's Day cards with you.  I think you'll be able to figure out my favorite new In Color!!


This first card is a sneak peek at a new stamp set - Lovely Inside and Out.  (It also has a coordinating set of thinlits.)  I paired the Lemon Lime Twist with black and love how the colors pop!  I also used Work of Art on the card and some retired washi tape.


This is the card I will be giving to my mom.  She loves flowers.  I took her yesterday to a local nursery and she bought a hanging basket that attracts hummingbirds and a camelia bush.  I ended up buying her a second hanging basket for her porch for an early Mother's Day gift since I will be out of town.  Mom is 88 and legally blind so she has a little trouble getting around.  The people at the nursery were great with her.  They got a wagon and pulled her around the nursery in it!!  I wish I had thought to take a picture.

This card uses another sneak peek stamp set - Oh So Eclectic which also has matching thinlits!  The "Happy" is from the new Happy Birthday thinlet - I just cut away the birthday portion.  The bird is stamped in Lemon Lime Twist and Always Artichoke.  The flowers are Fresh Fig and Berry Burst which is also the color of the card stock.The Mother's Day sentiment is from the retiring Crazy About You.


My final card is oh so simple!  I wish you could see how sparkly it is up close with Wink of Stella on the Dragonfly wings.  I stamped the dragonfly from Dragonfly Dreams in Lemon Lime Twist (told you it's my fav!), Peekaboo Peach and Soft Sky.  Each was stamped off first.  The body was stamped full strength.  The sentiment comes from another sneak peek set - Happy Birthday Gorgeous.

I hope you enjoyed the cards I made to share with you today.  Hop on along to the next blog and see what Laurie has in store for you.

Our April Blogs:

Tamra Davis
Jo Anne Hewins
Michelle Irinyl
Melissa Kerman
Tracie Evans Langley
Sharon Maranich (you are here)
Laurie Meier
Lisa Tedder 
Frances Wagner

Sunday, March 26, 2017

Spring Time! March Blog Hop

It's spring time and time for the March blog hop by the NC Stampin' Up demonstrators. We do a blog hop on the last Sunday of each month.  Glad that you have joined us this month.  Now let's see what spring'y cards I have for you!

First is this cute Swirly Bird card!  I won't tell you how long it took me to get all those colors embedded behind the black swirl!  It's not hard - just time consuming to run all the different colors through the framelit.  But I think it was worth it!  The sentiment comes from Sunshine Sayings - a great stamp set for putting together sentiments.


What is spring without flying a kite?  How many years has it been since you have run with a kite coaxing it to stay up in the air?  I can't count the years! Plus I was never very good - or patient to fly a kite! I remember beach days when my kids were young and they would get their daddy to fly the kite with them - not me!!

This card also uses the Swirly Bird stamp and framelits as well as Layering Love.  I just love the font and the words in this set!  For a little sparkle, I adhered a few sequins.


Finally, I have a cute little box (that I CASE-d from a UK demonstrator) that I made using Sale-A-Bration products.  I made the box with the Inside the Line DSP and made a belly band around it using the Sale-A-Bration Glimmer Paper (Sweet Sugarplum.)  I die cut the bee from Mint Macaron Glimmer Paper also to coordinate with the little bee on the DSP.  The box was super easy to make and only takes a few minutes.  Here are the directions if you want to make one:  It should hold a few small chocolates for a sweet little treat.

Cut your DSP to 6" x 12" (so you can make 2 from one sheet of paper)
Score on the long side at - 2, 5, 7, and 10"
Score on the short side at - 2" and 4"

That's it!


I hope you have enjoyed my spring projects.  Hop along to see what Laurie has to share with you HERE!!


Here is the complete list of our blog hop participants:

Jo Anne Hewins
Michelle Irinyi
Tracie Evans Langley
Sharon Maranich (you are HERE)
Laurie Meier
Sue Root
Lisa Tedder
Frances Wagner

Sunday, February 26, 2017

NC Blog Hop Favorite Occasions!

Welcome to the February 2017 NC Demos Blog Hop - whew!  That was a mouthful!  This month we are concentrating of Favorite Occasions.  We are using stamps from the Occasions Catalog with an emphasis on a Spring Holiday or event.


If you follow my blog, you might know that I am obsessed with the High Tide stamp set.  I have made several cards using the beautiful lighthouse stamp.  You can see them HERE and HERE and I still have others I haven't posted yet!  But I thought this card would be perfect for this year's anniversary card for my hubbie!  What do you think?  We will be celebrating 44 years of marriage on April 7.  (How did that happen?  Seems like we were just dating a few years ago!)


Not only do I have an anniversary card to share, but there are several birthdays coming up so I thought it would be great to catch up on some birthday cards so they will be ready to go when I need them!

This card uses the "celebrate" embossing folder from the Occasions catalog along with "you" from Hello You Framelits.  The stripes running down and the "swish" are from Gorgeous Grunge.  I stamped them in Bermuda Bay, Peekaboo Peach, Rich Razzleberry and Watermelon Wonder.  This was a really easy card to make.


Here is another stamp set that I have been having fun using.  It is in the Occasions catalog and is called Crazy Cake.  There are so many variations that you can put together using this stamp set.  It is a two-step stamp set but since it is photopolymer, it is easy to line up.  I love two-step stamps and that is what got me hooked on Stampin' Up 12 years ago.  (I just passed my 12 year demonstrator anniversary on Feb. 16!) The cute little frog popping up from the cake is from the hostess set, Love you Lots.  I don't normally get the hostess sets but I got this one right away and have used it so much! The sentiment is from Sunshine Sayings.  I stamped each cake part onto white cardstock (except the one on the bottom which is stamped onto Sweet Sugarplum cs), cut them out and popped them up with dimensionals.  That made it easy to line up the frog and the stars directly onto the card.  The colors I used are Rich Razzleberry, Sweet Sugarplum, Marina Mist, and Perfect Plum.


Here is another card using the Crazy Cake stamp set.  These cake pieces were stamped directly on the white cardstock panel using Tempting Turquoise, Cucumber Crush, Peekaboo Peach and Denim. Unfortunately, I could not find the flame for the candles in the set.  It is really teeny tiny and probably got stuck to something and will never be found again.  But I found a candle flame in the set, Sprinkles of Life that that worked.  The sprinkles on the sides of the turquoise card are also from the Sprinkles of Life set.


Here is one last card using Crazy Cake to show that you don't have to use all the parts of the cake.  I stamped you're from Watercolor Words (just mask off the "the best")  I love the color combo of Dapper Denim and Emerald Envy.   (This layout was cased from Brian King.)


I hope you enjoyed my anniversary and birthday cards and they will inspire you to make a few of your own.

Enjoy the blog hop and hop right along to the see what Laurie Meier has prepared for you.


Debra Ballance-Byrd -
Tamra Davis 

Jo Anne Hewins 
Michelle Irinyl 
Melissa Kerman 
Tracie Evans Langley -
Sharon Maranich (You are here)
Laurie Meier 
Lisa Tedder
Frances Wagner -