Showing posts with label watercoloring. Show all posts

Tuesday, April 21, 2020

Ribbon, Ribbon, Ribbon!

I love bright colors.  So, this first card fits the bill.  These two cards made with the Ride With Me stamp set can be used for just about anyone - young or old.


I started out with a Real Red base. I cut strips measuring 3 3/4" x 3/4" in Daffodil, Bermuda Bay, Real Red, Gorgeous Grape and Granny Apple Green and adhered them to the Whisper White.   I tied a piece of ribbon around the white piece and then adhered it to the red card.  I cut out a piece of watercolor paper with the Stitched Rectangles Dies. I stamped the truck and balloons with Versamark and heat embossed them with black powder.  I water colored the truck and balloons using the ink refills and my Aqua Pen.  When all was dry, I attached the water colored piece to the card with dimensionals.  I just wish I had a stamp of a lady or man to put in the driver's seat!  We used to have a set called Loads of Love that had the people stamp in it but I think I must have sold it. Oh well!


This card is the same except I used all retired colors.  The colors I used on it were:  
Card Base - Peekaboo Peach, Lemon Lime Twist, Wisteria, Turquoise, Rose Red and Plum.

I have a lot of ribbon!  During this isolation period, I worked on getting my ribbon somewhat organized.


I used to try to keep my retired ribbon separate from SU current ribbon.  Well, over time, I probably have about 5 spools of ribbon that are current and the rest is retired.  I have pretty much given up on separating them since Stampin' Up retires almost all the ribbon selections each year.  So, I decided to put all the colors together.  Now I know that I have about 8 spools of white ribbon and only 2 rolls of red!  But all of it in the picture above are Stampin' Up ribbon whereas the most of the ribbons below are not Stampin' Up.


This way of displaying my ribbons helped me out with these cards.  I knew I wanted to have a ribbon on the cards so I checked my ribbons first to determine what colors I had.  Since I had a full spool (almost) of Perfect Peach ribbon, I colored the truck peach!  Same for the Real Red spool of ribbon.

Monday, February 3, 2020

No Matter the Weather - Under My Umbrella

I'm having fun with Under My Umbrella stamp set!  We have had a lot of rain this winter but I guess that's better than having a lot of snow and ice!  Last Friday, Sonny and I drove to Troutman to try out a restaurant someone had told him about.  It was a cold and rainy day but while we were out, it turned to a beautiful snowfall.  The flakes were huge and it was so pretty.  It didn't last long - maybe an hour or so - which was fine by me.  Anyway, we got to Troutman and proceeded to try and find this restaurant.  All Sonny could remember was that it was near Food Lion.  He couldn't remember who told him about the place, what they served, or the name of the restaurant - just that the food they had sounded good to him.  Needless to say, we did not find the restaurant although there was a restaurant right in front of Food Lion called Dixie that I think was probably the one.  He wasn't sure so we drove on to Statesville to a little dive (Phifers) that we like that serves the best fried chicken!  That's when it started to snow.  

OK - on to my cards.


Aren't those rain boots the cutest?  I stamped the umbrellas onto Gingham paper (retired 6x6 pack) and fussy cut the boots.  The sentiment is punched with the Pretty Label Punch.  I stamped the flowers directly on the Whisper White cardstock and colored them with my SU Blends.  The card base is Lemon Lime Twist (retired, but one of my favorite colors - I stocked up on it when it retired.)


This card was a fun one!  I stamped the umbrellas with black Staz-On ink, masking the umbrellas as I moved up the card.  I first used Watercolor Pencils and the Aqua Pen to color the umbrellas but I didn't like it.  So, I pulled out my Watercolor Crayons that have probably been retired about 10 years but I still love them.  They worked much better and I just colored right over the pencils. 

Friday, February 22, 2019

February Stamp Club

Yesterday was my stamp club meeting.  I have decided to try something new this year.  Instead of the gals having to order $20 from Stampin' Up, they can either do that or just pay $20 for the class.  I have heard from several people who dropped out of Club that they just didn't need anymore stuff and found when they purchased stamps, etc. they just weren't using them at home.  But they were willing to pay for the class instead.  Works for me!

I also switched up how I did the class.  I couldn't decide which cards to offer for club, so I just put 8 cards out (in their basket with pieces precut) and told them they could make 4 cards - any ones they wanted.  It was funny - only 4 cards were picked.  One gal made 2 each of two birthday cards.  So I will be saving the other cards for next month.  I've got a couple move gals coming next week since they couldn't make it today.  We'll see if they pick anything different.

These are the four my friends picked to make today.


Amazing Life stamp set from Occasions Catalog (pg 28)  The happy, flowers and cake were colored with SU Blends.  I used the Rectangle Stitched Dies - my favorite thing in the catalog!!


So Hoppy Together - from Sale-a-Bration - is such a fun set.  Nancy had fun coloring Mr. Frog!


This humming bird is a big hit! This set is another one from Occasions Catalog - Humming Along.  I didn't purchase the framelits so the girls had some cutting to do but it wasn't difficult.  The bird was water colored with ink from the stamp pads.  The lesson I learned - don't color him with the Blends because they soak through the card stock and you can see it on the back. He was colored with Mint Macaron, So Saffron and Calypso Coral.


Another variation of the Amazing Life birthday cake.  A ink wash was put down first before stamping the cake.  Everything else was colored with the Blends.


This was the favorite!  I embossed the flower and humming bird in gold and it looks amazing!

Wednesday, March 8, 2017

End of Sale-a-Bration and In Colors Retiring


It's almost that time again! Retirement for the In Colors.


If you are familiar with the Stampin' Up! In Colors, you know that we have a set of 5 colors that only last for two years.  Then they retire and are replaced with 5 new colors.  So, you may be wondering about the 5 retiring colors.  You can see them above.

NOW is the time to stock up on reinkers for your ink pads, on cardstock, designer paper and on the ribbon or embellishments you enjoy in these colors BEFORE they are sold out.  (They tend to sell out pretty quickly.)  AND if you order this month, you can enjoy FREE Sale-a-Bration gifts on your purchases.  A win-win for you!!

This is the final month for Sale-a-Bration.  You won't be able to order the Sale-a-Bration items after March.  Here are a couple of cards I have made using stamp sets from Sale-a-Bration.


I just love this chick!  I used my Watercolor Pencils to color them.  The DSP is some retired paper I have in my stash that I thought went well with the chicks.


This card uses the elegant Delicate Details.  It makes great backgrounds.  For this card, I embossed the images using white craft ink and white embossing powder.  I adhered a strip of glimmer paper between two of the borders.  (Sorry for the fuzzy picture.)

Sunday, January 29, 2017

NC Demo Sale-a-Bration January Blog Hop

Creative minds have been at work here in North Carolina!  Welcome to our monthly Blog Hop. I hope you are getting lots of inspiration from the NC demos blog hop today.  Our theme this month is Sale-a-Bration, which means a FREE project for every $50 purchase from Stampin' Up.

I am sure as a paper crafter, you are probably aware of the popular new craze called adult coloring books.  The book publishing geniuses really hit the mark when they started offering coloring books for grown-ups.  A lot of us didn't even know how much we secretly missed them!   Not only is coloring super relaxing and fun, but it also takes us back to simpler times - when all we had to worry about was making sure we put our toys away.  As a child, coloring and paper dolls were my favorite things!  I didn't play with baby dolls or do sports, but give me a coloring book and I was happy.  It was so fun to get a new pack of crayons and try out all the colors - especially if you got the super big package!!  Fast forward to our new Sale-a-Bration catalog and guess what?!  Yes, a designer paper just begging to be colored.  It is Stampin' Up's! answer to this fun, out-of-the-blue craze.  The Inside the Lines Designer Series Paper leaves you with the opportunity to make the colors of each paper your own.  Think of all the ways you can use this paper!

I have chosen to highlight the Inside the Lines DSP for my projects.  There are so many choices when it comes to using this DSP.  Hopefully, you will enjoy what I have done with them.


I'm excited to share these cards with you.  Each card is colored using a different tool such as:  sponging, watercoloring, markers, and sponge daubers.  Each method provides a different look to the paper.  While the cards are different from each other, they are simple to make with only a few additional layers and embellishments.

For the first card, I cut a 3" x 5 1/4" strip of DSP and colored it using Stampin' Up markers.  I used the Swirly Scribbles Thinlits to cut the white card stock (4" x 5 1/4").  The middle piece was adhered on top of the DSP which was then adhered to my white card.  The two pieces on the left and right were popped up with dimensionals.  I stamped the sentiment from Thoughtful Banners and punched it out with the Duet Banner Punch.  The final step was to sprinkle silver sequins all over the card.


 My next method of coloring was with Copic Alcohol Markers.  I cut a flower out of the DSP and used the Watercolor Pencils to color the flower.  I popped the flower up with dimensionals.  I used my Two Way Glue Pen on the flower and sprinkled it with Dazzling Diamonds Glitter.  The sentiments are all from Thoughtful Banners and each one is popped up.  Can't wait to send this to my daughter!


My next card is watercolored using the ink from the Peekaboo Peach and Wild Wasabi ink pads and my aqua pen.  As long as you don't get your aqua pen too wet, the paper won't buckle.  I did use a SU marker for the darker orange (Tangerine Tango).   The sentiment (from Layering Love) is stamped on a piece of Peekaboo Peach cut out with the Stitched Shapes Framelit.


For my next card, I only used a small strip of the DSP (2" x 4") which was colored with Copic markers.  I used a lot of glue dots to hold down the pleated Sweet Sugarplum ribbon.  (You can find this ribbon on page 21 of the Occasions catalog.  It is the Succulent Garden Combo Pack.)   The sentiment is from Heartfelt Sympathy (pg 51 of annual catalog.)


For this card, I used the wonderful Watercolor Pencils found in the Occasions Catalog.  Sales for these pencils have exceeded Stampin' Up's forecast and are continuing to sell strong.  Because of the cost incurred in back orders, Stampin' Up has made the decision to place the pencils in not-orderable status as of last Thursday (1/26).  The estimated availability for them is Feb. 13.

I scribbled the pencils on the paper and then used my Wink of Stella to blend the colors.  You could also use an aqua pen (but not real wet) or a blender pen.  I have tried all three but I think I prefer the Wink of Stella (clear)!


My final card is super simple.  I used a sponge dauber and just daubed the Sweet Sugarplum ink randomly on some of the flowers.  I colored the leaves with the Watercolor Pencil also, blending it with my blender pen.  The circle is die cut from Stitched Shapes framelit.  I also die cut the flower from the Sunshine Wishes framelits.  This is a great set of framelits to have - check it out on page 194 of the annual catalog.  Not only do you get this flower but also the little butterfly, a heart and four sentiments (hope, love, congrats and sunshine).


I hope you enjoyed my take on the Inside the Lines Designer Paper and you are inspired to create your own cards using this paper.

Hop on along now to the next stop on the Blog Hop -


Tamra Davis -

Jo Anne Hewins

Michelle Irinyl

Tracie Evans Langley

Sharon Maranich   (you are here)

Laurie Meier

Saturday, January 28, 2017

Hey Chick - Valentine

Happy Saturday!  I wanted to share another card we made last week at Stamp Club.  This is a cute Valentine card but you could also make it into a birthday card as several of my stamping friends did.  I used the darling chick from the Sale-a-Bration catalog - Hey Chick!  I just think he (or she) is adorable!!


I stamped the chick with Black Archival ink since I was planning on watercoloring and didn't want the colors to bleed.  I used the new watercolor pencils to color the chick.  The little hearts are from the Jar of Love set and the heart balloons are from Balloon Builders.  This proved a good lesson on masking.  We used a sticky note to mask the middle balloon after it had been stamped with Sweet Sugarplum ink and stamped the two balloons on either side.  I used a Sharpie Marker to draw in the balloon strings.

We are headed out this evening to watch the Charlotte Checkers hockey game.  This is the first time we've seen them play this year.  It's a fun outing.  We are going to try out the restaurant in the Bojangles Coliseum.  When Sonny and I were dating, one of favorite date nights was to watch the Checkers vs. the Greensboro Generals.  At the time, we both lived in Greensboro (where we met) and so we were pulling for the Generals.  There was always a fight that broke out between the two teams on the ice.  They were natural enemies I think!!  You know, a hockey game is not a good one unless there's a fight or two!

Make sure to check back tomorrow evening for the NC Demos Blog Hop.  We will be featuring products from Sale-a-Bration.  I will show you fun ways to use the Inside the Lines Designer Paper.

Sunday, July 31, 2016

July NC Demos Blog Hop

Welcome to the July NC Demos Blog Hop.  We hold this Blog Hop on the last Sunday of each month so mark your calendars so you don't miss it!!

This month our challenge was to use your favorite consumable product from the Annual Catalog (DSP, embellishments, ribbon, etc.)  I'm afraid I didn't read the directions very well and thought we were to use our favorite new dies - oops!

So my first card does use the White Perfect Accents (which is a consumable) - they aren't new but I like them! For this card, I water colored onto a piece of 3 3/4" x 5" Shimmery White card stock.  I love this card stock and as long as you don't soak your card stock with water, it is great for water coloring.  I used a mixture of Melon Mambo, Pumpkin Pie, Sweet Sugarplum and Crushed Curry, squeezing the ink into the lid of the ink pad and using my Aqua Brush to paint it on.  I die cut the Flourish Thinlit piece from Shimmery White and using the Fine Tip Glue Pin adhered it to the water colored piece.  Believe it or not, but this is the first time I have used the Flourish Thinlits and I have had it for at least a month!  This thinlet is just beautiful!!  The "Hope" thinlit is from one of my favorites from the Annual Catalog, Sunshine Wishes.  I cut one from a piece of water colored Shimmery paper and 2 more from a piece of the cardboard that comes in SU's DSP packets and glued them all together so it would be raised up a bit.


For my next card, I used a favorite consumable - the In Color Paper Stack (pg. 174).  First I embossed the white panel with the Lucky Stars Embossing Folder and adhered the DSP to the top and bottom which I then adhered to the Sweet Sugarplum card.  I punched 2 clouds out of Vellum using the Tree Builder Punch.  I stamped Happy Birthday (Sunshine Sayings) in Sugarplum ink and punched it out with the Duet Banner Punch before adhering it to the raised up arrow tag.  (Sorry but the ribbon I used is retired!)  I die cut "Shine On" from the Sunshine Wishes Thinlits.  I die cut "sunshine" and cut off the "sun" and die cut "congratulations" but only using the "on" part!  It's hard to tell, but the clouds and "shine on" are both painted with the Wink of Stella Clear Glitter Brush and are really sparkly.


I hope you have enjoyed my cards - even if I did not follow the directions closely!  Head on over to the next stop on our hop who is Frances Wagner .  If you get lost along the way, below is a list of all the blogs participating in our Blog Hop.

TAMRA DAVIS
JO ANNE HEWINS 
TRACIE EVANS LANGLEY 
SHARON MARANICH (you are here)

FRANCES WAGNER


Wednesday, February 17, 2016

Stamp Club Picture Perfect

This is another one of the cards we made at Stamp Club this week.  It was so easy but looks so good.

 
The circle is watercolor paper.  I just used my Aqua Painter and ink that I squeezed into the lid.  I painted the bottom with Sahara Sand which I then stamped Gorgeous Grunge lightly.  The top is painted with Soft Sky with Lost Lagoon painted across the horizon.  The secret is not to think about it - just load your Aqua Brush with water and ink and swish it across the paper.  The rope image is from Sea Street.  I curved the stamp on the acrylic block.  Use Gorgeous Grunge all over the Vanilla card and glued a piece of burlap ribbon down one side.  On scrap vanilla card stock, I stamped the starfish from Picture Perfect (love this stamp!), cut it out and then went over it with Wink of Stella before adhering it to the circle with dimensionals.  The birds are done by hand (just make a check mark!)
 
While I was working on the cards, I was standing up to stamp and bent over my work table.  Sammie jumped up on my back and peered over my shoulder to make sure I was stamping straight!  I had my phone right beside me so was able to get a picture!


Wednesday, April 8, 2015

Mother's Day Card

I think cold weather is behind us!  Today I think the temps got up to 86.  It was sure nice - just about boating season!  Sonny bought a new battery today for the boat; I think he'll be putting it in the water soon.  His hip is still bothering him.  In fact, he is scheduled for a hip replacement May 20!!  He needs both hips done but the dr. doesn't want to do both at the same time.  So, hopefully, this one won't be too bad and he will schedule the second one soon after recovering from the first one.

I worked a bit on my card stock organization today.  I love my rolling cart which is where I store loose card stock by color.  I kept scraps in a baggie that I dropped in each color folder but it was a pain to pull out each baggie and I found myself just dropping scraps into the folder.  So I ransacked the house looking for manila folders which I stapled together on the sides and put in the color folders.  Then I put my scraps in each one of them.  Now I just need a few more folders!

It has been a while since I just made a card for fun.  So I pulled out Indescribable Gift and did some watercoloring.  I love to watercolor and love how this card turned out.


The colors I used were:  Always Artichoke, Rose Red and Baked Brown Sugar.  I stamped the image onto watercolor paper and embossed it with white embossing powder.  Then I used my Aqua Pen and ink that I had squeezed into the lid of the inks to color. 

Tuesday, April 17, 2012

April Club Cards

Just finished getting everything ready for my club this week.  My Tuesday gals will be here late this afternoon for some stamping fun.  I just love having gals over to stamp with.

Here are a couple of the cards we will be making today:  They both are using sets that will be retiring May 31.  So, if you love these cards, you better order the stamp sets so you can CASE me.

I think this is my favorite!  I made my own DSP by stamping a piece of white card stock with various flower stamps from FLOWER FEST.  What's super about this stamp set is that all the flower stamps coordinate with punches so you don't have to cut the flowers out - you just punch them!


 SUPPLIES USED:
  • Stamp:  Flower Fest, Happy Birthday to You (both retiring)
  • Card Stock:  Peach Parfait, Whisper White, Watercolor paper
  • Ink:  Versamark
  • Accessories:  Watercolor Crayons, White Embossing Powder, Heat Gun, Top Note Die, Big Shot, Aqua Brush
  • Punches:  Flower Fancy, 5 Petal Flower, 2 3/8" Scallop, Butterfly, 1 1/4" Circle
HOW TO:
  •  Stamp flower stamps randomly all over 3” x 4 ¼” white card stock in various colors   Adhere to bottom of Peach Parfait card
  • Die cut Top Note from white cardstock.
  •  Stamp sentiment about the middle and to the right side on top Note with Black Ink.
  •  Stamp flower images from Flower Fest stamp set onto Watercolor paper using Versamark Ink and emboss with white embossing powder.  Heat with heat gun.
  •  Color flowers & leaves using Aqua Brush and Watercolor Crayons.
  •  Punch out flowers using – 5 Petal Flower Punch,  2 3/8” Scallop Punch, Butterfly Punch, Fancy Flower Punch,  1 ¼” Circle Punch.
  • You have to cut leaves out with scissors and adhere to the card.
  • Stamp Butterfly antennae in black and cut out.

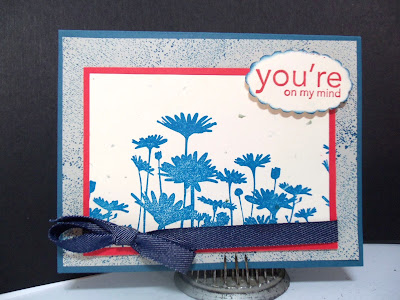
This card uses a great stamp set - Inspired By Nature.  I'll be sad to see this one go.  I also used a Wheel for the Textured background.  I seem to forget about my wheels.
SUPPLIES:
  • Stamp:  Inspired by Nature
  • Card Stock:  Not Quite Navy, Sahara Sand, Poppy Parade, Confetti 
  • Ink:  Not Quite Navy, Poppy Parade
  • Access:  Textured Wheel, Dauber, Scallop Oval Punch, Blue Denim Ribbon, Dimensionals
HOW TO:
Not Quite Navy cardstock:  8 ½” x 5 ½”  /  Sahara Sand cardstock:  4” x 5 ¼” 
Poppy cardstock:  4 ½” x 3 ¼”   /  Confetti cardstock:  4 ¼ ” x 3”
  • Use Textured large wheel and wheel the Sahara Sand card stock using Not Quite Navy ink.  Adhere to card.
  • Stamp flowers from Inspired By Nature onto Confetti cardstock using NQN ink.  Adhere to Poppy card stock.
  • Stamp sentiment with Poppy ink on scrap of Confetti.  Punch out with Scalloped Oval.  
  • Tie ribbon around Confetti  card stock.   Adhere using dimensionals.