Wednesday, June 29, 2016

Inkie Fingers!

Aren't sunflowers beautiful?  I made this sunflower using the Starburst Thinlit.  I can't believe how many different things you can do with that thinlit.  Don't know why it took me so long to purchase it!


I die cut the starburst and then used a circle die to trim off the longer edges.  I also die cut a circle for underneath the "sun."  Then I ran them both through the Woodland embossing folder.  The center piece is cut out with a circle die and embossed with dots.  A simple and fun card.

I lived up to my blog name yesterday and got some really inky fingers!  I mistakenly put my fingers on the Dapper Denim ink pad yesterday and this is the result:


 Look what I got in my last Stampin' Up box!!

Sammie has been my constant companion the last few days I have been working in my stamp room!  She crawls into that box and curls up and sleeps the day away!  At night she is downstairs with us and gets in her "Bo Box."  For those who don't know, that is a box from Bojangles that my sister & mom brought to her!


Sunday, June 26, 2016

NC Blog Hop - My Favorite New Stamp (Jars)

It's the last Sunday of the month and that means it's time for another NC Demos Blog Hop!  This month we are each featuring our favorite new stamp set from the new annual catalog.  I am totally in love with Jars of Love - the stamp set and the framelits!  Oh - there are so many ideas running through my head for this set.  I used this set last week at Stamp Club and we made two different cards.  If you missed that post, check them out HERE.

This is the very first card I made with Jars of Love - flowers being poured out of the jar.


First I stamped the jar in the top left of the white card stock in Memento Black Ink.  Next stamp a bunch of flowers in the jar and coming out of it using Sweet Sugarplum, Flirty Flamingo and Mint Macaron inks.  I used my fringe scissors to cut a little grass from Old Olive card stock, wrapped a piece of the Sweet Sugarplum ribbon around it and adhered it to the black panel which is then adhered to the card base (Sweet Sugarplum).  Die cut several flowers and adhere them to the grass.  Finally put a small pearl in the center of the die cut flowers and stamp your sentiment.

This next card is my favorite and it is a shaker.  It would be perfect to welcome a new baby!


My first step was to stamp the background pieces onto Whisper White.  For the mint macaron stripes, I brushed off the dust from the Brushstrokes Background stamp (don't know why I haven't used it much) and just stamped it on an angle.  (Another one that would work for this is the new Diagonal Stripe background stamp.)  I blotted some of the ink off the stamp before putting it to the paper and spritzed it a little bit with water because I didn't want it too dark.  The background piece on the bottom - Pink Pirouette - is made using the same Diagonal Stripe stamp and just stamping once horizontally and next vertically to achieve a checkered look.  Use a black fine marker to make stitch lines around the edges. I punched the large star using the Star Framelits from Soft Sky and stamped on it with one of the Timeless Texture stamps.  The small stars at the top are from the Star Framelits also. There is a piece of white twine wrapped around the top of the card before adhering it to a Mint Macaron card.  The jar is stamped twice on Thick White Cardstock in Mint Macaron ink and die cut.  I stamped a background piece one one of the die cut jars with different sized star stamps that I found in different sets in pink and blue.  I die cut a piece of acetate in the jar shape and adhered it to the back of the second die cut jar.  I used strips of dimensional tape on the edges but BEFORE you remove the backing on the tape, fill your jar with tiny stars and sequins.  Then take the cover off the adhesive and adhere the star stamped background on the back of the jar and acetate.  Stamp the jar lid with Versamark and emboss it with gold embossing powder.  Die cut and adhere to top of jar.  Punch out the tiny hearts in Mint and adhere them to the jar lid.  Wrap a piece of white twine around the jar and adhere it to the card.  Tie a piece of ribbon in a bow and use a Glue Dot to adhere it to the card.  Adhere a button to the ribbon.  I used my computer to type the saying and cut it out.


My next card was really simple to do.  I stamped the jar image onto a piece of vellum using Staz-on black ink and die cut it.  I die cut a piece of gold glitter paper and adhered it on top of the vellum.  Next stamp several of the leaves onto Whisper White card stock (3 3/4" x 5 1/2").  Stamp a couple of them full strength and a couple of them "second generation."  Adhere the vellum jar on the page using dimensional strips to the edges.  Tie a piece of ribbon around the left side before adhering the white piece to the Pool Party card.  I used a piece of retired Pool Party glitter ribbon.


My final card was also a simple one and a fun one to make!  I have flowers coming out of the jar above so this one needed fireflies coming out (or lightning bugs - which term do you use?  I say lightning bugs.)


I stamped the jar onto a piece of scrap white card stock and die cut it. (but you could just as easily stamp direct to the card.)  I used daubers to sponge a bit of Soft Sky around the edges of the jar and then adhered it to the left side of the card.  Next stamp the fireflies in black ink on the jar and flying up and off the right side of the Whisper White.  Use a Daffodil Delight marker and color the wings.  I used the Fine Tip Glue Pen to put a tiny bit of glue on each firefly and sprinkled Gold Glitter on them.  The "Just Sayin" is from Crazy About You and the other sentiment is from the Jars set.   Mount the white card onto a piece of black card stock and then onto the Daffodil Delight card.

OK - that's all for me.  But not for you - continue along with the Blog Hop and see what the other NC demos' favorite sets are!  The full line up below will help you move along so you can see all the projects.

TAMRA DAVIS
JO ANNE HEWINS
TRACIE EVANS LANGLEY
SHARON MARANICH (you are here)
FRANCES WAGNER

HOSTESS CODE info

JUNE HOSTESS CODE:  49DUAQCN

Here is HOW to shop online and use the HOSTESS CODE:


  • Order On-line HERE  (be sure my name, Sharon Maranich, is shown in the upper right corner.)
  • Create your own personal account OR sign in if you already have an account.
  • Start shopping by adding products to your "Shopping Bag"
  • At anytime before checking out, you will need to enter and apply the HOSTESS CODE. (see screen shot below)  Don't forget to click APPLY
  • Complete your shopping
  • Then check out.


If you are in my club and are unable to come, this is another way you can put your order in and it will still be counted as your club obligation.  Plus, it will be shipped directly to your house.

Thursday, June 23, 2016

Paper Craft Crew Challenge with Swirly Birds

Once upon a time .... I used to do a lot of card challenges.  Splitcoast Stampers have several challenges every week - from color challenges to design challenges.  A lot of stamping blogs also offer different challenges.  With this card I am doing a design challenge from the Paper Craft Crew Card Sketch (say that 10 times fast!)  They are celebrating their 200th challenge with this design.  I was a member of the Paper Craft Crew when it first started and did weekly cards for a few years as a member of the team.  Back then, I mainly did digital cards for the challenge since that was when Stampin' Up still supported My Digital Studio.  Sadly, that is not the case anymore (and I am still sad about it!!)  I decided to get out my new Swirly Birds set.  This is the cutest stamp set!  It's funny - when I first saw it in our pre-order, I did not like it so I didn't purchase it early.  Well, guess what was on my first order when the new catalog came out!!!


I used several stamp sets on this card.  For the Dapper Denim striped background, I used the  Diagonal Stripes Background Stamp (pg 125).  For the light Flirty Flamingo center background, I used one of the watercolor wash stamps in Work of Art, stamping off once before stamping on the white card stock.  I like the combo of denim and pink in this card, what do you think?

Here is the sketch if you are interested in making a card with it.  You might want to visit Pam's blog since she is giving away a pretty good prize this week!  (Sunny Girl Scraps)  Also stop in at the Paper Craft Crew Challenge Blog and see the other cards for this challenge.  Many of team members are also giving away blog candy.

Wednesday, June 22, 2016

Bless Your Heart!

I really like the Starburst Framelit.  I don't know what took me so long to order it but when I started seeing some cards others had made with it, I bought it.  So glad it carried over to the new annual catalog!

In this first card, I die cut the starburst in Real Red and put it on a black card base.  The DSP and ribbon sticking out of the sentiment circle are all retired and some I found in my (huge) stash of retired items!!  The sentiment is a new stamp set, Layering Love.  When I shared this with my Stamp Club gals, a couple of them commented that this card would look great in red, white and blue.  Hmmmm - maybe another idea to share!!  Stay tuned!


 This next one was an experiment using some retired Envelope Paper (Delightful Dijon).  I die cut the Starburst with Delightful Dijon as well as the Envelope Paper and put it on a background of Envelope Paper adhered to a white card.  I just turned the top layer of the Starburst image a light bit to the right so the Dijon cardstock showed on the side.  I fussy cut the Layering Love sentiment and adhered it on top of a Dapper Denim star.


This card is pretty much like the red and black card above.   I just added a little bling.  Don't you love that saying "Bless Your Heart"?   You can find it in the Jar of Love stamp set.  We had a discussion yesterday at Stamp Club about Southerners using that sentiment.  I am a Southerner but that is not something I say a lot.  One of the gals (who is from the north) said she had heard that was the Southern way to say "F U" .... what????  I don't believe that!  I tried to set them straight but since I was the only Southerner in the group, not sure if they bought it!  What do you think????  Comment below please!


Monday, June 20, 2016

Serene Serenity DSP

These are the other cards we made this month at Stamp Club.

This first one was super simple! (I actually CASEd the idea from Stamp with Brian who CASEd it from someone else!)  I used a piece of DSP from the Serene Serenity pack.  This paper is filled with gorgeous inspirational pieces on one side and the other side has abstract patterns that are great for backgrounds.  I paired the DSP with Delightful Dijon and it matched perfectly.  The card itself is Tip Top Taupe - a color I have not used very much.  The sentiment uses Thoughtful Banners (a must have!) punched out with the Duet Banner Punch (both borrowed from my sister but on my "must have" list.)


This next card served double duty this month.  It was my swap card for Allison's monthly meeting as well as a card for my club ladies to make.  It showcases all the new In Colors.  I made a template with the Starburst Thinlit and sponged the color onto the white card.  The flowers are from Crazy About You and Flower Patch and punched out with the corresponding punch (Flower Medallion) and die (Flower Fair thinlits.)   The sentiment is Hello You Thinlits.  And for the finishing touch, I added a bit of silver metallic thread under the flower.


Hope your weekend was a good one.  We drove over to Reed Gold Mine on Saturday.  I didn't strike it rich though!  In fact, I didn't even pan for gold!  Reed Gold Mine was the first place gold was discovered in the U.S.  They were putting on an American Revolution reenactment that I though Sonny would enjoy.  It was ok but something to do on a Saturday!  Sunday we spent most of the day on the lake "chilling."  Ashley is house hunting in Hawaii.  She has discovered that her money will not go too far there in the housing market.  She spent most of Friday with a realtor looking at homes and was pretty disillusioned that evening.  She only saw one condo that she would even consider.  They are all pretty old, small and very expensive - like 2 bedrooms for $600,000+.  Sunday she went out on her own visiting a few open houses and found one condo that she really liked - again pretty small for the money, but that's the price she'll have to pay for living in Hawaii I think.  At least it made her feel better - that there are a few nice places for sale there.  The problem is the nice ones go almost as soon as they hit the market so you are going to have to be in the right place at the right time.  The one she found yesterday will have 2 weekends for open house before they will even start to take offers.  I so wish I could be there to house hunt with her.  I love to do that plus I have been with her every place she moved to look for houses. 

Saturday, June 18, 2016

Jars of Love

These are two of the cards we made in Stamp Club this month.  I just love the Jars of Love stamp set along with the coordinating framelits!  For the card below, I also used a piece of DSP from the Serene Scenery stack (another favorite!)  And how do you like the embossing folder????  It is new also and sure to be a favorite.  I stamped the flowers in Peekaboo Peach, Flirty Flamingo and Sweet Sugarplum.  The jar is stamped with Bermuda Bay and the leaves are Mint Macaron.  I used a little trick on the jar and flowers.  I punched out a circle and adhered it at the top of the jar with just 1/2 of it showing.  That gave me something to glue the flowers down to and made it much easier.


I had a hard time deciding which new sets to introduce to my club members this month.  I didn't want to overwhelm them by doing a different stamp on each card so I concentrated on just a couple new sets.  Here is the second card I made using the jars.

This one is a shaker card.  The DSP is retired (It's My Party) in Mint Macaron with a piece of the Peekaboo Peach ribbon down the middle to hide the seam.  I stamped the jar in black and used my marker to go around the edges in Mint.


Wednesday, June 15, 2016

What is your favorite In Color?


Summer is definitely here!  Sonny thought this weekend felt like we were living back in Texas - 100 degrees, still 80 degrees at night and no breeze blowing!  It took a while to get here but it can back off just a little bit now. 

This is a card I made trying to highlight the new In Colors which I love!!  I keep changing my mind about my favorite one.  This week it is the Peekaboo Peach.  Which one is your favorite?  If you don't want to buy the regular size ink pads, Stampin' Up is offering Uninked Stampin' Spots (pg 180). They come in packs of 5 so you could purchase them for $9 and with the ink refills ($3.25 each), you'd have all 5 colors pretty cheap.  


Ashley and Bogart arrived safely in Hawaii Monday.  Bogart didn't love being in the cargo part of the plane but think he was happy to see her when they arrived!  She had 5 suitcases - with one of them weighing about 65 lbs.  Luckily, someone met her at the airport and helped her with all her stuff.  She got a rental car and he followed her to her apartment/hotel.  Her room is on the 3rd floor overlooking the pool but no elevator so luckily, he helped her get all the luggage up to the room.  She said it's an older place but quite big with two bedrooms and a kitchenette.  Now comes the challenge of getting semi-settled and start looking for a place of her own.  Last night when she called, she told her Dad to go ahead and open his Father's Day present since he planned to go play golf today.  She bought him a Steeler Golf Bag (he already had the clubs).  I think he was surprised.

Monday, June 13, 2016

Hang In There

Well, today is the day.  Ashley is moving to Honolulu.  She and Bogart have an early morning flight from San Antonio and will be arriving in Hawaii in the afternoon.  I talked to her briefly Sunday and I don't think it has hit her yet - she's been too busy.  She has been staying at her college friends home for the past week and when she left their house Sun. morning she said the kids were all crying - that they won't see Bogart again!  She said she has too much to do to think about crying but will probably do so when Courtney drops her off at the airport this morning.

I made her this card a couple of weeks ago when she was trying to get everything done - selling her house, having her roof replaced because of the recent storms, trying to get all her papers signed and processed for her transfer, getting a airplane-approved carrier for Bogart plus all his papers for him to enter Hawaii.  He can't travel in the plane like he normally does but has to go in the cargo area.  Luckily, the airline she is flying is one of the few with a temperature controlled cargo.  But, it is still going to be a long flight for him with a lay-over in California.

This card uses the retired Sale-a-bration stamp.  I love this little chick!  The balloons are from Balloon Celebrations.  I stamped them in black onto Soft Sky cardstock and then sponged ink over them.  Lots of retired stuff on this card - the Washi Punch for the sentiment; the twine, the cloud stencil, and the Dots embossing folder.  No matter - it all makes a cute card!


I went to my 50th High School reunion this weekend!  I kept procrastinating and didn't sign up in time; plus I had promised my mom I would take her to my nephew's high school graduation in Charlotte.  Well, late on Friday, my nephew found out that he was not going to be allowed to graduate because he didn't take a computer class that he had to take to graduate.  So Saturday afternoon, Sonny and I drove to south Charlotte and got a hotel room and went to the reunion.  We were able to pay at the door.  Of course, name tags had already been made for everyone with their senior picture on it beside their name.  Yay!  I didn't have my picture on my name tag!  It was fun seeing people that I haven't seen since I graduated and trying to match up their faces now and then.

Friday, June 10, 2016

Paper Pumpkin - Manly Occasions

Thursday at 5:00 PM (MT): The flash sale is here! Sign up for Paper Pumpkin now and get your first kit for only $5 USD. Use promo code “ONEDAYDEAL” at PaperPumpkin.com today.

One-Day-Deal-thumbnail-US


You've seen a lot of my samples from Paper Pumpkin.  I love getting a surprise in my mailbox every month.  I usually make one or two of the projects as the directions call for in the box.  Then I use the stamps and parts of the kit to create "out of the box" cards.   It's amazing what you can come up with when you have all the coordinated pieces.

Last month's kit was Many Manly Occasions.  I think everyone struggles with "manly" cards.  I pulled the April and May Paper Pumpkin boxes out at the May stamp club and let the gals make a card using the pieces in the box.  I wish I had remembered to take pictures as they were all different. Here are a few of the cards that I made from the May Manly Occasions kit.  (A lot of them are CASEd from cards I saw on Pinterest.


This one is pretty simple.  I punched the balloons out from the orange corragated paper that was included in the kit.

I got the idea from Dawn Olchefske.  I cut apart one of the lattice fronts of the card and came up with 3 pieces to use on 3 different cards (this one, the one above w/balloons and the heart punch further down.)  The flowers are punched using the Pansy Punch and the Petite Petals Punch.  "celebrate" is from the new Thoughtful Banners stamp set and Banners Punch (that I borrowed from my sister since my order has not arrived!)


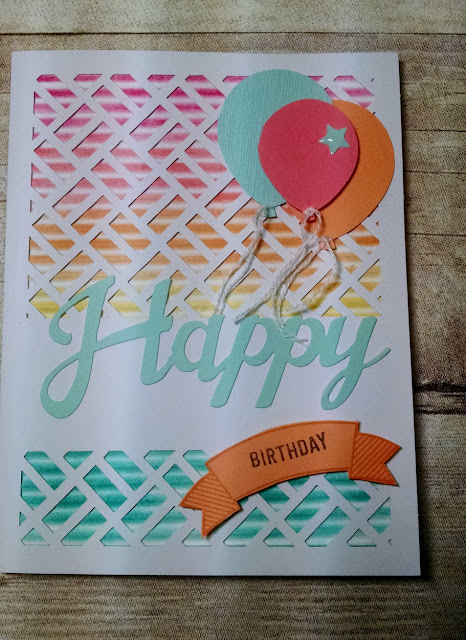
I love the soft pastel colors and this is a great way to show off some of the new In Colors.  I used by Stamping Crimper (had to dig it from the back of the bottom drawer and dust it off!) to crimp a piece of white cardstock.  Then I sponged Flirty Flamingo, Melon Mambo, Daffodil Delight, Peekaboo Peach, Bermuda Bay and Pool Party on it.  Next I adhered it to the back of the lattice front.  I punched out 3 balloons and tied white thread around them.  The banner is from the Thoughtful Banners bundle.

This card took a little patience!  I started out with a piece of Elegant Eggplant cut at 4 1/8" x 5 3/8".  Next I cut strips of Dapper Denim and Emerald Envy at 5/8" wide.  I used temporary tape to adhere the Eggplant card stock down so I could position the strips.  Using tweezers or the piercer helps to move the pieces around through the lattice.  When you get them all placed where you want, adhere the piece to the back of the lattice front.  I love the effect!!  'Happy" is a sticker that was Pool Party but I used my Elegant Eggplant marker to color it.

Below is what my mat looked before I glued it down.


This is the third card from cutting the lattice apart.  Pretty simple - the heart is from the Sweetheart Punch and the banner again from the Thoughtful Banners bundle.  I cut off 3" the front black piece and adhered the matted lattice piece to it.  (see picture below)


Hope these ideas inspire you to try Paper Pumpkin at the great price of $5 today!!

Tuesday, June 7, 2016

What a deal!!

If you have ever thought about checking out Stampin' Up's! Paper Pumpkin monthly kits, do I have a deal for you!  Get ready for a flash sale!  Starting at 7:00 PM (EST) on Thursday, you can get your first Paper Pumpkin kit for only $5!!!  What a deal!  But don't delay in signing up because this deal will only last a day.

This offer is just for new subscribers.  You don't want to miss it!  Go to my online Paper Pumpkin sign up page by clicking in the box marked Paper Pumpkin above.  Use promo code ONEDAYDEAL to get the special one day offer.


This special price applies to one kit for June, 2016.  After the first month, the price for the subscription will return to $19.95.  BUT, keep in mind, you can cancel at any time!  This offer will end on Friday, June 10 at 1:50 AM (EST.)

Monday, June 6, 2016

Happy 90th!


My friend, Margaret's mom will turn 90 this month.  Margaret and her whole family - two daughters and their children - have all gone to England to celebrate her birthday.  I made this card for her.
 

Using the stamp set, Number of Years, along with the Large Number framelits makes this card an easy one.  I cut the numbers out of Blackberry Bliss to match the card.  The colors I used in this card are Blackberry Bliss, Old Olive and Watermelon Wonder.  The DSP is from Sale-a-bration and is now retired.

I am patiently (ha) waiting for my new catalog order.  I got up early Wednesday morning to put my order in as fast as I could before going to Newcomers coffee.  I thought about doing two-day shipping but it was an extra $40 - that could buy another stamp set AND a framelit!!  So, I am waiting.  It is supposed to be delivered on Thursday.  Then I will be sharing some of the new stamp sets.

Saturday, June 4, 2016

Happy Birthday Times 3

This is a card I made several months ago using a stamp set from Sale-a-bration.  But you could do a very similar card with any other stamp set.


I really like the emboss resist technique.  In this card, I stamped "happy birthday" 3 times using VersaMark ink.  Next I embossed all 3 of them with clear embossing powder and my trusty heat gun.  The final step was to sponge over the embossed images with ink.  I used Mint Macaron, Watermelon Wonder and Crushed Curry.  I scattered a few sequins around and made a couple of little banners at the top - a pretty quick and easy card.

Wednesday, June 1, 2016

Pretty Packaging

I just realized I didn't share my gift packaging for Mother's Day.  Who wants plain jane wrapping??? Not me!

I bought my mom a couple of shorts outfits.  They fit into one of my Paper Pumpkin boxes and I wrapped it with kraft paper.


Next came the decorating.  I made a belly band from some DSP that I had in my stash (retired).  Next I die cut flowers and leaves using the Botanicals Framelets and glued them to the package.  I fed a piece of twine through and voila! a pretty package.


Of course, my mom wanted to save the arrangement so we had to carefully get if off the package!