Thursday, February 27, 2014

Vivid Vases

I am again using the Vivid Vases stamp set.  It is a single stamp and is really versatile.  I haven't used it yet as a single vase but I'll be trying that soon.


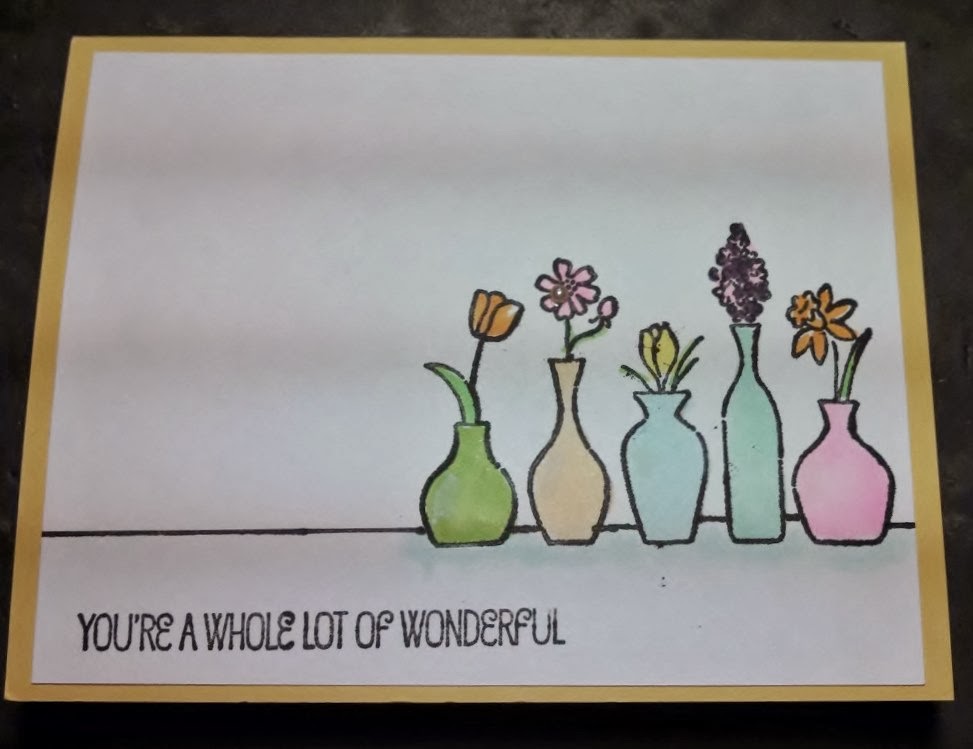
For this card, I stamped the vases in Memento Black.  I masked the sentiment so I would just get the vases in my stamping.  Next I colored them using my Aqua Painter and the ink from the lid of the stamp pads.  I love to color this way.  You get just a wash of color and not real dark. I painted a little bit of blue below the vases.  Next I took a ruler and a thin Sharpie to make the straight line across the bottom of the card.  Next I masked the Vases and stamped the sentiment on the left bottom of the card.  

I'm going back to the eye doctor Friday to see how well my cataract surgery went.  I'm also going to talk to him about doing my right eye.  I'd like both of my eyes to work together!!  

Wednesday, February 26, 2014

Paper Craft Crew Challenge

It's time for another Paper Craft Crew Challenge.  I made a card (with MDS) this time using Sale-a-Bration products.  This would be an easy one to reproduce (or CASE) and you wouldn't have to use MDS.

Sketch 


So, what do you think??

Tuesday, February 25, 2014

Take Ten Magazine - Spring 2014

I had a nice surprise last week.  Sonny brought in the mail and gave me a package that I was not expecting.  When I opened it up, it was the Spring 2014 issue of Take Ten magazine.  No, I don't subscribe to this magazine.  But in the past, I have sent cards to the magazine in hopes of having them published in the book.  I have not submitted any cards to them in a couple of years at least.  So I was quite surprised to receive this letter from them with the magazine.


Guess they hold on to submissions for a long time!

Cover of the magazine
 I was especially surprised to find out that not only had they published one of my cards, but THREE cards taking up all of page 66 in their monthly "Variation on a Theme."  The challenge is to create a set of cards that share a theme- color, layout, stamp set, etc. while using a different stamped image on each card.


 The stamp set that I used is a retired Stampin' Up set - Awash With Flowers.  It is a beautiful two-step stamp set.

So, that is my claim to fame for today!!

Sunday, February 23, 2014

Accordian Fold Tag Card

We had a fun weekend - what about you?

Friday Sonny and I went to the Social Security Office prepared to wait for an hour or so.  Surprisingly, when we arrived there were only 3 people in the office so our wait was not long at all!!  After that little trip, Sonny took me to one of his favorite restaurants that the guys visit on his skeet shooting days.  He has been raving about their chicken to me for a long time.  I have to agree, it was very good as was the fried squash and mashed potatoes and gravy that I had!!  Needless to say, we didn't eat any dinner that night still being full from lunch!

Saturday we met Marianne and Greg and drove to Greensboro to the RV Show.  It was fun to see all the different RVs.  Marianne and Greg were dreaming about their next RV while Sonny and I were just along for the ride.  If I could talk him into it, I would love to have a camper to travel around the US.  We used to have such good times as a family camping in our Pop Up Camper.  But Sonny says "no way" so guess camping is not in our future.  After the RV Show, we had some time to kill so we decided to try and find the apartment complex where Sonny and I met 43 years ago.  We couldn't remember the name of the street but Marianne did!  She remembered as a kid, coming to visit me in the apartment.  She would have been about 10 years old!   She says she remembers that we went over to Sonny's apartment for dinner and I made pork chops!  Her memory is sure better than mine!  Anyway, we found the apartments and they didn't look so bad.  There used to be a swimming pool in the middle of the courtyard but it is gone and there are a lot more apartments now than there used to be.  The complex is now called Smoketree Apartments.  When we lived there, it was Spanish Arms Apartments.  It was a brand new apartment complex for Singles Only.  I was probably one of the first 10 or so people to move in.  Sonny moved in later in the year.  In order to attract new tenants, they provided a keg of beer three nights a week in the clubhouse.  But we couldn't drink the whole keg in one night, so there was beer in the clubhouse every night of the week!!  It was a fun place and we both have good memories of our three years there.  We had hoped to eat at a restaurant that Sonny and I used to go to when we were dating, Cellar Anton's, but sadly, it closed last year after 53 years in business.  So we found another good Italian restaurant that Marianne and I had visited when we attended a Quarterly meeting last year.

During the snow week, I made this Accordian Fold Tag Card:

Front of card

Inside

Accordian Tag opened
The card was made using the Two Tags Die which (sob) is retired.  I think this is one of my favorite dies and I will continue to use it.

Measurements:

  • 3-1/2 x 12″ piece of cardstock   
  • Score at 3″, 4-1/2″, 6″, 7-1/2″, and 9″
  • Panels for decorating the inside are 1-3/8″ x 2-5/8″ 
  • Outside panel is 1-1/2″ x 2-5/8″ 

To make the topper for the tag, fold the 3 1/2" x 12" card stock accordian style and place the folds of Tag Die above the score line before die cutting.

Today I made this card using the same directions but using the new Scallop Tag Topper in the Occasions Catalog.  It is smaller (width wise) but it works.

Card open - I used Fresh Prints DSP stack

Card front - tag closed

Close up of opened tag.


Friday, February 21, 2014

Card In a Box

As promised, here is the Card in a Box instructions.  There are a lot of YouTube videos on the web but most of them use 12 x 12 card stock.  This one uses a piece of 4 1/4" x 11" card stock so you can two from one sheet of card stock.  They are a lot of fun to make and fold flat to fit into a regular envelope.


·        Start with 4 ¼” x 11” cardstock.
·        SCORE @ 2 5/8”   /  5 ¼”  /   7 7/8”  /  10 ½”
·        Turn cardstock to the left so the 4 ¼” side is at the top of the score board.  SCORE 1 ¾”
·        With the 1 ¾” (vertical) fold line on your left, Cut on the fold lines – STOPPING at the 1 ¾” fold lines.  (you will be cutting into the smaller rectangles)
·        Cut the small tab at the top completely off.
·        Fold all VERTICAL score lines
·        From the Tab, fold the THREE smaller flaps down.
·        DO NOT FOLD the 4th small flap.  This is the back of the box.

·         Designer Paper for decorating:
·        Three pieces cut @ 2 ¼” x 1 ½” – for top flaps
·        One piece cut @ 2 ¼” x 4” – for back of box
·        Four pieces cut @ 2 ¼” x 2 ¼” (square) for bottom flaps.


Put box together with Red Line Sticky Tape for best results.

For inside of box:
·        Cut 2 pieces 1” x 4 1/8” – score @ ¾” from each end (for inside of box)
·        Fold the tabs on score lines on the inside pieces
·        Secure the tabs inside the box (dividing the box into thirds)


Card in a Box with Cupcakes and Balloons

Card in a Box with Party Owls and Balloons

Thursday, February 20, 2014

Stamp Club Cards for February

This week is my Stamp Club.  We made a Card in a Box project and 2 easy cards.  The Card in a Box was a rather lengthy project so I made sure to make the other two cards easy and quick.  I will share the Card in a Box tomorrow with directions.

The other two cards used items from the Sale-a-Bration catalog.  I wanted to use the Good As Gold kit so the gals could see what was included and how easy it would be to put together a card but that you could also amp up the card with things you have in your arsenal.


This is the card I made from the Sale-a-Bration Gold kit.  I used one of the banners that is written in another language and stamped the "hello" hexagon and put it over the foreign language greeting.  So you can use everything in the kit!  The kit comes with an envelope and a gold liner.  I cut a portion of the liner off the bottom to use it on my card.  Once you put the liner in the envelope, you can't tell that I cut any of it off.  I backed the polka dot card with a piece of Island Indigo cardstock BUT later discovered that by adding the additional card stock, it won't fit in the envelopes provided.  The note cards and envelopes are smaller than our standard cards.

The second card we did was about a 10 minute card!  


This is my Washi Tape Card.  Washi Tape is growing on me.  This is the Watercolor Wonder Washi Tape that is in the Occasions Catalog.  There are three rolls of tape in gold - stripes, plain and dots.  We just took strips of tape and put them in the center of the Naturals White card stock.  Stamp a sentiment from See Ya Later (Sale-a-bration) in Versamark and emboss with gold embossing powder.  Use dimensionals to pop up the sentiment in the center of the card.  Adhere the whole thing to a Naturals White card.  Easy Peasy!!

Tuesday, February 18, 2014

Just a Quick Note

Just a quick note to let you know I had my cataract surgery today.  It went great.  I was in and out of surgery in about 15 minutes.  I think I was #15 for him today and there were 3-4 after me!  After the surgery, Sonny and I grabbed some lunch before heading over to the doctor's office for him to check my eye.  I looked real cute with the clear plastic eye shield on!!  They took the  eye shield off.  I'm to wear it just at night for a week so I don't rub or scratch my eye.  It's really strange to be watching tv or reading with no glasses on!  I am still pretty blurry and my eye is scratchy but I am sure it will get better every day.  The worst part is, as one of my readers commented yesterday, the "regime of eye drops" I have to put in every day.  I have 3 little bottles of drops that I have to put in my eye 4 times a day.  And I can't put them in all at one time.  I have to wait 5 minutes between each one.  I go back to the doctor next week and I will talk to him then about doing my other eye!  Seems dumb to have to get new glasses now and then have the second eye done down the road and have to pay for another set of glasses .... if I even need them then.  I'm hoping for just needing "readers."

Well - time to go put my eye shield on and lay my head down on my pillow!

Good night!

Baby Welcome to the World

My nephew and his wife had a boy Monday morning!  Lincoln Morse arrived at 6:42 a.m. Monday morning weighing 7 pounds 2 oz.  Katrina had to have a "C" section but all reports are that she is doing well.  Isn't that cool - a baby named Lincoln born on Presidents Day!!

Here is the card I made for them last week and have just been waiting for the big day to get it in the mail.


I used a lot of retired items in this card - Stocking Punch, stamp set, Bashful Blue card stock but I don't think Lincoln will mind!!

We have been watching the Olympics night and day.  I'm really enjoying the ice dancing, luge and snow boarding.  Even Sammie is enjoying watching the Olympics!


I am having my cataract surgery Tuesday.  Wish me luck!!  Can't wait to be able to see sharper.

Monday, February 17, 2014

SU Card Kits - What A Deal!

I want to tell you about a few card kits that I think are a GREAT deal!!  If you want to order any of these kits, visit my online store (see tab at top of blog) and use the Hostess Code MFPFTVG4.

Hip Hip Hooray Card Kit for $19.95
The HIP HIP HOORAY card kit gives you 20 cards at your fingertips.  The kit contains everything you need (minus scissors) to create 20 beautiful cards for a variety of occasions.  The kit is excellent for beginner crafters but advanced crafters could also use the kit and use your skills to "jazz" it up.

The Hip Hip Hooray Kit includes:

  • cardstock and envelopes for 20 cards
  • twine, clips and adhesive die-cut embellishments
  • three-piece Hip hip Hooray Stamp Set PLUS a clear block
  • dimensionals
  • Basic Gray Stampin' Spot
  • Full color instructional brochure

Everyday Occasions Card Kit sells for $29.95
The Everyday Occasions Cardmaking Kit puts birthday, graduation, wedding, gratitude cards at your fingertips.  This kit contains everything you need (minus scissors and adhesive) to create 20 cards PLUS it comes with a beautiful box to store your cards in.

The Kit includes:

  • cardstock and envelopes for 20 cards
  • twine, buttons and clips
  • pre-cut paper embellishments
  • Stampin' Spots
  • Seven-piece Occasions Stamp Set AND a clear block
  • full color Tips and Tricks brochure
  • A storable, giftable box


The Happenings Simply Created Kit in the Occasions Catalog is a wonderful way to make some quick and easy cards.  The kit comes with everything you need to make 15 notecards except adhesive and sentiment.  When I first saw this kit, I have to confess I wasn't too impressed.  But after seeing all the cards you can make with it, I have changed my mind.  The actual cards are really cute.  It's the perfect way to make some quick thank you and "thinking of you" cards!


Includes pieces for making 15 cards: 
■ 15 card bases: finished card size: 4-1/4" x 5-1/2"
■ 15 sheets of single-sided, printed designer paper backgrounds, 5 ea. of 3 designs
■ 15 die-cut accents, 5 ea. of 3 designs
■ 15 Silver glitter banners
■ 15 White banners
■ 15 pieces of Baker’s Twine, 10" ea.
■ 15 buttons


Friday, February 14, 2014

Humpty Dumpty Snowman

I told you yesterday about my problems with building a snowman.  Well, guess it wasn't my fault Frosty didn't want to stay standing up in my yard!  (see this post)  Well today I decided to make a card in honor of my snowman.


I used the stamp set Snow Day to make this snowman with all his parts and pieces scattered in th snow.  It was fun to make.

Do you have a stamp set in your collection that you will never get rid of?  Well, I have a few of those.  Garden Collage is one of my all time favorite sets and I have not used it in several years.  It is one of the first Stampin' Up sets that I bought when I became a demonstrator.  Today I pulled it out and created a card using one of the Saleabration stamps too- Banner Blast..  I used my Prismacolor colored pencils with Gamsol - a technique I have not done in a couple of years.  I actually had forgotten about my pencils and watercolors that I have in my bottom desk drawer.  Maybe tomorrow I will dust off the watercolor crayons!


We saw sunshine today!!  Sonny couldn't get his truck out of the driveway so he ended up walking down to where we have our boat stored in the neighborhood so he could brush the snow off the boat.

Our boat is under that snow!
When he got back, he decided to shovel off the driveway and was able to get my car out.  Maybe tomorrow we can go somewhere.  I have been ok and stayed busy being crafty and reading.  Sonny on the other hand is going stir crazy!!