Friday, March 29, 2019

Stampin' Up! Storage - Your Space YOUR WAY!

04.01.19_HEADER_STORAGE_BY_STAMPIN_UP_NA


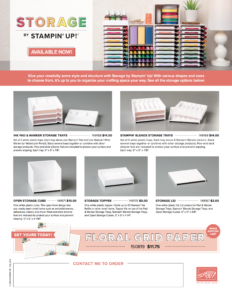
I have exciting news!  Stampin' Up! just introduced their own line of craft room storage solutions!!  Coming on April 1st, you can order ink pad holders, marker holders, storage for Stampin' Blends or ink refills and more!  And it's all totally customizable to your crafting space and your storage needs! 

Here is a Configuration Chart from Stampin' Up! to help you decide how many storage pieces you need.  Download it here - CONFIGURATION CHART


 Here are some features and benefits of Storage by Stampin’ Up!:
  • Keeps products organized, tidy, visible, and trackable at all times.
  • Ensures that your Stampin’ Pads, Stampin’ Write Markers, and Stampin’ Blends are all stored horizontally, as recommended.
  • Designed to be stylish, durable, compact, stackable, and modular.
  • Blends in naturally with most home decor with its white neutral color.
  • Stacks vertically and can be arranged to fit practically any flat workspace.
  • Easily assembled and disassembled for rearrangement and/or cleaning.


Wednesday, March 27, 2019

It's Almost Good Buy Time

It's almost good bye time.  You might feel like Sale-a-Bration just keeps going and going, but sadly it doesn't.  There are only five more days to enjoy all the amazing benefits that Sale-a-Bration offers - it ends on Sunday.  I don't want you to miss out on one bit of it.

Here are a few of the cards I have made using my FREE Sale-a-Bration stamps.

LOVELY LATTICE

HELLO CUPCAKE

HELLO CUPCAKE & SO HOPPY TOGETHER

COUNTRY FLORAL EMBOSSING FOLDER

SO HOPPY TOGETHER

COUNTRY FLORAL EMBOSSING FOLDER


Tuesday, March 26, 2019

Easter 2019 cards

Last week was a busy one for me.  I played bridge one day, went out for lunch, played Hand and Food, and had Stamp Club.  I'll be sharing the club cards later this week.

It's time to be thinking about your Easter cards.  Easter is April 21st this year.  If you are like me and like to wait until the last minute to make your cards and they end up going in the mail late, you might want to get a start on them now!  I hope to send my cards out early this year!!  I don't have many Easter stamps but I thought this lily would fit the bill.  What do you think?


I used the Gingham Gala designer paper (6"x6") for the background.  I stamped the lilies with Balmy Blue ink and the leaves with Granny Apple Green.  The ribbon was on back order but Stampin' Up got it back in stock a couple of weeks ago.  It is a Sale-a-Bration item.  I punched 2 holes on either side of the lily stems and threaded my ribbon through them and made a bow.  After stamping the image, I die cut it out using the Rectangle Stitched Framelits.  The sentiment is from a retired Stampin' Up set and I fussy cut it.


Here is another Lasting Lily card.  This time I stamped the flowers in Grapefruit Grove and Crushed Curry.  I used a sponge dauber to ink a little bit of the Grapefruit Grove onto the Crushed Curry flower and vice versa before stamping them.  This time I fussy cut each flower out and arranged them on the Whisper White card (with a 1 1/2" strip of Gingham Gala DSP on the side.)  The bow is from Wishing You Well stamp set.  

Friday, March 15, 2019

Country Floral

I love to color!  As a child coloring and playing with paper dolls were my favorite things to do.  I have good memories of being at my grandmother's house every Sunday for family dinner.  While I was waiting for dinner to be served, my great aunt would cut out paper dolls for me from McCall's magazine.  Do you remember Betsy McCall paper dolls?  Oh, I just loved her!  Can you believe you can purchase these paper dolls on eBay?  I sure wish I'd saved my old paper dolls.  What fun to see them again!


Well, these next two cards were colored with Stampin' Up Blends.  So fun!  I ran a piece of Whisper White cardstock through the Big Shot with the Country Floral Dynamic Textured Impressions Embossing Folder (what a mouthful!)  This embossing folder is a Sale-A-Bration item from the second release.  BUT .... Stampin' Up recently announced that it will carry over into the 2019 annual catalog along with the Tea Time Framelits Dies from the first Sale-A-Bration release.


These were such fun to color.  I tried to keep the sentiments and embellishments to a minimum to showcase the flowers.


I used some of the Gingham DSP on this card.  The scallop is a die Colorful Seasons.  I stamped the sentiment on a piece of white paper that was die cut using the Rectangles Stitched Framelits (my favorite!!)  I added a few Pear Pizazz leaf sprigs from the Sprig Punch.

Wednesday, March 13, 2019

Even MORE August 2018 Paper Pumpkin

I think these are the last of the August (2018) Paper Pumpkin kit!  I still have a few elements left over but I'm ready to move on to other projects.  I hope you have enjoyed these alternate cards from the kit.  I think I made about 15 cards from the kit!!


I used a retired embossing folder (Petals) for the background.   Other items used were the Leaf Punch and Stitched Shapes dies.


This card was done with Blackberry Bliss and Crushed Curry.


I fussy cut the flower that is in the corner.  The leaf background was made from the negative part of a sheet of punched out leaves (from another Paper Pumpkin kit).  I sponged the leaves with a dauber and Old Olive ink to make the background.

Tuesday, March 12, 2019

More August Paper Pumpkin Alternatives

I'm back with even more cards I made using the August Paper Pumpkin.


For this card, I just used a strip of the card piece and layered some lace under the strip.  I think I have had this ribbon lace for about 10 years!  I found it in my stash of ribbon and thought it looked really nice with this card.  In the Paper Pumpkin kit was a couple of pages of green vellum leaves and a couple of pages of clear vellum leaves.  I used my sponge brayer on the clear leaves to color them a light green.  Would you like to get this card for your birthday?


Another strip of the card with a scalloped edge of Blackberry Bliss under it.  I stamped the flowers using Calypso Coral ink on the Calypso Coral card.  The speckled strip was cut from the inside of the envelope that was included in the kit


For this card I layered the rectangle of flowers on Blackberry Bliss and Old Olive.  I stamped the flowers on the white part with the baby wipe technique but just used purple and pink inks,

I found a great app to organize my food recipes this weekend.  It is called Copy Me That.  I am always searching for low cal, Weight Watcher friendly dishes to make.  Before I discovered Copy Me That, I would print out the recipes leading to a bunch of paper I would have to sort through to find what I wanted.  Or if I got the recipe via my e-mail, I would move them over to a Recipe File that I had created and usually forget about them and not use them!  With Copy Me That, you add the button to your browser and when you find a recipe you want to save, you click to copy it.  You can then add a tag to it (chicken, beef, instant pot, Thanksgiving recipes, etc) and edit any part of the recipe.  I edit my recipes to show how many Weight Watcher points it is.   The app copies only the recipe, removing all the extra webpage stuff and you can link back to the original website if you want.  One thing I really like is that the app prevents your device from going to sleep.  No more having to touch your phone with greasy hands to "wake it up" and see what's next. The app is free and will sync across all your devices.  I have it installed on my laptop, mobile phone and my desktop computer.  There is also a section on the app for Meal Planning and Grocery List although I haven't used those functions yet.  You just create your meal plan for the week with recipes from your recipe box and then quickly create your shopping list right from your meal plan!  Give it a try and simplify your life!

Thursday, March 7, 2019

Paper Pumpkin from August

I have made so many cards with the August Paper Pumpkin kit!  The colors in this kit are great - Blackberry Bliss and Flirty Flamingo plus your choice of green - Lemon Lime or Garden Green.  It is always so fun to see how many different cards I can make with the kit.


For this card, I stamped the Blackberry Bliss flowers at the bottom of the card and used the little heart shape stamp for leaves.  I started with my flower in the middle and worked to the sides to try and get them spaced right.  After stamping all the flowers, the Blackberry Bliss flower seemed to have a faint crosshatch on the stamp so I used my Aqua Pen and a little of the Blackberry Bliss in and went over each flower to make them a bit darker.   Then I fussy cut the bottom of the card so you can get a sneak peek of the strip of cardstock at the bottom of the inside piece.  For the sentiment piece, I used my 1" Circle Punch for the corners of the Blackberry Bliss piece to match up with the sentiment that came with the kit.


This card is similar to the one above.  But this time I stamped the flowers on the inside and fussy cut it.  I cut off about an 1" of the bottom of the top card so you could see a sneak peek of the flowers.  I cut one of the card panels in half and used half in the card above this one and the other half at the top of this card.  I scattered a few sequins around and adhered a small bow on one of the flowers.


This card was easy.  I used one of the cards that came with the kit.  I die cut the oval from the Stitched Shapes framelits and stamped a couple of flowers on the oval.  The ribbon is Berry Burst but I thought it went pretty good with these colors.  The sentiment is from the Occasions catalog - Incredible Like You.


I think this card may be my favorite.  I did the Baby Wipe Technique for the flowers.  You can see the technique HERE.  I forget about this technique but it is definitely a Wow!


This is a "Z" fold card which is pretty easy to make.  I again cut one of the pre-stamped cards in half and used half on the front of this card.  The sentiment is from Love What You Do.


This was another easy card to make.  The leaves are green vellum (came in the kit).  I stamped the flowers with Flirty Flamingo and used dimensionals to adhere them to the card.  

Hope you have enjoyed my alternative cards.  I will have more to show you in my next blog post.  Don't forget - if you would like to try Paper Pumpkin, I suggest you do it now so you can get the special 6th birthday kit.  You would need to put your order in by Sunday, March 10!!  If your order is less than $150, please use my Hostess Code found above in the top left.  Thanks!


Tuesday, March 5, 2019

Facebook Card Swap


The Stampin' Up demos in the southeast area of the US were recently challenged on Facebook  to make a card and send it to the person who left a comment on the post right before you.  It was a great way to connect with other demos in our area.  It was a huge success!  Around 200 different demonstrators participate and send each other happy mail. 

Below are the two cards I received. 


This card was sent to me from Kathy Donovan.  She did a great job watercoloring the image.


I was totally surprised to receive this darling bunny card.  It came from Christi Wroe.  Christi is the person I sent my card to.  She went above and beyond!!  A lot of time went in to this beautiful card.


Wednesday, February 27, 2019

August 2018 Paper Pumpkin

Do you have projects mounting up and don't seem to get to them (like me!)?  Maybe it is time to prioritize your projects.  Make a list of them and then number them.  Check off your list as you go and before you know it, they will be done!  What cards do you need most urgently now?  If you are like me those are probably birthday, get well and sympathy.  And pretty soon I'll be adding Easter, Mother's Day and Father's Day to my list.

At my Stampin'  get-togethers, I tell the gals they can use any sentiment they want for the cards we make.  Last week one of my friends who hasn't joined us in almost two years, came and concentrated on birthday cards.  She took two of the birthday cards I had designed (see them here) and made two of each.  Not only does she have a few birthday cards but it made it easier for her to make the second one.  So when you sit down to make a card, why not make two at the same time?!  It will make life simpler!

I worked on making cards from my Paper Pumpkin kits this weekend.  There are about three kits that I haven't done.  The cards I worked on Sunday came from the August Paper Pumpkin.  I don't know why I didn't do this kit when it came in.  It is gorgeous!!  I understand why I still have my December and February kits but why was I so busy in August??  I think that is when I was having a mental block about making cards and just had to take a break from card making and blogging.

The first two cards are made according to the directions for the August Paper Pumpkin.   Those flowers are already printed on the card.


The next card is a Z Fold card - so easy to do.  I cut one of the pre-printed cards in half to make the Z fold card.  I actually made another card like the one below but with a birthday sentiment.  But I have already mailed the other card and forgot to take a picture of it!

I just love this sentiment!


I'll be posting other cards from this kit as I make them.

Sunday, February 24, 2019

Blog Hop - Keeping It in the Lines

Welcome to the North Carolina Demos February Blog Hop!  Whew - that's a mouthful!  So glad you are here and will get some ideas for your own card making from our cards.   If you have already visited Tracie's blog, I'm sure you enjoyed a wonderful project.  Tracie does great work!  I'm Sharon Maranich from the NC Piedmont area and I was born and raised in Charlotte.

This month's theme for the blog hop is your favorite coloring method.  Well, my favorite way to color is with the Stampin' Up Blends!  These markers make it so easy to blend colors and create beautiful works of art for all of your card making.  The colors, as the name suggests, blend beautifully, mainly because the colors are picked out and designed to blend with each other.  These blends take the guess work out and lessen the learning curve for coloring.  I love using the Color Lifter too.  It makes it easy to erase colors with it.  It is good for blending the dark and light colors.


For this card, I used the Dandelion Wishes stamp set.  I stamped the dandelions on the edges of the Basic Gray card stock with Versamark and used the white embossing powder to emboss them.  Next came the Pumpkin Pie Blends and I colored some of the flowers and all the little stems.  I used one of my favorite embossing folders - Subtle - to emboss both the Basic Gray card and stamped piece.  I matted the piece onto Pumpkin Pie card stock.  The sentiment was stamped on a Layering Circle die which was also matted onto a Pumpkin Pie circle.


This card uses the Love What You Do Photopolymer Stamp set.  I stamped the flowers and leaves along the edge with Memento Black ink on Very Vanilla card stock that was cut out with the Rectangle Stitched dies (my favorite!)  Next I colored the flowers with Bermuda Bay light and dark SU Blends.  I used the Well Written dies to cut out "miss" and the bird.  I actually die cut 2 of the "miss" - one is Bermuda Bay and the other in Night of Navy and staggered them just a little bit.  I matted the Vanilla piece onto Night of Navy and then onto the Bermuda Bay card.

There is a bit of a story behind the "miss" and "you"!  I bet most of you have experienced this before.  I was going to do both words with the Well Written dies and took them both off the magnet sheet and  put them onto my table.  Well, wouldn't you know it, when I got ready to die cut them, I couldn't find "you."  I looked everywhere and crawled around on the floor (picking up little bits of paper and the backs of the glue dots while I was down there!)  Finally I just gave up and stamped the "you" (from the Sale-a-Bration set, Part of My Story).  I was so upset because I had never even used the "you" die and now it was gone.  BUT .... when I turned my card over to put tape on the back and assemble the card, there was "you" stuck to the back of the vanilla card stock!  

OK - that's all for me today.  I hope you have been inspired to create your own masterpiece.  If you need help or want to add any of these supplies to your own stash, please let me know.  I'll be more than happy to help you on your stampin' journey!  Enjoy the remainder of the Blog Hop.  Next stop for the blog hop is Sue Root.  I'm sure she will have something amazing to share with you!  

We do this Blog Hop each month on the last weekend of the month.  So don't forget to join us at the end of March!


Happy Stampin'!  

Sharon


SHARON MARANICH - you are here!