Showing posts with label Paper Pumpkin Kit. Show all posts

Wednesday, July 29, 2020

Summer Nights Add-on Package

Whether you subscribe to Paper Pumpkin or not, here is a good deal you might be interested in purchasing.


Paper Pumpkin Summer Nights Add-On


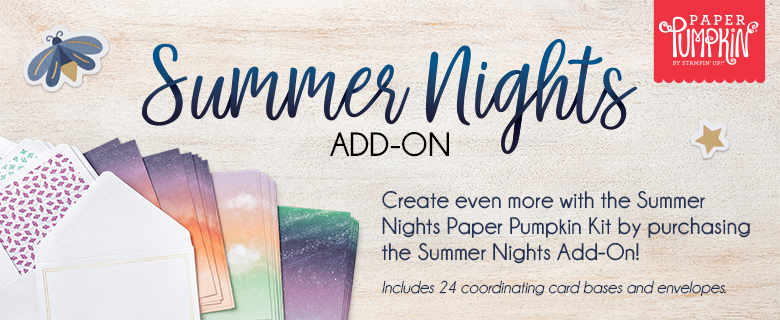
For $10 you get 24 card bases and envelopes!  What a deal .... and look how pretty the card bases are!

The July Paper Pumpkin - Summer Nights - is great!  They seem to get better each month.  Here are 3 of the cards I made with the instructions in the kit.


I love the ferris wheel and roller coaster.  Although I'm a big chicken and won't ride either of those!!  I hate to get stopped at the top of the ferris wheel and I always felt like I was going to get thrown out of my seat in the roller coaster.  The only roller coasters I would ride over and over again is at Kennywood Park near Pittsburgh.  There are three roller coasters there that I like to ride - The Racer and The Pippin and The Jack Rabbit.  They are all wooden roller coasters and not the steel ones that turn you upside down and backwards.   


I love the vellum jars in the kit.  I have traced a few of them onto vellum to use on other cards.


Aren't these lanterns so cool?!  (Even if  I did get ink on a couple of them and I didn't even notice it until I looked at the photo!)


Monday, June 15, 2020

For You, My Friend

Happy Monday!  Hope you had a good weekend.  It was very pleasant here all weekend.  The temps have been rather low for June which is very nice.  We just turned our A/C on a week ago.  Unfortunately, our upstairs unit was in need of freon.  We had to wait a couple of days for the A/C guy to come and fix it.  Sonny was in the A/C/Heating business (York) and has a jug of freon but he doesn't have the tools to put it in the unit.  But at least we only have to pay for the service call and not for the freon because it is ridiculously expensive.  There were a couple of nights last week before we got it fixed that when we went to bed, it was 85 degrees upstairs!  Luckily we have an old box fan that we turned on and it did the trick for us.  Our A/C units are on their last legs ... they are 20 years old so we know we are on borrowed time with them.  We haven't been able to go out on our boat because it also is not running!  Sonny worked on it for several days with no luck so he had to take it to the shop.  It's been a little over a week now and we haven't heard from them.  Hopefully, we'll have it by this weekend so Sonny can spend Father's Day on the lake.

I pulled out one of my old Paper Pumpkin stamps (from Jan. and Feb. 2019) to make this card.  


The card base is Calypso Coral.  I ran the Whisper White piece through the Country Floral Embossing Folder (retired).  I used a dauber to lightly put ink (Mint Macaron and Calypso Coral) onto the raised up flowers and leaves.  The Mint Macaron and Whisper White piece in the center was run through the Rectangles Dies.  I used SU Blends to color the cactus, lizard, bird and teacup. 

Tuesday, June 2, 2020

Over The Rainbow Paper Pumpkin Style


LAST CHANCE ITEMS!

Today is the last day you can order your retiring favorites before they are gone for good.  Be sure to check out the items that are still available (many are discounted) as they will only be available for purchase today.

2020-2021 ANNUAL CATALOG GOES LIVE ON JUNE 3rd!

It's that time again - a brand new annual catalog! How exciting!  It goes LIVE on Wednesday (2 pm EST) and you can be sure that I will be ordering all my new favorites bright and early!  There's so much to love - new suites and bundles galore, wonderful designer papers and lots of really wonderful embellishments!  If you have ordered from me recently, you should have received your catalog by now.  If you didn't, please let me know and I will get one sent to you.

PAPER PUMPKIN

I have been playing with the colorful May 2020 Paper Pumpkin craft kit.  It features 4 out of 5 of the 2020-2022 In Colors:  Bumblebee, Just Jade, Magenta Madness and Misty Moonlight.   This kit is full  of rainbows and sunsets!

These new In Colors should brighten and lift your spirits!

Making Memories with MIchelle In Colors

I gave this one to a friend.  I just love this card!  I used a retired Washi Label Punch to make the pajama pants.

Instead of a martini, let's have a Quarantini!

Lots of  fussy cutting here!
 For this  one, I used the negative part of the cloud that I had punched out and carefully cut all around the negative space.

I used the Seaside Embossing Folder on the Magenta card.

Part of the cloud is adhered to the back of the card and the "hey" cloud is holding the card shut.

I made a belly band on this card.


This is one of the cards with the instructions in the kit.

I used the Circles Dies and layered Purple Posy, Misty Moonlight, Just Jade and Magenta Madness. 
Do you know that last year this time, I was laying on a beach in Hawaii!!??  Oh how I wish I was there now.   So speaking of rainbows, sunshine and Hawaii, I thought you might enjoy this animated rendition of "Over the Rainbow" by a Hawaiian musician, Israel Ka"ano.  I hope you enjoy it as much as I did.


Friday, May 15, 2020

A Box of Sunshine!

Box of Sunshine - June Paper Pumpkin


About the June PAPER PUMPKIN KIT:

  • Kit contains supplies for 8 cards and envelopes (2 cards of 4 designs)
    • Card size: 4-1/4″ x 5-1/2″ (10.8 x 14 cm)
    • Envelope size: 4-1/2″ x 5-3/4″ (11.4 x 14.6 cm)
Coordinating Colors: Basic Black, Bumblebee, Crushed Curry, Poppy Parade, Shaded Spruce, White, and Gold
Box of Sunshine Information: This kit includes extra pieces and stickers (including a sticker label) to help you create cards AND a Box of Sunshine filled with treats and goodies to send to a friend. (Treats not included.)

Watch the Video:

Watch this video below, then read on for all the details so you can get your own box (or boxes!) of sunshine!


To subscribe go HERE.  Your Paper Pumpkin crafting kit subscription will begin with the June 2020 kit )mailed around June 13).  You can cancel at anytime, but I know you'll love these fun monthly paper crafting and card making kits delivered right to your mailbox each month! 

You'll want to get your June Paper Pumpkin Box of Sunshine Kit reserved ASAP so you can #sharesunshine!  The May kit sold out in April, so don't delay.

Monday, May 4, 2020

Alternative My Wonderful Family

How do you like the colors in the strips of paper in my blog heading?  They are (as close as I could match them) the new IN COLORS!  I don't know what my favorite is yet but I'm leaning toward the Magenta Madness and Just Jade!  As a demonstrator, we will be able to put a pre-order in next week.  For sure I'll be getting the In Color cardstock and inks!

On the subject of being a demonstrator, I got this in today's mail!


Hard to believe I've been a demonstrator for 15 years!  It's funny because I never worked anywhere for 15 years!  The most I worked was for Coppell High School for 10 years.

I made several alternatives for the April My Wonderful Family Paper Pumpkin Kit.

This was a fun one to make.  I cut strips from Pear Pizzazz, Shaded Spruce, Soft Sea Foam and some green glitter paper from my stash and glued them down onto a piece of Whisper White cardstock.  The important thing to do with this technique is make sure the first piece you glue down is straight on the page.  All the rest then will line up leaving a small gap in between.  After getting all the pieces glued down, cut the piece to 4" x 5 1/4" and adhere to the Mint Macaron card base. 

This one is really simple.  I inked the little leaves with Pear Pizzazz and using my dauber, put a little bit of Shaded Spruce on them.

I used one of the squares from Layering Squares Dies.  The tree is stamped on the base card with the frame adhered on top with dimensionals.  I inked the tree image with Pear Pizzazz and like the card above daubed a little Shaded Spruce on the stamp.  I sponged a little Balmy Blue on the tree.

I used the negative of the leaf punch out and sponged Pear Pizzazz and Shaded Spruce on the card.  I learned a new trick on this card.  I used the Tombow liquid glue and using my finger, spread the glue onto the negative leaf.  Let it dry -10-20 minutes and it will be a sticky template you can use.   


Friday, May 1, 2020

April Paper Pumpkin - My Wonderful Family


Wednesday night Sonny and I had a night out!  We packed the cooler and went upstairs to my craft room to play virtual Music Bingo via Zoom! (My desktop computer has a bigger screen.) That has become our weekly outing!  We play music bingo on Saturday and Wednesday nights at 7 pm.  Ashley also dials in so we get to see her twice a week!  So funny!  Next week they are going to try and set the Zoom app up to play trivia.  If anyone is interested in joining, let me know and I'll send you the details.

This month's Paper Pumpkin Kit is My Wonderful Family.  There are stamps for daughter, son, mom, dad, sister, brother ....  It is a good one for Father's Day and Mother's Day.  Here are a few cards I have made from this kit.


Stampin up april 2020 paper pumpkin my wonderful family | Cindy ...

This is the card that is in the instructions.  It opens with a "Z" fold.

This is the second card that is in the instructions.  The green flap opens down and the white piece with the tree opens up.

This is one of the alternative cards I made.  I stamped the top and bottom background with the large leaf part of the tree.  I used the negative from the leaf punch out and sponged leaves with Mellow Moss ink and my dauber.  I didn't want to cover up the verse.  I punched the green leaf sprig out of Mint Macaron and the flowers from Rococo Rose.  The butterfly is a punch out from the PP kit.

I stamped the large leaf part of the tree on Whisper White cardstock in Granny Apple Green, Bermuda Bay, Gorgeous Grape, Mango and Melon Mambo.  Then I used the Circles Dies to cut out 9 circles.  Once I adhered them to my white cardstock, I ran it through the Quilt embossing folder.  I die cut "friend" from Lovely Words thinlits and stamped Happy Birthday from Well Said - all in Emerald Envy

I love this one!  Hopefully you are quarantined with someone you can stand to be with 24/7!!   No matter how much you love someone, being with them 24/7 can be tricky!  We have it worked out  here - Sonny goes to the golf course with his buddies 3-4 days a week; I take walks and hang out in my craft room most of the day before we meet up to fix dinner and watch tv at night.

Monday, April 27, 2020

April and May Paper Pumpkin Info

I got my April Paper Pumpkin last week and will be sharing my cards with you in the days to come!

About the April Kit
  • Kit contains supplies for 8 cards and envelopes
  • Card size: 4-1/4″ x 5-1/2″ (10.8 x 14 cm)
  • Envelope size: 4-1/2″ x 5-3/4″ (11.4 x 14.6 cm)


Coordinating color for April Kit:


May Paper Pumpkin

Subscribe April 11 – May 10
The Paper Pumpkin team loves planning fun surprises, so they’ve been VERY excited to let us know what they have in store for the month of May: a fabulous kit featuring 2020–2022 In Colors, plus Purple Posy, an In Color from the 2019–2021 collection. This means that as Paper Pumpkin subscribers we will be first to get our hands on new In Color products.  
About the May Kit
  • Kit contains supplies for 12 cards and envelopes
  • 8 cards are traditional size
    • Card size: 4-1/4″ x 5-1/2″ (10.8 x 14 cm)
    • Envelope size: 4-1/2″ x 5-3/4″ (11.4 x 14.6 cm)
  • 4 cards are note card size
    • Notecard size: 5″ x 3-1/2″ (12.7 x 8.9 cm)
    • Envelope size: 5-1/8″ x 3-5/8″ (13 x 9.2 cm)
Coordinating Colors: Four NEW In Colors plus Purple Posy from the 2019–2021 In Color collection. (The new In Colors were introduced on April 24.)

Monday, April 20, 2020

Never Ending Card


Have you ever made a Never Ending Card?  It's really not as hard as it looks and is a great WOW!  You can get the instructions/tutorial from Splitcoast Stampers.


It really looks complicated.  The mechanism is just 4 pieces of cardstock (Balmy Blue for my card) that are 3" x 6".


I used the DSP from Pleased As Punch which is not available now.


I enjoyed decorating all the different panels with things from the Paper Pumpkin kit and the Pleased as Punch paper.

So .... check out the  TUTORIAL   at Splitcoast.   Splitcoast Stampers is always a great resource for tutorials.  Plus they have Weekly Challenges that are a lot of fun - especially, when you are stuck at home!!

Saturday, April 18, 2020

No Matter the Weather .... We're in This Together!

04.01.20_DEMO_HEADER_AC_2020_2021_COUNTDOWN_NA


Can you believe it's time to say good-bye to some of our stamps, DSP, dies, embossing folders, ribbon ......!!  On April 22 at 1:00 pm (MT), Stampin' Up will post retiring product lists for the January–June 2020 Mini Catalog and 2019–2020 Annual Catalog. These last-chance products will be available until June 2 or while supplies last only.  And remember—retiring items sell fast. Get your favorites before they’re gone!  This is a great time to get re-inkers for the retiring In Colors.  They sell out fast.

As promised yesterday, here are the remainder of the March Paper Pumpkin cards.


I stamped the boots onto the gingham check paper and adhered them to the Stitched Label.  The lemon lime is retired but I hope it makes a come-back sometime.  I really like it.

Can you see the shine on the boots?  I used Shimmery Crystal Effects on the boots and on the portion of the umbrella above.  Also if you look close, you can see the little rain drops among the hearts.  Do you ever cut your sentiments apart?  It's a good way to use them when they won't fit on the card.  I sponged So Saffron onto the cardstock with the hearts and layered it onto one of the envelope lining.   I wrapped Bakers Twine that came with the Paper Pumpkin kit around adhering it on the back with tape.

Again I used a piece of the envelope for the pink stripes.  

This background uses the rain stamp from the Paper Pumpkin kit.  I stamped off in Calypso Coral, Daffodil Delight, and Petal Pink and used the stamp horizontally to make the background.  At the time I made this card, I didn't know what this stamp was supposed to be.  I finally figured it out with a little help from someone's card on Pinterest!  

More sponging - the top I sponged with Balmy Blue and the bottom with Shaded Spruce.  I stamped the raindrops with Balmy Blue.  The green striped paper is from an envelope that I cut apart.  The card base is Shaded Spruce.

I guess I could have used this card for Easter!  I dug out my Scallop Punch that has been retired for years to do the bottom of the Petal Pink cardstock.  I ran it through the hearts embossing folder.  It was a great way to use up all the little hearts that came with the kit - I had just enough!

Friday, April 17, 2020

No Matter the Weather

Can you believe I have made about 25 cards with the March Paper Pumpkin?!!  I've run out of ideas (and CASEs) though!  I have about 10 more cards to share with you and then I'll be moving on to something else.  My April Paper Pumpkin is on it's way to me.  I'm hoping I get it on Monday.  It's too late for you to order the April kit BUT you might be interested in the May Paper Pumpkin kit!  The Paper Pumpkin team loves planning fun surprises, so that is what is in store for us in May.  I haven't seen it of course, but it is supposed to be a fabulous kit featuring 2020-2022 IN COLORS plus Purple Posy which was an In Color this past year but because of issues they had with Purple Posy, they pulled it last summer.  So, as Paper Pumpkin subscribers, you will be the first to get your hands on the new In Color products - a full two weeks before you can order In Color items from the new annual catalog!  The new In Colors are top secret - for now!

MAY PAPER PUMPKIN

OK - a few more March cards.  I have 10 left to show you.  I'll put 5 up today and 5 more tomorrow!

I left this one as a note card and I had an envelope left to put it in.  Now to mail it!  I fussy cut the clouds and stacked them with dimensionals.

This was a super easy card.  I cut the note card in half and mounted the girl in boots onto Old Olive cardstock.  The label and flowers were punched out and adhered with dimensionals after wrapping a piece of bakers twine around and tying it on the label.  All these items were in the kit.

This Calypso Coral is bright!!  I die cut the rectangles with the Sweetly Stitched dies (Balmy Blue and So Saffron.)  The boots and label are adhered with dimensionals.

Can you see the shiny raindrops on the clouds?  I love those raindrops!  I stamped the boots onto green gingham DSP.  Notice the rain coming down from the clouds.  It took me a long time to figure out what that stamp was.  I used it on another card horizontally and as a background.  I wrapped some twine in a circle and put a piece of tape on the back of it to adhere it down to the card.  The label over the top helped hold it in place also.

Now for my favorite card of the day!   Details below.


Four Square Pop Up Card Fold

Front:
  • Card Base: Petal Pink Cardstock 8-1/2" x 5-1/2". Score and fold at 4-1/4'.  
  • Layer #2: Whisper White Cardstock 5-1/4" x 4". Glue to card base.
  • Layer #3: Cut up the green envelope to measure 4-3/4" x 3-1/2" and glue to card front.
  • Circles: Use different color paper and cut with a 2" Circle Punch and a 1-1/2" Circle Punch. Adhere with dimensions to card front.
  • Sentiment: Stamp the sentiment on the circle that came with the kit and glue to card front using Stampin' Dimensionals. 
  • Boots: Cut a single pair of boots from the die-cut and glue to the large circle using Stampin' Dimensionals. 
  • Hearts: Glue to hearts to the other circle using Mini Stampin' Dimensionals.
  • Bling: Add the sequins to the background. 
Inside:
  • Layer #1: Add a layer of Whisper White Cardstock to each panel that measures 5-1/4" x 4". 
  • Layer #2: Shaded Spruce Cardstock layer over both white layers that measures 5" x 3-3/4".
  • Layer #3: Petal Pink Cardstock strip 8" x 1-1/2". Score at 2", 4" and 6". Glue to the inside by adding adhesive to the first section and the last section. 
  • Rectangles: Cut (4) Whisper White Rectangles that measure 2" x 1-1/2". Glue to each section of the Petal Pink Cardstock strip. 
  • Boots: Cut the remainder of the boots to create single pairs and glue one pair to each rectangle.
  • Hearts: Glue one heart to each set of boots.

I hope you have enjoyed these cards today.

Thursday, April 16, 2020

Boots and Umbrellas!

Where did spring go?  The furnace is going in my house!  I'm ready for the temps to get back in the 70s at least!   Last night Sonny and I played Music Bingo on-line again.  It is something different to do at home while we are stuck at home. 

Here are a few more Paper Pumpkin cards I made.

Paper Pumpkin + Under My Umbrella - a great fit!   The pink stripe piece in the background is the inside of one of the envelopes that I cut open.  I don't know if you can tell, but the boots are shiny.  I covered the boots with glue from the Fine Tip Glue.

I used another envelope inside for the card (green stripe.)  The scallop rectangle is from the Sweetly Stitched dies.

This time the envelope insert is the yellow striped piece.  I cut down the card with the girl and boots and layered it onto Calypso Coral.  

This one was so fun to make!  I used the negative part of the circle page after popping out all the circles.  I masked and sponged Balmy Blue and Pear Pizzazz onto the circles.  Next I flicked some Wink of Stella all over.