Showing posts with label framelits dies. Show all posts

Wednesday, November 2, 2016

Stitched From the Heart

Keep your fingers crossed that my computer doesn't crash.  It has been running so sloooow lately.  I've taken it apart today and cleaned inside and I am hoping that will help.  Guess I need to back it up - just in case!

How do like my new blog heading?  Those are some pictures I took last week in Sonoma.  

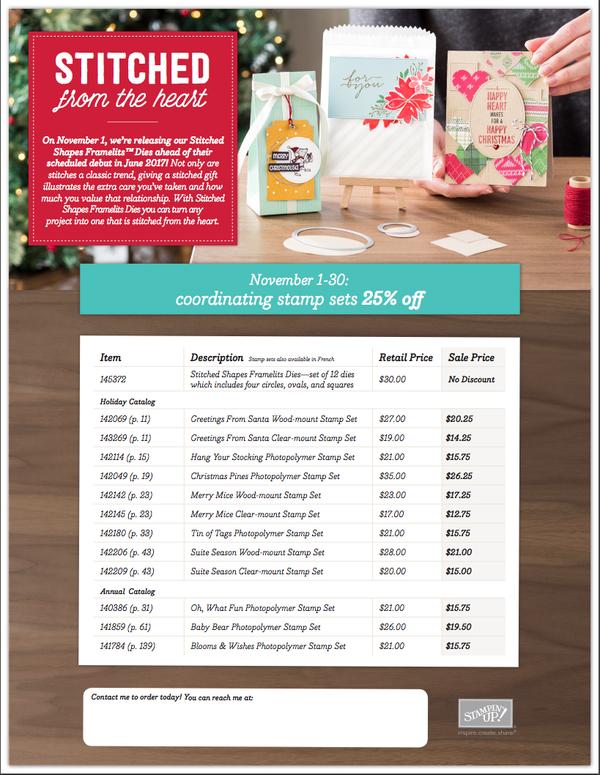
Anyway .... I wanted to share with you a new product that Stampin' Up just released yesterday - a fabulous new framelit called Stitched Shapes.   I already have them on my wish list and will be ordering soon!  I think they are going to add a lot to our cards.  I like to do piercing around my layers but don't usually do it because it is too time consuming.  This set includes 12 dies - 4 circles, 4 squares and 4 ovals with stitching around the edges.  And to add to the fun, the coordinating stamp sets are also on sale for 25% off for the whole month of November!!

Image


And here is a sweet video featuring the Stitched from the Heart framelits.  Notice that JOY on the mantle!  I am going to M's and look for those and decorate the letters with the stitched red circles!!


Here are a few pictures from my San Francisco trip.  Of course, most of the pictures with me in them are on Ashley's camera!
Hanging on the cable car!


Panoramic view of Golden Gate taken from the Presidio right before we drove across the bridge.

These hearts were in a park across from our hotel.  This one was painted by Tony Bennett - I Left My Heart in San Francisco.


Tuesday, September 30, 2014

Tips for Your Card Making

I love it when I learn something new!  One of my blog readers left me a comment yesterday in response to my problem of losing my photopolymer stamps.  (Thanks, Kim!)  Kim had a very good hint which I incorporated today.  Here was her tip:

I use an acrylic free standing photo frame to keep track of the loose stamps. I too clean at the end of creating. Cleaning kills the creative buzz. lol I keep the photo frame on my desk where I stamp. It's one left over from making those post it holders. I can stick those single stamps on to it, and they don't get lost. I can't see them when I drop them either. 

As it happens, I had a clear acrylic frame in my stash of Dollar Store items.  I slid a piece of card stock inside to make it a little easier to see and used it today while I was stamping.  (If you don't recognize these stamps, they are from the latest Paper Pumpkin.)  It's pretty cool - the stamps stick to the frame great!  Hopefully, no more crawling around on the floor looking for my stamps!


I also learned another tip today.  When you stamp an image and want to cut it out with a Framelit, do you find yourself going through all your framelits until you find the right size?  Well, that was what I was doing.  So, I spent a little time today solving that dilemma.  I cut some retired card stock (who doesn't have that laying around???) to 4 1/2" x 5 1/2" (whatever size works for you) and die cut a lot of my framelits.  I punched a hole in the top and have it hanging near my stamp table.  I may end up putting them in page protectors but haven't decided yet.  It already came in handy for me tonight as I was making a Christmas card and trying to decide on the sentiment.  Read the article HERE


.


Thursday, April 3, 2014

Word Bubble Rainbow Love

Welcome to spring!  Yesterday and today were beautiful days!!  I'm loving it so far.  The weather man is calling for rain on Friday and Monday and the temps to drop next week - highs only in 60s.  So guess I'll enjoy it while I can!!

The beautiful sunshine prompted me to create a bright and cheery card.  In fact, I loved it so much, I could't stop and made 3 cards using the same theme.  I may be doing this one in club this month.  We'll see!

I used the Word Bubbles Framelits and the Just Sayin' stamp set.  They can both be purchased as a bundle from the Occasions catalog for $37.25 (clear) and $43.95 (wood).  This set did not grab me when I first got the catalog but I have really used them a lot.  Check out my "rainbow" cards using the framelits and stamp:


Here are some great ideas that were shared in January on Stampin' Up's corporate blog:  Check it out HERE.

Tuesday, December 3, 2013

More of Ashley's Creations

Thought I'd share the rest of the cards Ashley made while she was here.  Not too bad considering we were only in my craft room a day and a half!!  Wish I could say I got this much accomplished!


Framelit Card she made for a friend who is getting out of the Army in a few days trying to decide what is next in her life.

Framelit card closed

Simple card using Apothecary Accents sizzlits

She had a hard time with this one but finally got the rectangle cut out in the center with my exacto knife.

Very similar to the previous card - just didn't use the knife!!  Uses Delicate Doilies stamps.

Monday, July 8, 2013

Backyard Basics Swaps

As you probably know, Stampin' Up is celebrating it's 25th anniversary this year.  Each month they are featuring a "best of" stamp set.  We' ve had flowers, hearts, and now Shelli's favorites.  Who better to pick a “Best of” stamp set than the person who helped start Stampin’ Up! out of her garage 25 years ago? Shelli Gardner, our CEO and co- founder picked her favorite stamp images from the past 25 years and helped combine them into a single set just for you. 


Best of Shelli Clear-mount Stamp Set #133488 $14.95
Even better, this set includes a never-before-seen flourish image, and the flower image coordinates perfectly with the 3/4” Circle Punch.

Shelli has some samples on her blog of projects she created with this Best Of Set.  Check them out HERE and HERE.

I got a few more swaps done today.  I think I have about 60 now not counting the 40 for the "January" organized swap and the 15 cards for the NC Demo dinner and swap.  So I'll be coming home with a bunch of new ideas! 

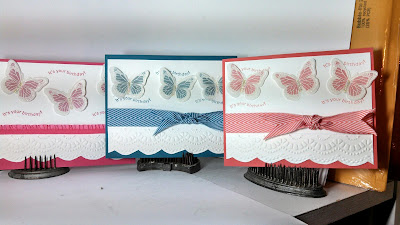
This one is my favorite though!  I think this is called the stained glass technique.  Whatever ... I love it!  I think we will be doing this at club this month too.  I stamped the butterfly from Backyard Basics in white on vellum paper and embossed it.  After cutting the butterflies out with the matching framelits, I used my markers to color the back of the embossed butterflies.  I did a few of these cards using one of the flowers from Secret Garden too but I like the butterflies the best.

Thursday, June 27, 2013

Chalk Talk

 In the 2013-2014 annual catalog,  the Stampin' Write Marker New Color Kit (item 130034, page 163)  helps you update your Many Marvelous Marker pack. Now, SU has sweetened the deal. For a limited time, from June 26 until October 31, you can buy any of the new colors in the pack or on their own! Go ahead, fill in the missing pieces in your collection or buy the whole lot. 

ITEM  PRICE  DESCRIPTION
 130034  $28.95 Stampin' Write Marker New Color Kit
Bermuda Bay, Blushing Bride, Calypso Coral, Crushed Curry, Island Indigo, Pear Pizzazz, Pool Party, Smoky Slate, Soft Sky, Wisteria Wonder
 131899  $3.50 Bermuda Bay Stampin' Write Marker
 131265  $3.50 Blushing Bride Stampin' Write Marker
 131902  $3.50 Calypso Coral Stampin' Write Marker
 131901  $3.50 Crushed Curry Stampin' Write Marker
 131905  $3.50 Island Indigo Stampin' Write Marker
 131266  $3.50 Pear Pizzazz Stampin' Write Marker
 131904  $3.50 Pool Party Stampin' Write Marker
 131898  $3.50 Smoky Slate Stampin' Write Marker
 131900  $3.50 Soft Sky Stampin' Write Marker
 131903  $3.50 Wisteria Wonder Stampin' Write Marker


I have been trying to work on a few swaps for convention.  I can't believe it is in three weeks!  Usually by now, I have a lot of them ready to swap out.  But I am not taking as many this year as I have in the past.  I love the swapping at convention but seriously, do I really need 100 more samples to find a home for in my craft room???!!   

One of favorite stamps is Chalk Talk with the matching framelits.  I'll have to admit the framelits had me stumped though.  They come with several frames and 3 odd looking pieces.  I couldn't figure out what they were until just yesterday.  You put those little pieces in the frames to cut a little opening in the tag!


This is the first card I made.  Don't you love red and black?  The DSP is from Modern Medley and I used Vanilla for the card and tag.  I love it but I am in a swap that is trying to use everything new in our swaps.

  
So, I went back to the drawing board and made this card using the new In Colors that I love!!  The DSP I used in this one is from Quatrefancy Specialty.  I particularly like the DSP piece that is on top of the Coastal Cabana flag piece.  It is a window sheet with the quatrefoil design on it in white.  So you can see the Coastal Cabana piece through it.  See the faux ribbon I used on the tag?  I cut a sliver of paper - some of them are DSP and some are from card stock.  I used my scissors to break down the fiber of the paper a little bit so it would be more flexible.  Then I carefully tied it into a little knot through the tag opening. I used the Fancy Fan embossing folder for both of the Crisp Cantaloupe flag pieces.
 
I had a helper today while I was making my cards!  Sammie tried hard to keep her eyes on me .... as well as the squirrel who was sitting on the roof outside the window but just couldn't do it for long!
 
See?  eyes are pretty much closed.  She didn't even wake up when I ran something through the printer!!

Sunday, June 9, 2013

Pop Up Flower Garden

What a busy weekend for me!  Friday started off with Judy picking me up to play Hand and Foot (which my team won, by the way!)  When she dropped me off at home, I discovered Sonny was not home and I had not brought my keys to get in the house.  He was running errands in Mooresville.  So Judy was kind enough to drive me to meet him.  She was headed in to Mooresville anyway to Subway so I didn't feel like I made her go too far out of her way.  Anyway .... thanks Judy!!  Sonny was at the grocery store.  By the time we finished there and got home, I only had a couple of hours before I needed to drive in to town again.  Newcomers annual fundraiser, Bingo, was Friday night.  We have a Bingo night with prizes and silent auction items every year and all the proceeds go towards our Literacy Program.  Our big silent auction item is the dinner that the Southern Living Lunch group auctions off.  This time we decided to also add a luncheon for 8 people along with the dinner for 10.  We serve the winners a gourmet dinner (and lunch this year) with wine.  We made $400 on the dinner and I think about $250-300 on the lunch!!  So, not too shabby!  There were so many great prizes this year - door prizes as well as bingo prizes.  The committee outdid itself.  I donated 4 boxes of hand made greeting cards with envelopes and was thrilled to see that they were on the silent auction table and were popular.  I think they sold for around $50!  Marianne, Angela and my mom went with me to the event.  Sonny stayed home this year!  I came home with a nice basket with wine, napkins, plastic wine glass (great for the boat!) and truffles and the plant centerpiece.  Marianne got a silent auction item of a game basket.  Mom got a gift certificate from Denny's and a nail spa.  Angela won a gift certificate to her favorite Mexican restaurant.   So, we all did pretty well.

Saturday morning I had to get up at 6:30!!  How AWFUL!  I went to a class at Verizon to learn how to use my "smarter than me" phone.  It was somewhat helpful but I did find out that I knew a lot more than the other people in the class!  After the class, I went to Concord to teach a group of ladies My Digital Studio.  I just love teaching others to use MDS.  It is so rewarding to hear the "ahhhh's" and "ohhhh's" as they learn the program.  It's such fun!  When I got home, I tried to take a quick siesta before leaving again to meet the family in Statesville for dinner at a new Mexican restaurant.  The food was good but it's hard for me to compare NC Mexican food after eating it in Texas!!   I was so tired when we got home but made it until 10:30 before going to bed.

Today I have been getting ready for bridge at my house.  I have 12 ladies coming to play.  I spent a lot of time working on my digital scrapbook from England and Ireland.  I am trying to finish it in time to take advantage of Stampin' Up's digital sale that ends at the end of the week.

Last Thursday I had time to finally play around with the Pop'n'Cuts Die and dress die.  I made this card using the die:

Front of card using Secret Garden stamp and framelits

Inside of card bottom from Feeling Goods stamp and Secret Garden

Card opened.  The flower pot is made using the dress die and cut it in half.  The flowers are from Secret Garden.
Close up of flower pot.

Thursday, August 23, 2012

Button Jar

How about another card with Perfectly Preserved?  This time the jar is filled with buttons.  Did your grandmother have a button jar?  Mine did a lot of sewing but I never found her button jar.  But, I do have several buttons that belonged to my great Aunt Love.  I keep them in a container in my vintage guest room along with a lot of items belonging to my grandmother.

I punched out a bunch of different colored buttons from cardstock (Daffodil Delight, Rich Rizzleberry, Tempting Turquise) using the Big Shot and the Button Sizzix die.  Here is what I did to make this card:
  • Use the jar framelit to cut the opening in the front of the card
  • Stamp the jar onto vellum and adhere to the back of the opening
  • Sandwich the buttons between the vellum and a rectangle of white card stock
  • Adhere a piece of Summer Smoosh DSP inside to cover the jar opening and vellum
 
I cut the curvy piece of DSP using a template that I bought at CKC.  I think it adds just the right touch along with the banners at the top and the card stock button.

Inside of card
I was at the grocery store earlier in the week and saw a display for Hatch Peppers.  There was a big sign announcing that Hatch Chilies were back.  Well, I had never heard of them and had no idea what to do with them but I bought a couple of them anyway.  After looking for recipes on the internet, I found a recipe for Quesadillas and made them for dinner tonight. They were really good but pretty hot.  If you like HOT, these are for you!!  Even Sonny thought they were hot!  Here's the recipe if you want to give them a try:

  • 2 hatch chiles (the recipe actually called for 4 but 2 was plenty for us)
  • 1 T butter
  • 1 t olive oil
  • 1 med. onion, sliced
  • 1 clove garlic, minced
  • pinch Kosher salt
  • 4 flour tortillas
  • 1 1/2-2 C shredded pepper jack cheese (I used a Mexican pre-packaged shredded mix)
  1. Broil chilies (with oven rack 6" from top) until skin is blackened & blistered about 5-6 minutes.
  2. Transfer roasted peppers to a paper bag & close for about 15 minutes.  This allows peppers to sweat making removing the skins easier.
  3. Remove the skin, seeds & stems of the roasted peppers (you should wear gloves but I didn't have any.)  Chop peppers.
  4. Heat butter & olive oil in skillet.  Once butter has melted, saute onions.  Cook until they start to brown, about 15 minutes.  Stir in roasted peppers, garlic and salt.  Remove from heat.
  5. To assemble quesadilla, place one tortilla on a flat surface; sprinkle half cheese & half of pepper mixture onto tortilla.  Place the other tortilla on top.  Cook quesadillas in a non-stick skillet over medium-high heat until the cheese is melted & the tortilla begins to brown.  Slice and serve immediately.
Tortillas are a staple in our house and ours are large ones.  One quesadilla was plenty for both of us although I had made 4 of them with the above ingredients.  Luckily, I did not cook the other two and froze them for another time.

Thursday, January 19, 2012

January Club Cards

My Stamp Clubs met this week.  I had fun designing Valentines and a couple of birthday cards for them to work on.  One of the gals requested a birthday card for a friend who has a Leap Year birthday.  Wouldn't that be weird - to have a real birthday every four years?   If you are born on a Leap Year, do you get your driver's license on February 28th or March 1st?  I found out that it is decided by each state.  Anyway, I looked through my stamps trying to decide what would be an appropriate card for a Leap Year person.  I found the retired set that has clocks I could stamp for the background.  I made the card real vintage-y and distressed the edges.


This uses a set from Saleabration (starts next Tuesday!)  and was really easy and quick to make.  We embossed the sentiment with white embossing powder.  The scalloped edge uses the Edgelits Dies from the Occasions Mini (pg. 7).  The red ribbon is retired but I love it on this card.

This was a Shaker Valentine.  I used the Peekaboo Die and the Big Shot to make the shaker part.  When it is closed, there are two hearts on top. 

More new products!  The stamp set is found on pg. 14 of the Occasions Mini, Take It to Heart.  A great set!  the "Love" is from a retired set as is the strawberries (Tart & Tangy).  There is a new set in the mini catalog with a chocolate strawberry (pg. 8, P.S.I Love You) but I don't have that set an still had Tart & Tangy.  We used Crystal Effects and a brown marker to make the chocolate.  Also the hearts can be punched out either with the Heart Punch OR the new Hearts Framelits Die.
 
This is my favorite because of the DSP from Saleabration!  Love it!  The stamp set is Build A Cupcake and I used the Cupcake Punch to make it easy.  The frames that the cupcakes are on are the new Labels Framelits Die.  The card is Calyso Coral which I don't think I have ever used! 


Wednesday, January 18, 2012

Sketch Challenge 22

Every Tuesday I get excited to check the Stampin' Up website to see what the latest My Digital Studio releases are.  They usually don't disappoint me. Yesterday's selection included "Sweet Shop" design kit and the "Labels Collection" punches.  The punches coordinate with one of Stampin' Up's new Framelits collection of dies and I love them.   So of course, I had to download the new releases and while I was at it, looked back for a few weeks and found some other goodies that I had to have!  Of course, all this was done last night around 11 pm.  Then I set about to make my card for the Stamping Queens Challenge using some of my newest "toys".  I had the card done and was in bed by midnight!  That is how quick and easy My Digital Studio is!

This card uses the Designer Paper from the Saleabration catalog - Everyday Enchantment.  This is one of my favorite papers and I know I will be ordering several packets!   The stamp set is from the Mini Catalog - Tea Shoppe.  Don't you just love that saying by Louisa May Alcott???  Even though I created this card using MDS, you can easily recreate it yourself using paper and stamps.  Give it a try or come up with your own creation using this week's sketch.


Sunday, January 15, 2012

Organization

How do you like my new Blog Header?  I did it in My Digital Studio using pictures I've taken during the year.  The first picture of Sonny and I was taken when we were in San Antonio in December at Christmas.  The next picture is Ashley and I in Ireland at one of the many pubs we visited.  Next is Marianne (sister) and I in our Steelers gear - I think it was during Super Bowl 2 years ago in Pittsburgh.  The next one is Sonny, Ashley and I in Ireland at Powerscourt Waterfalls between Dublin and Killkenny.  Next is Ashley and I at Ft. Hood when she returned from Iraq.  Not a great picture of me but remember, I had been sitting out in the 100+ temperature for about 3 hours!!!  The last one is the three of us at the Smithwick Brewery where we discovered our new favorite pint to enjoy.

I have been busy this weekend.  I finished cleaning my stamp room and moved furniture around.  I think I am going to like it.  I just hope I haven't organized my things to the point that I can't find them!!   I'm so excited about my ribbon holder!!  Here are a few pictures of the finished project:

This is my desk.  I didn't move it because I get such good light from the window.  Plus I can watch the birds and squirrels scamper around on the roof.  It won't stay this clean for long!  I love this desk with the great pull out baskets.  It is one that Ashley bought for herself when she was in high school.  It was used by her, Jeff (her brother) when she went to college, back to her for a brief time and then to me! 

This is the desk that I moved against the wall.  It previously was turned 90 degrees and I swiveled around to either desk.  It was sticking out in the middle of the room and this way gives me more floor space.  Under the desk are two Iris Carts which I have labeled each drawer so I know what is in there.  Note my Stamp Pad rack - it sits on the desk and holds all my SU stamp pads and refills.  Sonny made it for me several years ago and I love it!  The punches are held up with Ikea racks.  I need more!!!
This is my ribbon rack (on the right) which holds all my SU ribbon that is current in the 2011-12 catalog except for the wide striped grosgrain.  There are clips at the bottom to hold scraps of ribbon.   The ribbon shelf on the left is one I picked up a couple of years ago at an antique store - it is for a kitchen or bathroom and is supposed to hold a roll of paper towels. I added a dowel rod through the decorative iron scrolling on the side so I could add more ribbon to it.   I have 6 SU Ribbon Boxes on the shelf and the two dowels that hold all my non-SU or retired ribbon.


These are my shelves that hold my SU stamps.  I put all my non-SU stamps in the attic room which is accessible through my closet.  The shelf unit on the right holds all retired stamps!  On top are plastic jars (that used to hold nuts) with bits and pieces of ribbon in them.  I have them labeled as to colors.  I would like to start taking my wooden stamps apart and than I would have much more room.  The shelf on the left was made by my wonderful hubby!  (He's so handy.)  I have my current SU stamps, my Sizzix dies and other odds and ends.   My Big Shot sits next to the shelving unit so it is easily accessible.

I also organized my SU Designer Paper to some extent.  I used to keep it in a one of the Iris Cart drawers and would pull it out and have to go through eachall of it to see what I had.  Then I would get out the catalog to see what was current and which pieces went together and to see what colors coordinated with the DSP.  So, I took a 12x12 plastic holder - looks like a magazine holder and has plastic dividers.  I put the DSP in there and separated each pack that I had - Flirtatious, Twitterpated, Beyond the Garden, etc. behind the plastic dividers.  I labeled the name of the DSP on the top and wrote on a label the coordinating colors that matched the DSP and stuck that on the divider too.  That has sure made life easier trying to figure out what cardstock matched the DSP!

One more organization tip for you.  I have the new Framelits Dies from the Occasions Mini Catalog (and love them!.)  They come in a nice plastic envelope so what I did for storage was to tape some magnet strips to the cardboard that the dies are stuck on and then just slide them back in the envelope.


I hope you get some inspiration from some of my organization tips.  You know, you're never through getting things organized.  As soon as you think you are, you buy more stuff and have to figure out a way to organize it!!  If you have any tips to share, please leave me a comment.