Thursday, September 24, 2015

Delicate Ornaments

I have been working fast and furious on my swaps for Quarterly.  I have a little over a week to get them all done!  I signed up for: 3x3 card (11), full card (25), 3D project (15), tags (16) and the shoebox card (31)!  Plus someone had to drop out this week & I volunteered to be a "swap angel" and do another 16 tags!  Right now, I have completed all except the 3D and the extra tag swap so I am doing ok.  

The Southern Living Group that is part of Newcomers is hosting a tea and fashion show next Wednesday.  I was honored to be asked to be one of the models.  I went for my fitting yesterday at Chicos.  I have never shopped at Chicos - mainly because of the price of their clothes but I also find their sizing system very confusing!  They don't size their clothes the standard way, like 10, 12, 14, etc. but instead they are size 0, 1, 2, 3!  Very confusing for an old person like me!  I was a bit leary that the clothes were going to be too "hip" and young for me but I was pleasantly surprised.  I ended up buying a pair of jeans even though I don't usually pay big bucks for jeans!  But they fit so well I couldn't resist.  Everything in the store was 40% off so the $90 jeans were just over $50 after tax.  I will be modeling them next week.    (Pictures to follow!)

OK - I have more swap cards to share.


I loved this card using the Delicate Ornaments Thinlet Die (pg 15)  It also uses the new Curvy Corner Trio punch,   The pictures below show the unique fold of this card.


Another great card using the Embellished Ornaments stamp set and Thinlets with the Season of Cheer DSP and another unique fold.  But .... can you spot the mistake on this one?


Just the center panel opens.  The sentiment is punched out with the new Washi Label Punch (from the main catalog.)

OK - the mistake that I see is the DSP on the left side is upside down!

Tuesday, September 22, 2015

Halloween and Fall Cards

Here are a few more of the swaps I've received highlighting cards from the Holiday Mini Catalog.


Sunday, September 20, 2015

Fall Card Swaps

Today was a good football day!  The Steelers played their first home game and won big time!  I don't know if I am going to hold on to my first place in the Football Pool.  I did ok with the early games, but lost all 3 of the late afternoon games.  Now I am trying to pull Green Bay through and tomorrow night will be rooting for Indianapolis!  We'll see!  Right now I am 22 (wins) and 8 (losses) and the closest to me (4 people) have 19 and 11.

Sonny and I went to the movies yesterday and saw Walk In the Woods.  It was so funny plus the scenery was beautiful!  Robert Redford and Nick Nolte were the two old men who tried to walk the Appalachian Trail from Georgia to Maine.  Their banter back and forth had me laughing out loud.  I recommend you see it is you want a few chuckles.  I have heard mixed reviews but my review is a "thumbs up."

I recently participate in a couple of swaps using sets from the Holiday Mini Catalog.  Thought I'd share a few of them with you.


This is the card that I made.  I used the Woodlands embossing folder for the trees in the background and used a dauber with white craft ink to highlight them.  Then I stamped the spooky eyes (or are they bats?) and birds in the background.  I cut a Spider Web Doily in half and adhered it under the burlap ribbon that I had cut in half and pulled a few threads out of it to tie in a knot on the side.  I used the Lots of Labels framelits and cut one of the labels in half.  I got the plaid design by using one of the stamps from Your Presents.  I stamped the diagonal "present" in one direction and then turned it sideways and stamped it over the first one.


This card uses the Acorny Thank You set (pg 45).  It is a really cute set but not one I bought this time so I am happy to have this card to share.


This is one of my favorite cards!  It also uses the Woodland Embossing Folder in the background - it is very subtle.  She used the branch (sideways) in the Among the Branches set and hung leaves from it.  But my favorite part is the Glitter Splatter Technique that we learned at convention.  I had forgotten about it but I love it!  You dilute a little bit of Tombow liquid glue with water, making it pretty runny using your Aqua Pen.  Then get some of the glue on your Aqua Pen and tap it with your finger to spatter the blue all over your card stock.  Then sprinkle Glitter over the glue!  Let dry and voila, a sparkly card.

Hope you have a great week!

Wednesday, September 16, 2015

Christmas cards

I have a few Christmas cards to share with you.  Yes, I said Christmas - it's not too early to start.  If you do a few each week, you'll be ready when the hectic holidays arrive!


This card is so simple to make.  I did a watercolor swish on a panel of watercolor paper.  I watered down the ink from my reinkers and used my Aqua Pen to paint the 3 colors.  I stamped the ornament from Sparkly Seasons onto Vellum paper and punched it out.  Next the "falala" was punched out from the thinklets in red glitter paper and applied over the ornament.  The final touch was the Red Pom Pom trim stapled in the corner.  Really easy!

This is a set we received at convention - Your Presents.  


Another card using Sparkly Seasons stamp set but this time as a snow globe with a snowman inside.  The DSP is from the paper stack, Merry Moments.


This card uses the Woodlands embossing folder.  I love it!!  This time I embossed onto Smoky Slake and used my dauber to highlight the trees in white craft ink.

Tuesday, September 15, 2015

September Fall Stamp Club

Loving this week's weather!  Sonny just told me it is supposed to be down to 50 this morning!!  Time to turn off the A/C.  Cool fall weather plus NFL football makes this gal happy!  I am in a fun football pool and picked pretty good this week I guess.  I am FIRST right now with 14 wins and 1 loss.  One game left to go - I'm watching it now but about to go to bed so I'll have to wait until the morning to see if the Vikings pull it out against San Fran. (Updated - Vikings lost so I tied for first place this week.)

I had time yesterday to do a new blog header for fall - using My Digital Studio.  I haven't used MDS in a while and need to get busy and start on my 2016 calendars.

I attended a Holiday Stampaganza Saturday and made some really cool projects.  We also did a swap card.  Plus I recently did a swap with the NC demos so I have a lot of great samples from the Holiday Catalog that I will be sharing soon.

This week is Stamp Club and we are going to be using some of the Bundles from the Holiday Catalog.  Thought I'd share the directions I give my club gals if you would like to duplicate these cards.


HALLOWEEN CHEER ALL YEAR (pg 6)
Supplies:
·        Cardstock:  Basic Black, Very Vanilla, Happy Haunting DSP, Hello Honey
·        Ink:  Black, Hello Honey
·        Accessories:  2” Circle Punch, Spider Web Doilies (pg 47), ¾” Circle Punch
·        Stamps:  Cheer All Year
Directions:
·        Adhere spider web DSP to black card.
·        Adhere orange “pumpkin face” DSP to 3 ¼” x 4 ¼” panel of Black card stock.
·        Use Fine Tip Glue and adhere spider web doilie  to top left of panel.  It will hang over – cut that part off & save for inside of card.
·        Punch out 2” circle from Hello Honey card stock & adhere to center of doilie.
·        Stamp bat in black ink and adhere to circle with dimensionals.
·        Cut 1” strip of Tangelo Twist & cut end into flag.  Adhere to back of black panel so the flag part is sticking out.
·        Adhere panel to card in top left corner.
·        Stamp Happy Haunting onto strip of Very Vanilla and “flag” ends.  Adhere to panel with dimensionals.
·        Stamp “BOO” in black ink onto scrap of Vanilla, punch with ¾” Circle Punch and adhere to card.
·        Decorate inside of card!


This is not from the Holiday Catalog but I wanted to demonstrate how easy these flowers are to make from the Cotton Paper.

 THANKS CARD W/FLOWERS
Supplies:
·        Cardstock:  Bermuda Bay, Whisper White, Cotton Paper (pg 148)
·        Stamps:  Endless Thanks, Gorgeous Grunge
·        Ink:  Bermuda Bay, Watermelon Wonder, Crushed  Curry
·        Accessories:  Twine, Corner Rounder, Lovely Lace Emb. Folder, Paper Piercing Tool w/mat, brads
·        Punches:  Corner Rounder, Pansy, Petite Petals, Festive Flower Builder Punch
Directions:

  • ·        Emboss white panel with Lovely Lace folder.  Round corners.
  • ·        Tie twine around card & tie.  Adhere to Bermuda Bay card.
  • ·        Stamp sentiment (Endless Thanks) onto 3” x 2” white panel at bottom right with Bermuda Bay ink.
  • ·        Stamp dots from Gorgeous Grunge in Watermelon Wonder & Crushed Curry – STAMP OFF FIRST!!
  • ·        Adhere panel to card with dimensionals.
  • ·        Punch flowers: 
o   8 from Petite Petals Punch from Crushed Curry Cotton Paper;
o   4 from Pansy Punch from Watermelon Cotton Paper;
o   4 leaves from Festive Flower Builder Punch (use smaller leaf) from Green Cotton Paper 

  • Place the flowers one on top of another and pierce the center with your Paper Piercing Tool.  Put a brad through the center.
  • Crumble and fluff the layers and adhere them to the card w/glue dots.
  • Tuck the leaves under the larger flower and adhere them to the card.


HAPPY SCENES BUNDLE (pg 11)
Supplies
·        Cardstock:  Mellow Moss, Black, Vanilla, Happy Haunting DSP
·        Ink:  Black, Mellow Moss, Soft Saffron, Pear Pizazz
·        Stamps:  Happy Scenes, Cheery All Year
·        Hearth & Home Thinlits Dies
·        Accessories:  Markers, Square Pillow Box Die (for leaves), Postage Stamp Punch (retired), Mellow Moss Ribbon (retired), sponge daubers
Directions:
·        Adhere ribbon to bottom of Polka Dot Happy Haunting DSP.  (I used glue dots to pleat edge.
·        Adhere polka dot paper to Mellow Moss card
·        Use Hearth & Home Thinlit to cut out window & window sill parts.
·        Stamp scene on 2 ½” x 3 ¼” piece of Very Vanilla.
·        Use markers to color pumpkins.
·        Lightly sponge sky with Soft Saffron & grass w/Pear Pizazz
·        Adhere “scene” behind window die.
·        Adhere window to card on right side with dimensionals.
·        Stamp sentiment onto Very Vanilla scrap and use edge of Postage Stamp Punch on edges.
·        Punch out leaves using Square Pillow Box Die and adhere to front of window.

·        Decorate inside.

AMONG THE BRANCHES BUNDLE (pg 39)
Supplies:
·        Card Stock:  Very Vanilla, Delightful Dijon
·        Stamps: Among the Branches
·        Ink:  R.Razzleberry, D.Dijon, Tangelo Twist, Sahara Sand
·        Accessories:  Dijon Dotted Lace Trim, Punches – 2” Circle, 2 3/8” Scallop Circle, Sponge Daubers
·        Woodland Embossing Folder
Directions:
·        Emboss Very Vanilla with Woodland Emb. Folder
·        Use daubers to softly daube Sahara Sand ink onto trees.
·        Stamp leaves in different colors onto branches
·        Stamp on scrap Vanilla cardstock “AUTUMN WISHES” with R.Razzleberry ink.  Punch out w/2” Circle Punch
·        Mount onto 2 3/8” Dijon scalloped circle.
·        Tie Dijon Dotted Lace Trim around card and tie.
·        Adhere whole panel to Dijon card.
·        Adhere “AUTUMN WISHES” to bottom left of card with dimensionals.

Friday, September 11, 2015

Remembering 9-11

In remembrance of 9/11, I thought I'd post some pictures from my visit to the 9-11 Memorial last November.


We will never forget.

Thursday, September 10, 2015

Sleigh Ride Edgelits

I have been having fun with the stamp sets, framelits, punches, DSP, etc. from the Holiday Mini Catalog.  There are so many great sets and bundles in this catalog.  But one item I do not want to ever be without is on page 43 - the Fine Tip Glue Pen.  OMG!!  It is fabulous!  I used it earlier on a swap I am making to run a fine line of glue and put glitter on a flower.  So much easier than anything else I have used.  I suggest you put that on your list of things you have to have from this catalog!!

Here are a couple of cards I have made using the Sleigh Ride Edgelits (pg 12).  They were on my list from the beginning and I love them.


For this card, I cut the Santa apart and adhered it under the Vellum that I embossed snowflakes in sliver.   The "jingle" sentiment is from Jingle All the Way which is bundled with the Sleigh Ride Edgelits.


On this card, I sponged the Tip Top Taupe with white ink to tone it down a bit.  I did the trees in Mint Macaron and the embossed sky (using a new embossing folder - Softly Falling, pg. 24) is Pool Party. I mounted the whole card onto Lost Lagoon.  I like the varying shades of blue and green.

These are the bundles available in the Holiday Mini:

Built for Free Using: My Stampin Blog


If you are putting an order in on-line, please use my Hostess Code for this month  - TPJ9XSDC

If you are interested in the Paper Pumpkin Deal, TODAY is the last day to take advantage of the HALFPRICE deal!


There are some great items for this week's Weekly Deals - I don't know about you, but I can always use some pearls!  And the sequins will go great in a Halloween Shaker card!  And what about that silver ribbon and glimmer paper?  Great for the holiday stamping!


Built for Free Using: My Stampin Blog


New items have been added to the Clearance Rack this week also.  Remember, these items can be used for your club order too.

Built for Free Using: My Stampin Blog


Monday, September 7, 2015

Happy 21st Birthday!

Hope you had a safe but fun Labor Day!  I did.  On Saturday, we went to the movies and saw No Escape.  It was not the best movie I've seen and was quite bloody but it was entertainment for the afternoon!  On Sunday, we braved the heat and took our boat out.  It was not as hot as it has been but it was not cool either!!  Monday, we drove up to the mountains thinking the temps would be a lot cooler - not so.  We went to the Apple Festival in Hendersonville - a couple of hours from us.  Hendersonville is a really nice little town and one we will return to visit in the future.  Most of the tents selling things were gone but we were still able to get some delicious NC apples - honeycrisp - my favorite!  We watched most of the parade but after a little over an hour, we decided to cool off in one of the two Irish bars that were downtown.  Later we found a German restaurant a few blocks away and had dinner.  Oh my!!  It was delish!!  Sonny has already put it in his GPS as a favorite with intentions of returning.

I was able to get a little stamping done too over the weekend.  I mailed this card to my daughter-in-law's oldest daughter for her 21st birthday which was Sunday.  I am quite pleased with how the card turned out.


I used a stamp set from the Holiday Catalog - Your Presents - which I received from convention.  It is great that this set is not just for Christmas.  The stars are from the Star Framelits and I stamped on them using a really, really old and retired stamp set - Itty Bitty Backgrounds.  The "21" comes from the Numbers Framelits.

The best news of my weekend was that ..... Ashley made it back home safe and sound!!  She left Guam Friday around noon (which was Saturday, noon, for her) and arrived in San Antonio on Saturday around 6:30.  So, she had two Saturdays!  Her friends made a "welcome home" sign and greeted her at the airport and another one of her friends had a welcome home sign on her front door when she got home.  Not sure when we'll see her but it sure was great to just pick up the phone today and call her.

Thursday, September 3, 2015

Our trip to the beach!

We had a great time last week at Ocean Isle Beach.  Even though Sonny is not a beach lover like I am, he was a good sport and even sat out on the beach with me for a couple of hours one day.  He took his golf clubs and went to a driving range a couple of days.  He has not golfed for about 25 years and now that his hip is better, he is going to give it a try again.  We made the rounds of several beaches while we were there.  On Friday, we drive over to Calabash for some delicious seafood; Saturday, we went to Ocean Drive Beach (North Myrtle as it is called now); Sunday, we went to Carolina Beach and Wrightsville Beach.  I think on our next beach outing, we will go to Carolina Beach.  Sonny thought there was more to do there.  Admittedly, Ocean Isle is a very quiet beach with not much night life.  But we will be returning there to the Winds Resort because the day after we got home, I got an email that I had won a 4 day, 3 night stay at the Winds (where we had stayed) in an ocean front room for 4 to be used between late October and early March!  So, I will be planning a little get away again!  This has been my lucky summer - first I won the shopping spree with Stampin' Up and now a beach trip!

It rained on our last day.  I had hoped to make one more trip to lay on the beach, but Mother Nature had a different idea!


Tuesday, September 1, 2015

Holiday Catalog is LIVE!


The day has finally arrived that you can order from the fabulous new Holiday Catalog!!


Click on the link above and check it out.  Contact me if you want one of your own.
So, what are your new favorite items?
Project Kits?  There’s a Season to Season Wreath, the Witching Décor, Oh What Fun Tags, and To You and Yours Shaker Cards.


Bundles?  Oh my, this catalog is packed with bundles.  How many can you find? (17)
Designer Series Papers, 12″ x 12″ as well as 6″ x 6″.
Embellishments:  Pompom Trim, Enamel Dots, ribbons and buttons
Framelits and Thinlits:  most of them are available in 15% off bundles.  Check them out!!!
Embossing Folders
That new Fine Tip Glue Pen - take it from me, it is the BOMB!
Real Red Foil Sheets as well as Envelope Paper.
Reindeer Paper Clips (so cute)
New Precision Plate that’s fabulous for cutting intricate Thinlits.
Punches
Stamp Sets!  Such a variety, covering Halloween, Autumn and Christmas
This is one of my favorite embossing folders ever!


There are also a lot of You Tube videos from Stampin' Up that show you different ways to use all the new products.  Check them out HERE.

Wednesday, August 26, 2015

Christmas Ideas with Paper Pumpkin Kits

I have been trying to clean up some of the "half done" kits I have in my stamp room before I start any new ones.  I found several Paper Pumpkin kits that I had not finished so I decided to put them together and film a video for you.


One thing I forgot to mention that as a Paper Pumpkin subscriber, you can purchase older kits as they are available.  Both of the kits I demo-ed today are still available!!

To see other ideas using these kits, check out HERE.

Sunday, August 23, 2015

Paper Pumpkin - August 2015

I decided it was time for another video!  I received my Paper Pumpkin kit last week.  So, I decided to share with you what I did with it.  I followed the instructions for a couple of cards but then decided to switch things up and create a few of my own.  A few of the cards I CASE'd parts of them from other blogs but changing them and making them my own.  I ended up making 6 note cards and 6 full size cards.  The kit only contained the note cards but I was able to stretch the supplies and make a lot more.

You'll have to forgive me in the first part of the video when I was just a tad off camera!  I need to remember to do everything in the center!  Practice makes perfect!


Here are all the cards I made using this kit.  I also made 2 boxes as shown in the video.

These are the full cards

These are the smaller note cards
I highly suggest that you take advantage of the Paper Pumpkin sale that is going on now.  You have to sign up by September 10!  You get the first two months HALF PRICE - $9.95 (plus tax, but shipping is included in the price.)  If you go to the top of my blog, you will see a link to take you to sign up for Paper Pumpkin.  I saw a few of the upcoming kits at convention and they are going to be great!

  • Each month we send you a unique, surprise kit with a project-cards, journals, décor, and more!
    • We’ve even color-coordinated, measured, and cut everything for you!
  • Each kit includes stamps, ink, paper, and accessories
  • Each kit gives you a 30-minute creativity escape.
  • We will ship your Paper Pumpkin on or around the 15th of the month.
  • You need to sign up for a kit by the 10th of the month to get that month’s kit. If you sign up on the 11th of the month, your first kit will come the next month.
    • Let’s say you sign up on May 10th, we’ll send your kit around May 15th. If you sign up on May 11th, we’ll send your first kit around June 15th.
  • A Paper Pumpkin membership is $19.95 per month (but with the special, it is $9.95 for the first two months) and shipping is included!
  • There’s no commitment, you can cancel your monthly Paper Pumpkin at anytime. You can also skip a month if you want.

Thursday, August 20, 2015

August Stamp Club

Busy week for me (as you can guess from the lack of posts!).  I played bridge on Monday.  Then Tuesday, learned of the death of a husband of one of the gals in our bridge group.  Pete had been in and out of hospitals and rehab for 5 years with kidney disease but still, it was a shock.  Last night we went to a party at a friend's new house in our neighborhood.  Wouldn't you know it, an hour before the party was to start, it started raining.  We need the rain but it sure ruined the plans of those who had planned to boat over to Anna's house!  Luckily, her house is huge so there was plenty of room inside for everyone and even outside in the covered areas.  It was a lot of fun.  This has also been Stamp Club week although my numbers have dwindled drastically this week.  I ended up having a total of 4 people this week.  But we had fun anyway!  Here are the cards we made this week.

This card was one I received last spring in a swap made by Melissa Kernan.  It was a different use of the stamp set, Sheltering Tree.  The only change I made was to emboss the Mossy Meadow piece with the new Woodlands embossing folder from the Holiday Catalog,

 This set uses the Paper Pumpkin set I bought at convention.  Love the gift bag, card and matching envelope!

 Another CASE from Pinterest.  I thought the upside ice cream cones fit the sentiment great!!


This is a new set that I just purchased.  It is in the annual catalog - You're Sublime.  I just love the cute images in this set!  I haven't decided which is my favorite.  I think this set will make really cute little note card sets.  I used DSP from the Subtles Stack and let each person choose which image they wanted to make.

My $200 Shopping Spree order arrived yesterday while I was gone along with a $100 order that I had placed - all from the Holiday Catalog!!  I can't wait to start playing with all the new goodies!

Monday, August 17, 2015

Sneak Peek from Holiday Catalog

We got a call tonight from Ashley.  Of course it was Monday morning for her and she just wanted to say "Good Morning (from) Viet Nam!!  They had just arrived and she was getting ready to move off her ship (Millinocket) and move onto her new home for the rest of the journey, the Mercy.  She does not think her schedule will be too rigorous in Viet Nam and she will have time to do some sight seeing.  Hope so!

I thought I'd share a few more convention photos and give you a sneak peek of the Holiday Catalog.  I think it is a really good catalog this year and I have purchased a lot of stuff so far!


This set is called A Little Something and it coordinates with the new Square Pillow Box Thinlets that are also in the Holiday Catalog.  You can bundle the Square Pillow Box with the stamp set!  I love a good bundle deal!


This card uses All Ye Faithful stamp set.  And don't you just love that wood star??  


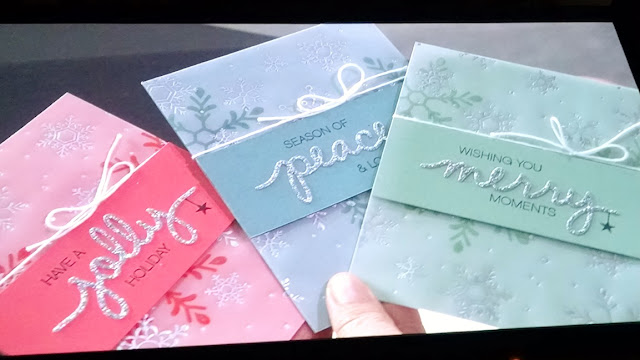
Next we have the Christmas Greetings Thinlets Dies - jolly, merry and peace.  Don't they look great cut from the glitter paper!  These thinlets also come in a bundle with the stamp set Holly Jolly Greetings (which I won in the prize patrol - but unfortunately, it didn't include the thinlets.)  They are on my list for sure.


 I think these Christmas Cuties are adorable!  I can't wait to get them in my order this week and do some watercoloring with my aqua pen.


It won't be too long until Halloween.  And these boxes will be easy to make with the Gift Box Punch Board and then do a little decorating using the Spider Web Doilies and Sweet Hauntings stamp set that also coordinates with the Note Tag Punch.