Tuesday, July 28, 2020

New On Line Store - Stampin' Up!

NEW CUSTOMER ON-LINE STORE - STAMPIN' UP!

shopping_dog.jpg

On August 4, a new customer on-line store will debut.

Here are some tips to help you:


VERY IMPORTANT:

  • The NEW Online Store goes LIVE on the same day that the NEW Mini Catalog goes LIVE so it's important that you review the following tips now, ahead of time, so you can be ready to order:

  • The current Password on your account will NOT pre-fill from the old online store to the new online store like you may be accustomed to. If your password automatically pre-fills for you and you DON'T know your password, I would urge you to go to your account at www.stampinup.com NOW and request to change your password so you'll know what to type in on August 4th. Click on FORGOT YOUR PASSWORD to reset. If you know your password, you should be all set. You'll just have to type it in.

  • Your Designated Demonstrator (hopefully me), that you currently shop with can continue to be your demonstrator but you must choose this demonstrator when placing your order or one will automatically be assigned to you. You may still use a demonstrators host/hostess code with your order if you do that each time you order.

  • NEW: Guest Check-out: If you choose to check-out as a Guest which is a new option, instead of signing in to an account, you can still enter a demonstrator BUT, if you do not choose a demonstrator, one will be automatically assigned to you. Make sure you pick your own demonstrator.

NEW ONLINE STORE HIGHLIGHTS!
  • The Online Store will now work on all desktops, tablets,and mobile phones, yay!
  • Larger imagery to better showcase our products and allowing up-close details to be seen will make your shopping experience more pleasant.
  • Inventory status information will be displayed such as: retiring soon, low inventory, or back-ordered.
  • Create and share your own personalized wish lists with the products you love.
  • Simplified checkout process.

As always, I am here to help you! If you need help setting up your Online Account or prefer that I place your order for you, please let me know!

Monday, July 27, 2020

Love those sunflowers!

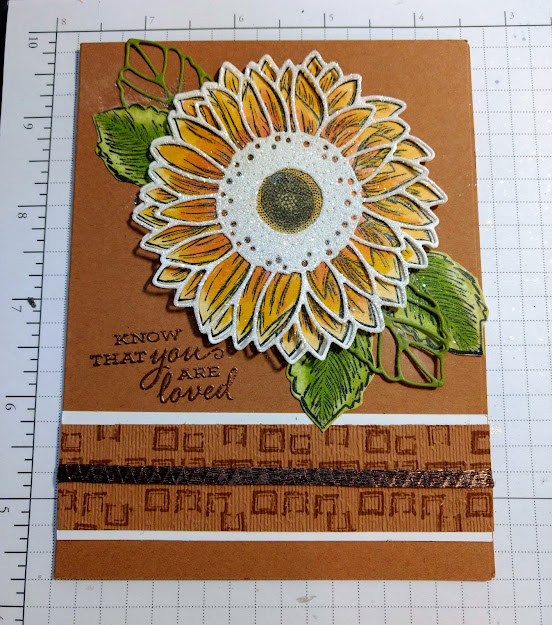
What a difference a die can make!  I showed you this card  a while ago and I really liked it.  But yesterday as I was cleaning up, I found a white outline sunflower that I had die cut but put the adhesive sheet on the wrong side so I didn't use it at the time.  I didn't want to throw it away so I glued the center down onto this sunflower (below) (leaving the sticky part of the die face up) and poured glitter all over the sticky die piece.  Make sense??  Anyway, I love the way it looks - that white die really pops that flower.  (Now if I'd only gotten the sentiment stamped straight!)

What do you think?


Just remember .... dies can sometimes make the difference in what you are making .... plus you save 10% by buying the bundle instead of the stamp and die separately.

Sunday, July 26, 2020

Happy 92nd!

Yesterday was mom's 92nd birthday!  She was so happy just to be able to leave the house and go somewhere different!  We had a family party at my house - Sonny and I, Mom, my two sisters and my brother-in-law.  It was a fun get-together.  I made chicken salad and egg salad and a fruit pizza for dessert.  Marianne made a relish tray and picked up tuna fish salad and made chocolate chip cookies and Angela brought along chips.  It wasn't terribly hot yesterday so we were able to sit outside on our deck and visit while Sonny and Greg worked on a project in the garage.
Here is the card I made for mom using the Celebrate Sunflowers set and patterned paper from Playing with Patters (6x6 pack).  I water colored the sunflower with Calypso Coral and Crushed Curry.  The leaf sprigs are die cut from bronze foil paper.  The little scallop on the side is from the Ornate dies.


Thursday, July 23, 2020

Sympathy Cards

Sympathy cards can be hard to make, don't you think?  I try to keep a few on hand.  I lost a special friend last week and made these two cards for her her son and husband.   My friend, Sylvia, was a very special lady.  She never met a stranger and had wonderful stories and jokes.  She was the elementary school secretary when my kids were young and I got to know her and call her friend through my volunteering at the school.  A few years later, she was one of the charter members of our bunco group - oh, the stories we would tell at that bunco game.  Most of us worked for Coppell ISD at different schools and we could catch up on things going on at their school (or another name for it - gossip!!)  When my mom came to visit once, we went to a party for Sylvia's birthday and there was an Elvis impersonator there.  My mom and Sylvia both loved Elvis and just swooned over him!  Sylvia will be missed by a lot of people.


Retired stamp - Thoughts and Prayers


Woven Heirlooms - I used the background stamp, Drybrush on the Crumb Cake card.

Wednesday, July 22, 2020

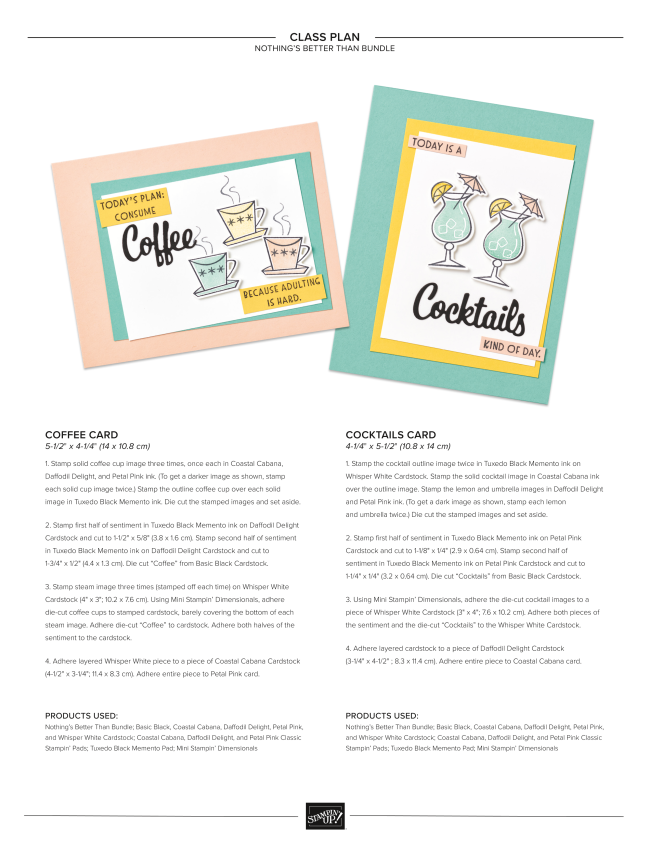
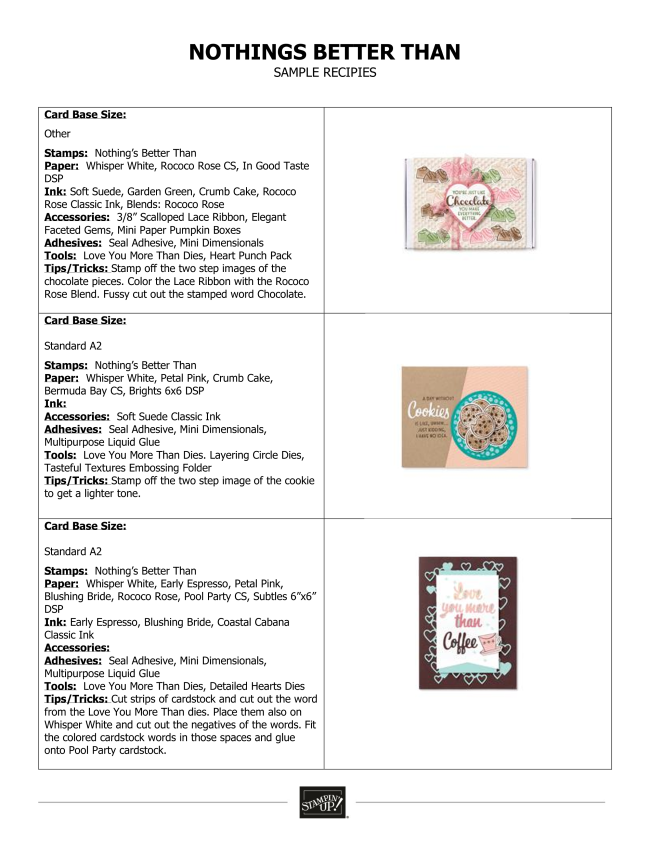
Nothing's Better Than ....

This bundle is so cute!  It was inspired by Connie Stewart who is one of Stampin' Up's Million Dollar Achiever.  I have seen some really cute cards with this set.


Tuesday, July 21, 2020

Beautiful World

Do you struggle when making masculine cards?  Well, I usually do.  BUT this stamp set that I just got is making the task much easier.  Check out Beautiful World on page 26 of the Annual Catalog.  Actually, the whole suite is amazing - the patterned paper, embossing folder, stamps, dies, trim and the foil sheets.  Check out these cards I made last week with this set.


This card is a semi-CASE that one of our NC demos (Lisa Tedder) did during last Saturday's NC Demos Stamp Along event.  I made my card in silver - the globe, silver mat, and "flag" pieces on the sentiment.  I used the die for the globe and backed it onto a Misty Moonlight circle.  I colored the ribbon with my Misty Moonlight SU Blend pen.  To make the silver mat on the card, cut out the center of the silver foil and save it for die cutting the globe and flag pieces (a savings tip!)  Take a brayer and ink it up with  White Shimmer Paint.  Roll it over the Dry Brush stamp (or the Birch stamp) so the shimmer paint covers it.  Lay a piece of 5"x 3 3/4" black cardstock over the stamp and rub to transfer paint onto the black cardstock.  Heat set.  Next I took my Aqua Painter and splattered watered down shimmer paint all over the black cardstock.  Assemble the card using Misty Moonlight for the base.  I embossed the sentiment in silver.  I think it looks sorta like the Milky Way!


This card was a little bit of an experiment.  I embossed a piece of Very Vanilla cardstock (2 1/2" x 5 1/4") with the World Traveler embossing folder.  This folder retired a couple of years ago and I never used it.  It is one of the reasons I purchased this stamp set - because I thought they went together well.  I used a sponge dauber to ink up the embossed strip - in Misty Moonlight, Crumb Cake and Soft Suede.  Next I inked the piece up with VersaMark and sprinkled Copper embossing powder over it.  I took a paintbrush and brushed away a lot of the embossing powder before I heat embossed it.  I tried to just accent the coast lines of the countries with the powder.  I mounted this piece onto Misty Moonlight cardstock.  The globe was stamped onto Very Vanilla cardstock.  I sponged a bit of Misty Moonlight and Crumb Cake over the circle.  The mat is Soft Suede which is stamped with splatters and embossed on the very bottom before adhering it to the Misty Moonlight card.


OK - this is a simple one but is very striking!  I used the retired World Traveler embossing folder and embossed a piece of copper foil paper.  I wrapped a piece of (retired) black ribbon around the copper piece and adhered it to a black cardbase.  I made a 2" tag in black and adhered one of the globes in the center.  I stamped the sentiment on a window sheet with Versamark, embossed it with copper powder and used the die to cut out the sentiment circle before adhering it to the globe.  


Another easy one!  The card is Very Vanilla with a black mat adhered.  Next is a piece of patterned paper that I found in my stash.  I sponged the edges with Soft Suede ink.  I used colored pencils to lightly color the globe.  The globe stand is copper foil paper.  The feather is stamped with black ink;  I used a yellow pencil to color the feather before using Wink of Stella on it.  It's hard to tell, but I stamped the sentiment on a clear window sheet and adhered it to the card.  The globe base and the inkwell are both on top of the window sheet.


This card actually looks like it is embossed but it is not.  I used the matching die and die cut 7 globes.  Before die cutting them,  I adhered them to a piece of Merry Merlot cardstock with the new (welcome back!) Adhesive Sheets (see them on page 162.)  Then it was easy to adhere them down to the 5" x 3 3/4" Merry Merlot cardstock.  I sprinkled gold Wink of Stella over the whole card.  The feather is embossed in gold and the little swirl is die cut from gold foil.  The tag for the sentiment is from the Tasteful Labels dies in Smoky Slate.

Wednesday, July 15, 2020

Picture Perfect Starfish

These are a few cards that Ashley made when she was here.  She used the starfish stamp from Picture Perfect (retired) with different backgrounds and embossing folders.  Makes you want to go to the beach, huh?  We are researching a possible beach trip at the end of August to Emerald Isle.  I haven't visited this NC beach before but one of the things we have to consider in our research is Corona-19 virus and how many cases the county has!  So far, Emerald Isle is our best shot with a low number of cases.  Let's just hope it continues!!


Friday, July 10, 2020

BLOSSOMS IN BLOOM bundle

Enjoy these cards using the BLOSSOMS IN BLOOM bundle!  
I LIKE YOU A LOT CARD

4-1/4" x 5-1/2"  

1. Stamp flower center image repeatedly in Just Jade ink around edges of Just Jade card front.
2. Die cut large flower pieces from Calypso Coral and Whisper White Cardstock; layer and adhere to stamped card front.
3. Stamp sentiment in Bumblebee ink on Whisper White Cardstock (4-1/2" x 1/2"; 11.4 x 1.3 cm). Notch left and right ends of cardstock and adhere to card front using Stampin' Dimensionals.
4. Adhere Flowers for Every Season Gems to card.

PRODUCTS USED:
Blossoms in Bloom Bundle; Calypso Coral, Just Jade, and Whisper White Cardstock; Bumblebee and Just Jade Classic Stampin’ Pads; Flowers for Every Season Gems; Stampin' Dimensionals
 
THINKING OF YOU CARD

4-1/4" x 5-1/2" 

1. Stamp images in Bumblebee, Calypso Coral, and Just Jade ink on Whisper White Cardstock (4-1/8" x 5-3/8"; 10.5 x 13.7 cm). Stamp sentiment in Just Jade ink on Just Jade Cardstock (2-3/4" x 3/4"; 7 x 1.9 cm).
2. Die cut flower pieces from Calypso Coral and Whisper White Cardstock; layer and adhere to stamped cardstock.
3. Adhere Flowers for Every Season Gems to stamped cardstock; adhere entire piece to Whisper White card.

PRODUCTS USED:
Blossoms in Bloom Bundle; Calypso Coral, Just Jade, and Whisper White Cardstock; Bumblebee, Calypso Coral, and Just Jade Classic Stampin' Pads; Flowers for Every Season Gems; Stampin' Dimensionals

Thursday, July 9, 2020

4th of July Lake Living

These are pictures I took when my daughter was visiting us.  Luckily, our boat was out of the shop by the time she got here.  It had been in the shop for about 3 weeks.  They had to order some parts and install them plus we were waiting for a new bimini top to arrive.  We were lucky and they all arrived the day before Ashley did!


Sunset on July 4th - waiting for fireworks to start.


Ashley enjoying her time off!


Our captain!


July 4th group selfie!


Friday night - we stopped by King Canary Brewery to have a beer after dinner at Flock.


My patriotic card I made for the 4th!  I used my SU Blends to color this DSP (Flowering Foil from Sale-a-Bration)


Wednesday, July 8, 2020

3 D POP UP CUBE CARD

What a great weekend I had!  Ashley was able to come for a visit!!  It was touch and go for a while, but she was finally allowed to travel.  She didn't find out for sure if she could come until late last Thursday so it was after midnight when she and Bogart arrived!  On Friday she and I played around in my stamp room after going to water exercise in the community pool.  Saturday we went out on the boat for a while and were able to watch fireworks on the lake.  Sunday we drove to Fort Mill, SC to get some peaches (Ashley's favorite fruit.)  On Monday, we did the water exercise again and played around with stamping some more.  Tuesday, again ... water exercise and back out on the boat for a couple of hours until it started raining.  The best thing that happened for Ashley on Tuesday was that she went to my hairdresser and got her hair cut and colored.  

Here are a couple of 3D cards that we made.  We watched a video by Debbie Henderson (on Facebook) to make this card.  It folds flat for mailing.

This one is Ashley's.  She used Seaside Shore (retired) and High Tide for her card.


Isn't it cute?


This one is mine.


I needed to put my birds up a little higher so they would show better.  I used Bird Banter for my card (retired)

So this morning when it was time for Ashley to drive back to Maryland, Bogart (her cat) was in his carrier .... until he saw Ashley with her suitcase heading toward him.  He quickly got out of the carrier and went into hiding.  We found him upstairs in one of the bedrooms hiding among the stuffed animal corner!  Can you spot him below?  It reminded us of ET when he hid in the closet among all the stuffed animals!


After Ashley got her hair done, we met Mom and Angela at an outdoor restaurant for dinner.