Wednesday, June 27, 2018

Graduation cards

I was busy last month making graduation cards.  Think I'm all done with that now and they are all mailed out so thought I would share.  I used a lot of retired DSP, punches and stamps in making these cards.


My cousin's youngest daughter graduated from nursing school and is now a full fledged nurse.  Way to go, Alex!


inside of Alex's card


My brother's daughter (my niece) graduated from high school in Charlotte.  She plans on going to community college for a year or two before leaving home and going to a 4-year college.


This one was my favorite!  My son's youngest (step) daughter graduated from high school in Alabama.  Cassidy has down's syndrome and has really accomplished a lot in her life so far.  I wish I could share their Facebook video of her graduation (but not sure how to do that!)  They held it in their backyard with family and friends.  It was so sweet!

Tuesday, June 26, 2018

My Stamp Club met last week and we made some fun cards.  You can sure tell it's summer time though - I had a really low attendance this month.  But we had a good time anyway!  Now I'm patiently waiting for some new products to arrive via Mr. UPS!!

Here are the cards we made using some new products and some that have been gathering dust on my shelf!


Supplies: 
Ø  Ink:   Grapefruit Groove, Smoky Slate, Blueberry Bushel, Granny Apple Green  
Ø  Cardstock:   Very Vanilla Thick CS    
Ø  Stamps:    Jar of Love 
Ø   Framelits – Everyday Jars
Instructions:
Ø  Stamp background jars with Smoky Slate.
Ø  Stamp the string around the jars w/Grapefruit Groove
Ø  Stamp 1 jar in Whisper White and die cut.
Ø  Stamp a bow w/Grapefruit Groove and die cut.
Ø  Stamp about 5 stems of leaves w/Granny Apple Green & die cut.
Ø  Adhere leaves to card with glue.
Ø  Stamp sentiment on Jar in Blueberry Bushel ink.
Ø  Use dimensionals to adhere Blueberry Bushel Jar to card.
Ø  Adhere bow to jar.


Supplies: 
Ø  Ink:   Blueberry Bushel, Highland Heather, Flirty Flamingo, Black, Granny Apple Green
Ø  Cardstock:   Thick CS, Whisper White, Daisy DSP (retired)
Ø  Stamps:   Love What You Do
    White Twine & Dimensionals
Instructions:
Ø  Cut 3 panels at 3” x 4 1/8” & 3 panels at 3 ¼” x 4 3/8”
Ø  Stamp the flowers on the 3 smaller panels.
Ø  Stamp “thank” on the bottom of one panel; Stamp “you” on the bottom of one panel in black.
Ø  Tie white twine around 3rd panel (that you did not stamp on bottom)
Ø  Mat the 3 panels onto the larger 3 panels with dimensionals.
Ø  Adhere strip of DSP in center of white card.
Ø  Adhere panels to card.


I love, love, love this stamp set!!
Supplies: 
Ø  Ink:  Black, Whisper White
Ø  Cardstock:   Thick CS, Rich Raspberry, Basic Black
Ø  Stamps: Serene Garden, Sheltering Tree (sentiment)
Ø  Framelits –Garden Scene Framelits
Ø  Subtle Embossing Folder
Ø  Stampin’ Blends
Instructions:
Ø  Emboss flower (framelit) in bottom corner of Thick card; fold in half
Ø  Stamp image onto White CS (using Stamparatus).
Ø  Stamp & Die Cut single flower and butterfly.
Ø  Use Stampin’ Blends to color all images.
Ø  Stamp sentiment onto Rich Razzleberry strip of cardstock with White Ink (Use Embossing Buddy FIRST)
Ø  Emboss sentiment and cut flag at end.
Ø  Emboss sentiment w/the new Subtle Embossing Folder.
Ø  Adhere butterfly, single flower & sentiment with dimensionals.  Layer onto black cardstock & then onto card.


We had trouble getting the sun out of the framelit without tearing it up.  I suggest when you use these framelits, you sandwich a piece of wax paper between the cardstock and the framelit.

Supplies: 
Ø  Ink:  Pineapple Punch, Blueberry Bushel, Lovely Lipstick, Pool Party
Ø  Cardstock:   Soft Sea Foam, Blueberry Bushel, Whisper White, Pineapple Punch
Ø  Stamps:  Swirly Bird, You Are My Anchor (April Paper Pumpkin)  
Ø  Swirly Scribbles Thinlets, Duet Banner Punch, Seaside Embossing Folder
Instructions:
Ø  Die cut swirly sun
Ø  Stamp swirl from middle of die cut swirly piece (sun) with Pineapple Punch (or for darker image, use Daffodil)
Ø  Emboss Soft Sea Foam panel with Seaside Embossing Folder & adhere to Sea Foam card
Ø  Adhere “wave” & sun to card.
Ø  On scrap white paper, stamp sailboat – cut out.  Adhere w/dimensionals.

Ø  On scrap white paper, stamp sentiment & use Duet Banner Punch.  Adhere with dimensionals.

Tuesday, June 19, 2018

More Swaps

These are the remainder of the swap cards I received.  Lots of ideas using some of the new stamp sets in the catalog!  My wish list keeps getting bigger and bigger!!!


Love this using Rooted in Nature - definitely on my Wish List!

Another stamp on my list.  The Handwritten background stamp (pg 172)!  Plus I love these new doilies.

I've already purchased the Lovely Floral Embossing Folder.  It goes with the What You Love Suite (p. 176-178).

Another card using the Lovely Floral Embossing Folder.  Is it on your list???

A great set - Hold on to Hope.  This set was carried over from the Occasions catalog.

Another one from my Wish List - Animal Outing!!  I have seen a lot of cute cards using this set.  The Layered Leaves embossing folder pairs with it well.

A beautiful card using Love What You Do.  I really like the new Detailed Trio corner punch.
I hope these cards have inspired you!  If you decide to purchase any of these items, please use my Hostess Code at the top left.  Thanks!

Thursday, June 14, 2018

Hawaii Pictures

As promised, here are a few of my Hawaii pictures.  I still have about half of them to go through!!

Ashley met us at the airport with lei's.  Mom loved it!  We had a little problem leaving the Charlotte airport though.  Mom doesn't have a drivers license, only a NC DOT ID card.  Well, it had expired - but we had not realized it.  Luckily, they let her through using the expired ID and her bank card!  Coming back home, the Hawaii Security didn't say a thing about it!  She was hoping she'd be stuck in Hawaii!!

Her first walk on the beach.  The water was pretty cold - I never got in past my waist.


It was really windy and the wind was bothering her hearing aids so she clipped the beach towel around her ears!

We had lots of good food in Hawaii!  This was our final night on the way to the airport - garlic knots and pizza!


These mai tai's were pretty strong!!


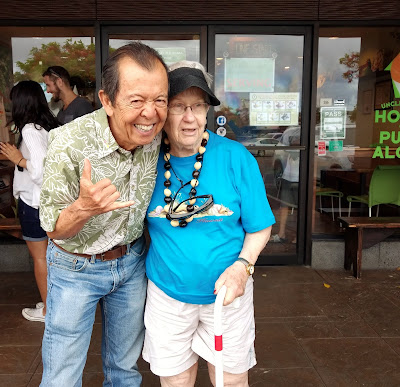
Mom had her first shaved ice at Uncle Clay's House of Pure Aloha.  This is her with Uncle Clay.  She told him to come to NC and open up a shop!!  He taught her to do the "shaka."


This was taken on Ford Island which is just across the bay from Pearl Harbor.  We went to Pearl Harbor first and watched the film before boarding a boat that took us around the memorial.  Unfortunately, we could not go on the USS Arizona memorial because of something being fixed on the ramp but we got a pretty good view anyway.

This is a banyan tree on Ford Island.  It is huge and I'm sure, several hundred years old!!!  


A selfie from Ford Island.  The USS Arizona Memorial is over Ashley's shoulder.


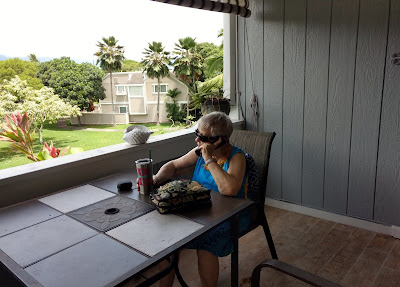
Mother spent most of her time in Hawaii sitting on Ashley's lanai!  She loved sitting out there - eating her meals, talking to her friends, playing with her IPad.  She wanted us to put a bed out there for her!


We didn't get many pictures of the 3 of us!


We went to a luau at the Hale Koa.  This was one of the fire dancers.


In Waikiki, there is an International Market with this statue of Don Ho.  


We had dinner one night at the Hula Grill in Waikiki.  This was our dessert - with a bowl of chocolate syrup on the side since Ashley does not like chocolate!!


We did a lot of eating!  This was at the luau.


Every good trip deserves a beautiful sunset!!

Tuesday, June 12, 2018

Swap Cards from 2018-19 Catalog!

Hi!  I'm back from Hawaii - returned last Friday.  Had a great time of course and I think my mom had the time of her life!  I'll be posting some pictures as soon as I get them (over 200!) downloaded and edited!  In the meantime, I participated in a NC Demos Swap and thought I would share the cards with you.


This is the card I made using the new stamp set, Love What You Do.  Other products used were:  Black, White and Pineapple Punch cardstock; Stitched Shapes, Flourish and Layered Circles Dies; Lovely Floral Embossing Folder, Old Olive Sheer Ribbon and a little pearl.


This card was made by Robin Purdum.  She also used the Love What You Do stamp set along with one of our new In Colors, Blueberry Bushel.

Isn't this flamingo so cute from Fabulous Flamingo (a two-step stamp)???  This card was made by Wendy Grover.  The leaves on the background are from Tropical Chic (I think!)  


Here is another beauty using Accented Blooms.  There was no name attached to this card so I can't give anyone credit for designing it.  This stamp set coordinates with the Tailored Tag Punch.


This card was made by Barbara Hansen.  She used a piece of the Specialty DSP, Share What You Love.


I love this Lemon Lime Twist card made by Jennifer Granstrand.  The products she used are: Detailed With Love stamp; Blackberry Bliss, Lemon Lime Twist, Whisper White and Vellum paper; Seaside Embossing Folder; Silver Edged Ribbon; and Rhinestones.

These are just a few of the great cards I received in the swap.  I'll be back later in the week to share the rest of the cards.

Sunday, May 27, 2018

NC Blog Hop - All About Storage!

Welcome to the NC Demos monthly blog hop.  I think you will like the topic this month!!  I am hoping to get some tips from my fellow NC demos!

Storage .... everyone's dilemma I think!  My daughter will tell you that I'm constantly rearranging and figuring out the best way to store all my stuff (and believe me, I have a lot! )  As crafters, we seem to accumulate soooo much!  And if you are like me, you don't want to part with anything!  Who knows when it will come into fashion again!  My craft room is made up of furniture that I have obtained from a variety of places!  My crafting desk is a wire basket system that my daughter had when she was in high school.  When she went away to college, my son inherited it.  When they were both gone, it came into my possession and has served me well over the years.  Along the back of the desk, I have a couple of plastic storage pieces that I recently got when our local craft store went out of business.  It holds my black and versa mark inks, blendabilities (in stamp boxes), and various items I use on a daily basis.

Next to my craft desk is my computer table which is a 5 foot long table that my husband had in his office before he retired.  It is usually pretty covered up with bits of paper, catalogs, cards, etc.  That is where my computer sits.  Underneath this table I have a couple of Iris carts with drawers holding watercolor paper, glimmer paper, catalogs, 12 x 12 paper, etc.  On top of the table, at the back, is my pride and joy - my stamp pad holder.  My husband made this for me about 12 years or more ago and it is great.  There is a place for all my ink pads (current) with the reinkers right next to them.  I have them arranged in color families - In Colors, Brights, Regals, Subtles and Neutrals. There is one section left that I have retired ink pads in - unfortunately, I need more space for them!


But I have a solution!  My husband got a drawer from the hardware store, notched the sides and glued thin wood into the notches so they would hold ink pads.  He also made a cover that would slide thus closing the drawer.  So, if you needed to take your inks with you to a crop, etc. this would make it easy.   I use it now just for my retired inks.


Next is storage for stamps and dies!  I have a shelving unit that I use to store my stamp cases.  Right now, I have more retired stamps than current!!  I usually keep the retired stamps (that I haven't sold) on the right side of the unit and the current stamps on the left.  I have to make more room on the right side now though!  I just stand them up so I can read the titles and put them in alphabetical order. I store matching dies/thinlits inside the matching stamp set.  I put a stickered circle on the outside of the stamp case if they have thinlits or dies that match the stamp and how many thinlits are in the case.


My punches (current and retired) are kept on Ikea rods.  I have run out of room and not sure what I will do next!


I have been using my Paper Pumpkin boxes for organization too and they work great!  I just turn them inside out and I am able to write on the outside of the box the contents in each box.  I was accumulating so many of the boxes I didn't know what to do so I was really excited to do this.  I have boxes of reinkers; the small uninked ink pads; sheets cut for the inside of my cards; pearls, rhinestones; etc.


My newest storage hack has just happened.  I have been a Paper Pumpkin subscriber for several years and found I was not using the stamps that came in the kits because I didn't know what they were.  I had been throwing them in one of the Paper Pumpkin boxes that I showed you above but not labeling them.  Well for the past few weeks, I took care of that.  I researched to find the month, year and name of each Paper Pumpkin stamp set.  (I called Stampin' Up for this info and found that they could only give me the previous year.)  Yes, I know the info is on the little sheet that comes with the kits, but I only started saving those sheets last year and I have kits from 2014!  I cut cardstock 4" x 5 1/4" and put that inside one of the clear envelopes that SU sells.  Then I slid the stamp set in and using my Dymo Labeler, I labeled each of the stamp sets.  I had a basket that I wasn't using and they fit nicely in it!  Now when I get my Paper Pumpkin, if I am not ready to make the projects, I just put it in the basket until I have time to do it.  In organizing these stamps, I realized how far the Paper Pumpkin kits have come.  I had a few sets from 2014 and 2015 and they were pretty basic.  I am so glad SU has stepped up the Paper Pumpkin kits.  I love getting that little surprise each month and sitting down and figuring out what alternative projects I can make with it.  And when I travel to Hawaii to visit my daughter, these are so handy to take along and work on them on the plane or at her house while she is at work.


I just completed one of my favorite Paper Pumpkin sets, Wildflower Wishes from this past February.  If I hadn't organized them, I wouldn't be able to tell you the name of the kit or the month and year!!


I hope I have given you a little help toward organizing your stamp room.  Seems we all can use just a few good ideas for storage!  Thank you for joining me this month.  Now, hop on over to the next blog and get more storage ideas!!

Toni Campana -


Sharon Maranich - You are here!

Frances Wagner