Showing posts with label Swaps. Show all posts

Sunday, July 7, 2013

My Convention Swap

I think we may be building an ark here soon if this rain doesn't let up!  It has rained the whole week.   But that has given me a good shot at staying inside and working on my swaps for convention (which is next week!!)  We went to the movies on Thursday, the 4th and saw The Heat.  I really liked it and got a few good laughs in but I'm a big Sandra Bullock fan.  I heard some people complain about the language (the "F" word was used a lot.)  But it didn't really bother me.  I don't use that word and don't like to hear others use it, but I'm not a prude about it either.  I think we may go see White House Down this afternoon in between the rain drops.

Here is the card I finally chose for my organized swap at convention.  I had to make 40 of them and they had to be something for the month of January.  My hopes of doing a snowman card was dashed when Stampin' Up did not include any of them in the big catalog.  So I borrowed Zoo Review from my downline and made this card.  It turned out pretty cute.


The sentiment is from Chalk Talk (pg 12) - probably my favorite set in the catalog!  It's hard to see but I put a bit of Dazzling Diamonds right under the bear's paws.

Well, back to the drawing board - I have more swaps to make that I will be sharing with you soon.

Friday, July 13, 2012

Clear Mount Stamp Tips

These guides are great for your clear blocks!    They come in two 8-1/2″ x 11″ sheets. You can use them on any of  your clear stamping blocks to help your postilion your stamped images perfectly.

They are reposition-able and washable. The guides include eight die-cut guides sized for blocks, D, E, F, H, and I, and three guides you cut to customize.

Straight, angled, and curvy lines on the guides help you easily line up sentiments, images, and repeated patterns.  I remove the guides and wash them with the blocks in dish soap. Then I rinse them and dry them and position them back on the blocks. They cling beautifully and the stamps cling to them beautifully too.
They are especially great with words.  Place the stamp on a line on the block and when you stamp, use the lines on the block to line up the bottom and sides of the card stock for great placement every time.
It’s easiest to attach the guides to the bottom of the block and then attach the stamp to the bottom – this avoids distortion. The greatest thing to do is use them for lining up two or more stamps on the same block together! They are easier and faster than the Stamp-a-ma-jig (although the Stamp a ma jig is one of my favorite tools.).   A Must Have!

Item # 121785 – $5.95 – you can order yours now!

Some customers have complained that the Cling Mount Stamps do not cling well.  Here is my solution to that:
 
1) make sure your blocks and the back of the stamps are clean. After using them frequently, you will get body oil on the surface and this reduces the cling. Just use the Stampin’ Scrub to clean the blocks and the backs of the stamps. You can also wipe them with an ALCOHOL FREE baby wipe or a damp cloth dipped in dish soap. Be sure to rinse the soap off the blocks or stamps before using.
2) Huff on the back of the block before sticking the stamp onto the block. This will create a layer of moisture to help seal the two together.
3) Place the stamp face down on the work surface and the place the block on top of the stamp and press gently, holding for a second or two. Pick up the block and press on the side of the stamp to make sure they are firmly attached together
4) When using a large stamp or when using Versa Mark or Craft Ink change the way you ink the stamp. Place the block on the table with the stamp face up. Hold the stamp pad in your hand and pounce it on to the stamp. This works great, also, to make sure that you are getting full coverage on the large stamps.
I seldom have any problems if I follow the steps above. BUT, there’s always an exception so here are two more tips that will solve the problem.
5) Rub the stamp and or the block on the back of your sleeve or pant leg to build some static electricity before attaching them.This really helps if the block is cold.
6) You can use a very light layer of Tombow glue (or Aleen's Tack It Over and Over) on the back of the Stamp – let it dry and it will be very tacky – It will stick perfectly.


So now that you know how to work your clear mount stamps, how about a card?  Marianne and I are going to Greensboro tomorrow for a NC Demos Non-Convention Goers gathering.  There will be 12 of us there and we are going to all do a Shoebox Swap.  Here is the card I am doing:


 I tell you, I am in love with the Postage Due stamp!!  This time, I stamped it in River Rock.  I just realized that I did not post the card with the latest changes.  I punched out the sentiment "Sending You Love" with the Itty Bitty Banners die (stamped using Cajun Craze ink) and adhered it in the top right.  I also stamped one of the postage stamps in Cajun Craze too to add a little pop to the card.  The other stamp is in Always Artichoke.

Marianne is doing a really cute card using the Petite Pocket Die.  I'll snap it tomorrow to share with you.

Well, better sign off and head on in to bed.  Marianne's already in the guest room asleep.  Sammie does not know what to do.  She usually sleeps in that bedroom on the twin bed closest to the window.  She sleeps on a pink blanket that I have folded up on the bottom of the bed and I noticed tonight that it is practically black from her fur!!  She keeps wandering in and out of the room where Marianne is but now she has settled outside the door.  At night, she starts out sleeping in our bedroom but leaves sometime during the night and I think goes in the guest room to sleep.  Who knows where she will end up tonight?!

Tuesday, September 27, 2011

Card Shares

I've been trying to go through some of the swaps I received this summer - from Quarterly, Regionals and Convention!  They are getting a little overwhelming!  Thought I'd share a few with you this morning.


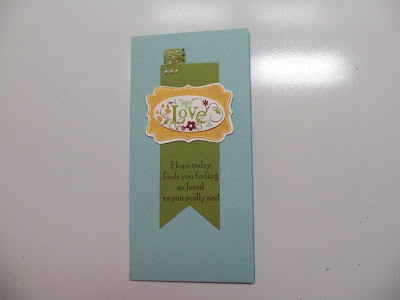
 This is a card that we made at SU Regionals in August.  It uses the frame from Four Frames (pg 141).  This is embarresing to say but I can't tell you where the "love" stamp comes from.  I have looked in the catalog 3 times and can't find it.  If you find it, leave me a comment and let me know!!

EDIT:  Found the stamp set!  It's in the mini catalog on page 40 - You Are Loved.  So pretty!

 This card is a double easel card (see below).  It uses Up, Up & Away (pg 63) and bright primary colors.  The clouds are sponged on for the background.  A great card!!


 Another cheery card using Pennant Parade (pg 69).  I have seen so many great cards using this stamp set.  You can make Christmas trees, party hats, ice cream cones, banners, etc with this set.  It is very versatile.
A punched flower - so simple but looks great.

Another card using the Pennant Parade set.

A pretty card using Aviary (pg 83).  This is another set that I have seen used in different ways to make a WOW card.
 Hope you have enjoyed these cards and have gotten some ideas for your own card making.

Wait till you see my Halloween card tomorrow for the Stamping Queens challenge.  I made it with MDS and I love it!!

Monday, September 19, 2011

Final Swap Share

The last of my Mini Catalog swaps:
 
I love this one!  It uses the new stocking die and the Big Shot.
 

This is one of my favorites!  It uses the DSP Frostwood Lodge and the Stocking punch and stamp set.

Always Thankful  - a good set if you enjoy watercoloring.

You Are Loved stamp set (pg 40)

Isn't this pretty?  It is Comfort & Joy and is embossed on vellum.
 I have got to get back in my groove!  I actually made a card today for a friend's birthday - a little belated BUT I fogot to take a picture.  I got a box today from Mr Brown full of goodies from the mini catalog.  Can't wait to make a few cards and share them with you.  But first, I have a major clean-up to do in my room.  It looks like a tornado hit!

Sunday, September 18, 2011

Home Again, Home Again, Jiggity Jog

Well, we finally made it back home.  We left the Mobile, Ala. area around 10 CST Friday morning and rolled in to our driveway a little after 10 EST. Didn't even stop for dinner!!  Not my idea .... I suggested stopping in Greenville, SC for the night but since that was only a little more than 2 hours away from home, Sonny wanted to keep going and sleep in his own bed.  I must say, our bed did feel good!!  The worst part of the trip was that we hit Atlanta at 5:15 so it took us over an hour just to make it through Atlanta traffic.    Yesterday was spent just unpacking and getting caught up on mail, e-mail, phone calls, etc.  Today we headed out to Big Al's to watch the Steelers dominate the Seattle Seahawks.  After last week's devastating game, today's shut-out was quite a victory.  And to make it even better, we watched the Baltimore Ravens get defeated by Tennessee.  (Baltimore clobbered us last week so it was sweet revenge!)

Now I am in the process of getting ready for my stamp clubs Tuesday and Thursday.  I'll be sharing those cards soon.  In the meantime, here a more of the swaps I received.


I can't imagine doing all this cutting for a swap!!  A lot of work. 

This is the card closed.


Thursday, September 15, 2011

More Mini Swaps

I retook (is that a word?) the pictures of the card swaps and this time got them to load.  So .... I've got more swaps to share with you from the mini catalog.  (Happy, Margaret?) 

I can't tell you all the stamps that are used in each card because I don't have my catalog with me.  I just tried to download it but it is too slow with the hotel internet connection.  But, I'm sure you have your mini and can tell which set was used!

This one uses Pumpkin Pie, Black (embossed with spider web folder) and glossy white.  The white circle is embossed with the single stamp (Haunted Forest) from the back of the mini catalog.  This is a great way to get a Halloween stamp if you don't need a whole Halloween set.

This is the single Halloween set again with the Halloween DSP.  It is stamped and embossed with black onto Vellum.

Another card with the single stamp .... how versatile this stamp is!  This time the Pumpkin Pie piece is torn into a shape and the Happy Halloween is stamped onto white and torn.  Love the bling on the "o" in Halloween!
A Thanksgiving card this time!   It looks like the rectangle panel was stamped with bleach
We left New Orleans this morning after having our beignets and cafe au lait at Cafe DuMonde - oh so good!!  We only drove a couple of hours to Biloxi and stopped at a casino there.  It's been a long time since we have done that - the economy has not permitted it mostly!!  But, we both did ok in just a couple of hours.  We didn't break the bank, but I sat down at the Black Jack table with $60 and walked away with $90 and Sonny came away making $50 more than he started with.  Not bad for two hours time!!  Our plans were to drive on to Mobile and spend the night.  When we got close to Mobile, we took a little detour toward Dauphine Island thinking maybe we'd find a place to stay near the water.  While the island was picturesque, there weren't any hotels (that we saw).  But then we saw a toll ferry that would take us to Gulf Shores.  That is where I wanted to go anyway.  When our children were pretty little, we took a very memorable vacation there with my sister and her family.  So, we got in line for the 6:30 ferry.  Around 6:10, they informed us the winds had picked up too much and they were canceling the ferry!  So, it was back to Mobile to find a hotel.  After our dinner, we came back to our room to relax.  Well, Sonny did walk over to a bar next door but quickly came back since they were having "open mic night."  This is what he is doing while listening to O'Reilly:


Sunday, September 11, 2011

Mini Swaps

I actually have a few cards to share with you today!  I participated in a Mini Catalog Swap and had the cards mailed to me here in San Antonio.  They arrived Saturday and I have taken pictures so I could share!  I haven't ordered any goodies from the mini catalog yet and after seeing all these great ideas, I am ready to order, order, order!

This one uses Christmas Lodge stamp set (pg 29) in Pear Pizazz.  There is also a bit of  the new Dazzling Details on the roof of the lodge.  The bottom portion uses the new Snow Burst embossing folder.

I can't wait to order these stockings!  This stamp is the Stitched Stocking punched out with the new Builder Punch (pg 34).  The colors are Lucky Limeade, Cherry Cobbler and Silver.  There is a cute little jingle bell hanging off the stocking.  You can purchase then from the mini too (pg 30).


This fall card uses the Gently Falling set (pg 16-17) with Concord Crush, Cajun Craze, and Garden Green.  Love the ribbon!!

Another card using Gently Falling - this is a very popular stamp set!  The colors used on this one are Cajun Craze, Very Vanilla, More Mustard and Early Espresso.  She also used the Houdstooth embossing folder (inking it).
This card uses Festive & Fun, a very versatile holiday set as well as Every Little Bit stamp set.  The colors on this one are Tangerine Tango, So Saffron, Concorde Crush and the In Patterns DSP.  Such an easy card to make but a great one!

Now I have to make my list!

Thursday, August 18, 2011

Swap Cards for Charlotte Regionals

I am going to Stampin' Up Regionals this weekend in Charlotte.  We are able to take a guest so Marianne is going with me.  We are going to drive down tomorrow evening and stay at the Hilton so we don't have to fight looking for a parking place Saturday morning.  Also, a bunch of NC demonstrators are also going to be downtown Friday night and we are meeting up with a group from Wilmington for dinner.  So it should be fun!  Marianne came over a couple of weeks ago and we worked on some cards to swap on Saturday.  Marianne used Snow Much Fun for her swaps.  I am doing 3-4 different designs and taking about 40-50 cards with me.  Here are a couple of the cards that I will be swapping:

 This car uses the wonderful Fabulous Florets stamp.  I stamped directly on the DSP except for the topmost flower which I stamped and cut out.

 This card was different for me.  I stamped the Medallion stamp with bleach - I actually used a Bleach Pen - onto the Crumb Cake cardstock.  Every one of them came out a little different.  Then using Elements of Style, I stamped the swirls with Versamark and embossed them.  This one is embossed with Gold Embossing Powder.

 These cards are similar to the one above it.  I stamped the bleached Medallion onto Chocolate chip paper and embossed the swirls with Black.

Here is one I embossed with Silver Embossing Powder.

Friday, July 8, 2011

Convention Swaps

I have been busy getting my swaps together for convention.  Next week this time, I will be there!!  Can't wait!   I've only been to convention once before - back in 2006 - just a year after I started with Stampin' Up.  So, I am looking forward to seeing all the changes that have been made since then.

I have signed up for just two organized swaps - one is for just 11 cards and the other I have made 50 cards to swap out.  The rest of the cards - about 50 - I will just use for general swapping on the floor of the convention.  So, I will be coming back with a lot of new ideas and samples!!

I love this snowman!!

Recipe:
Stamp:  Snow Much Fun
Paper:  Night of Navy, White
Accessories:  Markers, Dazzling Diamonds

This is one of the cards for the general swap.  I ran the Vellum through the Big Shot with the Dotted embossing folder (stamp the sentiment first!)

Stamp:  Vintage Vogue
Ink:  Calypso Coral, Tempting Turquoise, Old Olive

Tuesday, June 21, 2011

Swap Cards

I played a new game yesterday - well, sorta new to me anyway.  It was Duplicate Bridge.  A friend asked me to "sub" at her house and I didn't realize that was what they were going to play.  But, it was ok.  Duplicate Bridge is played just like regular bridge for the most part.  The scoring is different.  It was fun - you play a set hand and then the other table also plays the same hand so you can see how others win or lose the hand.  I was the third highest score so not so bad!

I have been working on swap cards for Convention.  I have signed up for 2 organized swaps and then I want to have other cards to randomly swap during the convention. 

 This is the card for the Fun Fold Swap.  When you pull on the Melon Mambo strip at the top, the inside card comes out like this:


RECIPE:
Stamps:  Flower Fest, Upsy Daisy (sentiment inside)
Paper:  Melon Mambo, Wild Wasabi, Whisper White, Pink Pirouette, Daffodil Delight, Beyond the Garden DSP
Ink:  Black, Melon Mambo
Access:  White Grosgrain Ribbon, Dimensionals, Crop-a-dile

 This is for a swap that you have to use a new stamp set.  This one was available to demonstrators for a sneak peek.  It is the only one I bought but it is the cutest!!  Love the snowman!  The little border sticking out at the top and bottom of the snowman is from the Triple Layer Doily Punch.  I cut it in half and am going to put a pearl in the center (forgot to before I took the picture!).  I have to admit I used two colors that are not my favorites - Garden Green and Poppy Parade.  They look good together but I just don't ever use these two which is why I picked them for this swap!

RECIPE:
Stamp:  Snow Much Fun
Paper:  Garden Green, Poppy Parade, Whisper White
Access:  Markers, Black Ink, Poppy Parade Stitched Poly Ribbon, Northern Flurries Embossing Folder

I have done several of these cards to give out for general swaps.  There is a Vellum overlay over a white card.  I stamped the leaves from Fabulous Florets on the white card and stamped the flowers on the Vellum.  To hold the vellum to the white, I strategically placed glue dots on the back of the vellum on the flower centers.  And then the ribbon held it all together.

RECIPE: 
Stamp:  Fabulous Florets, Tiny Tags
Paper:  Cajun Craze, Vellum, Whisper White
Ink:  Old Olive, Cajun Craze
Access:  Always Artichoke Ribbon Binding, Jewelry Tag Punch

AND .... I have a retiring stamp set for my monthly give-a-way.  Don't forget to leave a comment if you want a chance to win the cards I am featuring this month!!
 RECIPE:
Stamp:  Forest Friends, Watercolor Trio (sentiment)
Paper:  Whisper White, Bravo Burgundy, Retired DSP
Ink:  Espresso, Garden Green
Access:  (non-SU) Ribbon, Small & Medium Oval Punches, Oval Nestabilities

I just finished talking to Ashley on Skype and she is leaving her temporary base tomorrow via helicopter and returning to Maraz where she has at least 3 packages waiting for her!  She needs to start packing up for her return home!!!!  So excited!

Tuesday, April 19, 2011

Quarterly Swaps

The Quarterly swaps were, as usual, inspirational!  I always come away from Quarterly with so many good ideas.  This time was no exception.

Here are the cards I received in the Spring Swap:  A lot of them use items from the upcoming Summer Mini Catalog so you are getting a Sneak Peek!!  (I've identified the creator if I know them - a lot don't sign their work!!)

Travel Log stamp (Summer)  By Jeria

Dogwoods

The Open Sea stamp plus Nautical DSP - summer mini (by Janie)

Bold Blossom stamp (summer mini) 

Flower Garden Embossing Folder (summer) plus Beyond the Garden DSP (no name but I think it was Danielle's)

Strength & Hope (summer mini) by Tina

Bold Blossom (summer) 

New Triple Layer Blossom Punch (Nicole)

Easter Blossoms (Martinette, I think)

Sew Suite (Alana)

by Becky
I'm off tomorrow to meet an old high school friend for lunch.  We are going to meet at 131 Main Restaurant in Cornelius.  I'm looking forward to seeing Judy.  In the 5 years I've lived here, we've only gotten together twice.  That's pretty bad!  She just lives in Charlotte but she has 5 kids and several grandchildren and still works.  So, her time is pretty tied up.  We have known each other since 4th grade!!