Showing posts with label shoebox swap. Show all posts

Tuesday, February 4, 2014

Shoebox Swap Cards

A few more of the Shoebox Swap cards to share -

An easy Valentine using punches and/or Heart framelits

Starburst Sayings was the theme of the day I think!

Starburst Sayings!

Another Starburst Sayings!


Monday, February 3, 2014

Love You to the Moon


Hope your weekend was a good one like mine was.  Saturday my two downlines (Marianne and Debbie) and I went to a Shoebox Swap at another demo's home in Conover.  There were 14 of us there and we made some great cards.  I got so many good ideas for stamp sets in the Occasions and Sale-a-Bration catalog.  I will be posting them in the next week. 

These are the cards that Marianne and Debbie made.

Marianne - Vivid Vases from Occasions catty
I just love the saying "Love You to the Moon and Back."  I haven't decided if I'll get this stamp set but I do love this particular stamp for it's saying.  
Debbie - Love You to the Moon = Occasions catalog


After the Stamp-a-Stack, we met the family for Angela's birthday dinner at Sagebrush in Mooresville. 


Sunday I did a little house cleaning in my stamp room.  I worked on a few projects that I have had for a long time and just decided to put them together.  Not sure what I will do with them but they are made anyway!  Sonny and I watched the Super Bowl.  I was sure surprised with how badly Denver played.  I thought it would be a close game with the winner being determined in the last few minutes.  Boy, was I surprised!  I was pulling for the Seahawks even though I picked Denver to win in our football poll.  Saw a stat that said Denver has now lost more Super Bowls than any other team in history.   I didn't even win any of the Super Squares and had some good numbers.  I wasn't very impressed with the commercials this year.  Loved seeing the Budweiser and Coke commercials and my man, Bob Dylan in a commercial.  Lots of car companies this year.


View image on Twitter
Thought this was cute - with the white Bronco (representing Denver) being chased by the Seahawks!  Reminiscent of the O J Simpson chase many years ago.


Thursday, September 19, 2013

Shoebox Swap Cards

Here are some more of the cards I made at the Shoebox Swap at Allison's (who likes to see her name on my blog!!) shoebox swap.  I have been sharing them this week with my Stamp Club gals.  It's great to have these cards to share .... that way I don't have to buy all the sets!  (I try to anyway though!)

I'm not sure if I remember who did which card but I am going to try.  (Allison - let me know if I get one wrong.)

Good color blocking and using different embossing folders on Sharon Measmer's card.

Using the Chevron Punch and Expressions Thinlits Dies (pg 36 - holiday mini) Belinda made this colorful card.

Creative way to make a wreath - Sharon Measner used the flower from Betsy's Blossoms (pg 87)!  Great card!

A great fall card by Allison.  She used Pretty Prints embossing folder, Expressions Thinlits and that great burlap ribbon.

I think this was one of Allison's cards (??)  Great use of the single stamp on pg. 23, O Holy Night.


Love this punch art bat!!  Kathryn made this great Halloween card.

Monday, September 16, 2013

Winning Shoebox Cards

I have a few cards to share with you today!  Marianne and I went to a Shoebox Card Swap last week at Allison Barber's home.  We had a great time visiting with the gals and making the cards.  Everyone did 3 shoe box swaps so we got a lot of new ideas.

My swaps hit all the upcoming holidays - Halloween, Thanksgiving and Christmas!  I have already shared my Halloween card so here are my other two:

This card is very simple to make but it packs a "wow."   For the Christmas card, I used the stamp set, Joyful Christmas from the mini catalog.  I embossed the poinsetta on the Vanilla card stock with Cherry Cobbler embossing powder.  I stamped a second poinsetta and cut out the middle part of the flower and attached it to the embossed flower with a dimensional.  The sentiment is from the same stamp set.  But my favorite part is the Frosted Finishes Embellishments in the center of the flower (pg. 28 from Holiday Catalog).  They are gorgeous rhinestone embellishments!! 

My Thanksgiving card has lots of textures to it.  I embossed the Crushed Curry card stock with Stripes Embossing Folder in both directions to create the plaid embossed effect.  The DSP on the bottom is from Sweater Weather with a small strip of Cajun Craze to separate the two pieces.  They are layered on a Chocolate Chip card.  I stamped a Vanilla rectangle with the background from Truly Grateful (after stamping off once.)  Then I stamped the wheat in Chocolate Chip and used different markers - Crushed Curry, Cajun Craze, Choc. Chip to color in the wheat.  I matted this piece onto Chocolate Chip and Cajun Craze.  I stamped the "Happy Thanksgiving" (Tags 4 You) in Choc. Chip ink onto Crushed Curry card stock and cut it out.  (There is a punch for this set but I haven't purchased it yet.)  The final touch was to add a little of Gold Glitter to the wheat using my Two-Way Glue Pen.

Allison asked her neighbor to come over and judge our cards and pick a winner.  Well, guess what???  My Thanksgiving card was her choice!  I was totally surprised!  Allison gave me a super prize that I want to CASE.

Isn't this a great decorated note pad and pen?  I don't want to use it and have to mess up that stamped front page!

This is a coaster.  She covered a tile with Eastern Elegance DSP.  It is really cool!

Tuesday, July 2, 2013

More Swap Cards

I have more swap cards from Saturday to share.  They were all so good it would be hard to pick a favorite.  But while we were eating lunch, Allison had her neighbor come over and pick her favorite card.  It was fun even if mine didn't win.


The sentiment above comes from Hello Lovely (pg 22).  It is one that I will be gettingfree  at convention!  I love the color combo of this card.

This is a great new single stamp - Five Way Flower (pg 85) that coordinates with3 of the Scallop Circle Punches and the small flower punch in the Itty Bitty Shapes Punch Pack.  But my favorite is the little strip on the side.  We made that by stamping the flower stamp onto a tiny strip of card stock - creating our own DSP!!  Cool, huh?

A bright and fun card.  This card used Create a Cupcake and the new set, Label Love (pg 33) along with the cupcake punch.  Another great color combo.


Sunday, June 30, 2013

Swap Cards

Another busy weekend for me.  We went to a 70th birthday party for our friends on Friday night.  It was a lot of fun and I had my dancing shoes on!!  I was kinda the official photographer - at least that's what everyone thought!  I took pictures the whole night of the party and I am going to make a scrapbook for them with MDS.  I decided that would the best gift I could come up with - what do you give people when they get to a certain age and don't want to collect anymore "stuff"!!??

On Saturday, I went to a shoebox swap over in the Kannapolis/Concord area - about an hour from my house.  We were to take three shoebox cards for everyone to make.  Well, I got my cards ready a couple of weeks ago and put sticky notes on the outside of the boxes to make sure I didn't forget to put all the supplies in since I was still using the ink, stamps, etc.  Well, guess my sticky note system was not the best!  I felt like an idiot and left 2 of the stamp sets out!  Luckily, Allison (whose home we were in) had Mosaic Madness so I borrowed hers.  Midway through doing the cards, I discovered that Karen and I had done almost the same card as the other one I'd forgotten so they were able to use her set to make my card also.  Guess we CASE'd the same person!!

This is my card in Basic Gray and Pool Party using Oh Hello with a clay button.  I used the Pool Party Core'dination card stock and sanded the embossing

This is Karen's card in Blushing Bride and Soft Sky.  I guess great minds think alike (or in this case, CASE alike!)

This is another one of my cards - I remembered all the parts for this one!  I made the Strawberry Slush circles by using a piece of the rubber that popped out of one of the stamps in Chalk Talk - a great recycling tip!  I used the Chalk Talk Framelits and stamp set for this card. 
Stay tuned - I'll be sharing some of the other great cards later in the week!

Tuesday, July 17, 2012

Shoebox Swaps

Today is the day when the annual flight of the Stampin' Up demonstrators begin to flock to Utah for Convention. This year I am not among those winging their way to the Salt Palace. (boo hoo)  I will try not to whine too much since it was a choice I made.  I hope to go next year though!   Instead I will try and console myself with stamping and being productive.  My friend and roomie from last year is going to convention tomorrow.  She has busted her butt this past year building her business and I think it will pay off for her.  She has earned the trip to Fuji!! plus she told me she has gotten a couple of letters from SU that she has earned rewards this year and will be walking on stage.  I can't wait to hear what she is being rewarded for.

In the meantime, here are a couple of the Shoebox Swaps I did last Saturday.  Even though we only paid $5 for the event (plus gas & lunch), this swap is going to cost me.  We used several stamp sets that are now on my "must have" list.  This next one is one of them.  It is also on Marianne's list too.  We both love this card.


Shape Card Open (by Kathy Hunt)

Shape Card closed.
We used the Labels Framelits and the Big Shot to create the card.  The back piece is creased so it will open easily.  But the stamp set is what I love.  It is Stippled Blossoms (two step stamp).  We stamped the outline image in full strength Primrose Petals and the inside image in Primrose Petals that was stamped off.  The green leaves were done the same way.  The sentiment is Perfectly Penned - another great stamp set. 

Thoughts and Prayers by Amy Pennell
Luckily, I have this stamp set .... Thoughts and Prayers.  But I don't have the Apothecary Framelits!!  (on the list though.)  We punched out the flowers with the Itty Bitty Shapes Punch Pack with a tad of glue in the center and glitter.

Monday, July 16, 2012

Petite Pocket Die Card

Marianne and I had a great time in Greensboro Saturday at the Shoebox Swap.  We made 12 great cards and enjoyed the fellowship of some great ladies.  We left the house bright and early Saturday morning and got to the Shoebox Swap right at 9 a.m. - just in time! 

This is the card that Marianne created.  I was so proud of her!  She made her decision super quick Friday night.  It usually takes her forever to make a decision on what to create but this time, it didn't.  She used the Petite Pocket Die on the card.  This would be a great card to slip a gift card in or just a little note to slide out.  The cute flower is from Button Buddies and she used one of the new Dahlias for the center.


Ingredients:
Cardstock:  Elegant Eggplant, Wild Wasabi, White, DSP In Color Patterns Stack
Ink:  Versamark, Wisteria Wonder
Access:  Petite Pocket Die, Elegant Eggplant Dotted Ribbon, Bird Punch, Dahlias, Scallop Punch, Corner Rounder

After I played bridge today, I stopped by Mom's to pick her up and take her to Physical Therapy.  I was so happy to see how good she was doing.  Maybe we have turned the corner on her back stuff.  She has slacked off a lot on her pain pills and she wasn't using the walker!  Hip Hip Hooray!!  Her birthday is next week so maybe this is a big gift for her!

Friday, July 13, 2012

Clear Mount Stamp Tips

These guides are great for your clear blocks!    They come in two 8-1/2″ x 11″ sheets. You can use them on any of  your clear stamping blocks to help your postilion your stamped images perfectly.

They are reposition-able and washable. The guides include eight die-cut guides sized for blocks, D, E, F, H, and I, and three guides you cut to customize.

Straight, angled, and curvy lines on the guides help you easily line up sentiments, images, and repeated patterns.  I remove the guides and wash them with the blocks in dish soap. Then I rinse them and dry them and position them back on the blocks. They cling beautifully and the stamps cling to them beautifully too.
They are especially great with words.  Place the stamp on a line on the block and when you stamp, use the lines on the block to line up the bottom and sides of the card stock for great placement every time.
It’s easiest to attach the guides to the bottom of the block and then attach the stamp to the bottom – this avoids distortion. The greatest thing to do is use them for lining up two or more stamps on the same block together! They are easier and faster than the Stamp-a-ma-jig (although the Stamp a ma jig is one of my favorite tools.).   A Must Have!

Item # 121785 – $5.95 – you can order yours now!

Some customers have complained that the Cling Mount Stamps do not cling well.  Here is my solution to that:
 
1) make sure your blocks and the back of the stamps are clean. After using them frequently, you will get body oil on the surface and this reduces the cling. Just use the Stampin’ Scrub to clean the blocks and the backs of the stamps. You can also wipe them with an ALCOHOL FREE baby wipe or a damp cloth dipped in dish soap. Be sure to rinse the soap off the blocks or stamps before using.
2) Huff on the back of the block before sticking the stamp onto the block. This will create a layer of moisture to help seal the two together.
3) Place the stamp face down on the work surface and the place the block on top of the stamp and press gently, holding for a second or two. Pick up the block and press on the side of the stamp to make sure they are firmly attached together
4) When using a large stamp or when using Versa Mark or Craft Ink change the way you ink the stamp. Place the block on the table with the stamp face up. Hold the stamp pad in your hand and pounce it on to the stamp. This works great, also, to make sure that you are getting full coverage on the large stamps.
I seldom have any problems if I follow the steps above. BUT, there’s always an exception so here are two more tips that will solve the problem.
5) Rub the stamp and or the block on the back of your sleeve or pant leg to build some static electricity before attaching them.This really helps if the block is cold.
6) You can use a very light layer of Tombow glue (or Aleen's Tack It Over and Over) on the back of the Stamp – let it dry and it will be very tacky – It will stick perfectly.


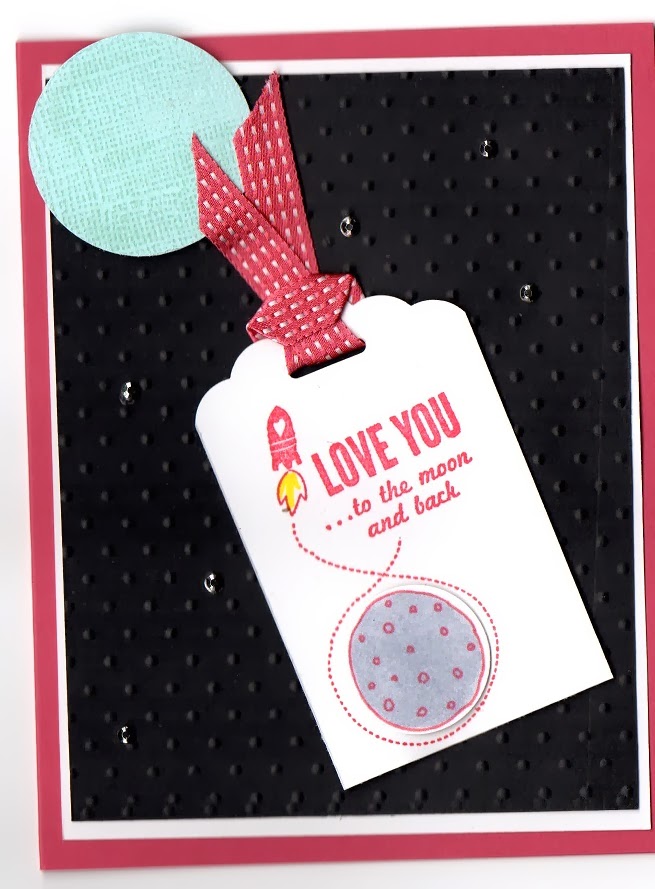
So now that you know how to work your clear mount stamps, how about a card?  Marianne and I are going to Greensboro tomorrow for a NC Demos Non-Convention Goers gathering.  There will be 12 of us there and we are going to all do a Shoebox Swap.  Here is the card I am doing:


 I tell you, I am in love with the Postage Due stamp!!  This time, I stamped it in River Rock.  I just realized that I did not post the card with the latest changes.  I punched out the sentiment "Sending You Love" with the Itty Bitty Banners die (stamped using Cajun Craze ink) and adhered it in the top right.  I also stamped one of the postage stamps in Cajun Craze too to add a little pop to the card.  The other stamp is in Always Artichoke.

Marianne is doing a really cute card using the Petite Pocket Die.  I'll snap it tomorrow to share with you.

Well, better sign off and head on in to bed.  Marianne's already in the guest room asleep.  Sammie does not know what to do.  She usually sleeps in that bedroom on the twin bed closest to the window.  She sleeps on a pink blanket that I have folded up on the bottom of the bed and I noticed tonight that it is practically black from her fur!!  She keeps wandering in and out of the room where Marianne is but now she has settled outside the door.  At night, she starts out sleeping in our bedroom but leaves sometime during the night and I think goes in the guest room to sleep.  Who knows where she will end up tonight?!