Sunday, July 31, 2011

Quarterly Bookmarks

I had a great time this weekend at NC Quarterly in Taylorsville.  I visited with old friends and made new ones.  I ended up coming home and sleeping in my own bed instead of on the air mattress!  I finished my shoe box swaps around 10 pm and since it had only taken me about 40 minutes to get there, I hit the road.

We did a bookmark swap and it was great to see all the different bookmarks!

by Debbie Tadt


by Leah Harrison


by Tina Lesson

by Pat Wilkinson


from Kathy Hunt

by Letricia Blake


Nancy Carr
This is one of  the 3D swaps that I received.  It is soooo cool!!

by Dina Wilson

Dina shared her instructions and template for this Fabric Flower Pot.  She got the idea from Qbee's website.

Saturday, July 30, 2011

Last Day for Special!

Just a reminder that SUNDAY is the last day for the $99 sign up special.

Check out this video from Shelli Gardner (the head "STAMPER" of Stampin Up) - she also shows you the Christmas Keepsake Box you will receive for free, and guess what, she is going to do a video and create that box, so we can all watch it and stamp along with her, won't that be fun?


http://www.youtube.com/watch?v=-_zLn1SzeWc

Friday, July 29, 2011

Quarterly Rejects

This week as I have said, I have been working on cards and projects for my Quarterly swaps.  Tuesday I did 2-3 cards that I loved but decided after doing them that they would be too complicated for my Shoebox.  We do a Shoebox Swap on Friday night.  You design a card and put all the materials to make the card in a box for everyone else to make.  Friday night we only have 12 participants but still, we need to get 12 cards made, visit, and snack and still make it to bed at a reasonable hour to get up bright and bushy tailed for the next day of events!


This wa my first reject.  This is a card that was demo-ed on stage during convention and I love it!  The "cake" is 3 Hershey miniatures wrapped in DSP.  I used punches to make the Razzleberry cake stand - Border Punch, Word Window and Oval.  I pulled a thread in the satin ribbon to gather it around the candy.  This would definitely be a card you would need to hand deliver!  It just took too much time and I decided it would not be a good card for the shoebox.

This was the next card that I made.  I embossed the Vanilla cardstock with the Elegant Lines Embossing Folder and then painted the raised lines with Gold Smooch.  I used the Big Shot and Scallop Circle Die for the Early Edition circle that I "smoothed" in gold on the edges.  The Fabulous Florets flower is embossed with Melon Mambo embossing powder and cut out separately.  Again, too much time and tools involved!

This is the card I settled on.  It uses the new Occasions Alphabet.  I have already die cut all the Top Note shapes for everyone and embossed the dots on the white Top Note.  So, basically they have to stamp and put it together!  The paper is from Paisley Prints.  And notice the edge on the white stamped piece?  I used the new Postage Punch to make that!!  I love it when you can do more with a Punch than it's intended use!  The flower is punched with the Triple Layer Blossom Punch.  I punched 4 flowers, spritzed them heavily with water and crumpled them up.  Let them dry a bit; then flatten them back out and put together with a brad.  I did not put them straight on top of each other but instead put every other one slightly to the side of the other one.


This is my Bookmark Card for another swap.  I used the Two Tags Die for the bookmark and just sponged Marina Mist on the bottom and Peach Parfait and Daffodil Delight on top (masking a circle for the sun).  Then I stamped the Sail Away sailboat.  If you click on the picture to enlarge it, you might be able to see how I did the sails.  I stamped them separately onto Vellum, cut them out and turned them over and used a Stylus and a rubber mat to gently rub onto the sails and puff them out.  It really looks cool in person!  This is another great stamp for a great price!!  It is a single stamp in the Summer Mini catalog but will be gone the end of August.  So, if you like it, contact me to order it!!

And finally, my Punch Art Swap!  Good enough to eat, huh?  I used the following punches to make it:

Bun Top:  Extra Large Oval Punch (Crumb Cake)
Bun Bottom:  Word Window
Lettuce:  Blossom Punch (Celery)
Tomatoes:  3/4" Circle Punch (Cherry Cobbler)
Cheese:  Word Window (More Mustard)
Meat:  Modern Label (Choc. Chip)

Well, that it for Quarterly Swaps.  Think I am going to have to shop around for a camera today.  Mine has bit the dust I believe.

Wednesday, July 27, 2011

Be Flirtatious!

There is some gorgeous new designer paper in the catalog.  I saw it used at convention and I received some really nice swaps that used the paper.  And bummer .... I placed an order a few days ago, and forgot to include it in my order.  You better believe I won't forget next time!  Check out pages 126-127 of the 2011-2012 Idea Book / Catalog to see the beautiful coordinating fabric, patterned paper, stamps and punches, all with flirty feminine colors and delicately detailed doily designs.

The Flirtatious Specialty Designer Paper includes two sheets of double-sided laser cut doily paper that is ideal for adding detailed embellishments to projects.  Use the full sheet of doilies on a scrapbook page or cut the individual doilies apart and you'll have 32 embellishments to layer on your cards, scrapbook pages, and decor projects.  The coordinating Lace Ribbon Border Punch is another great option for adding beautifully detailed accents.  I love how the Lace Ribbon Border looks with the 1/8" Taffeta Ribbon threaded through it - gorgeous!  The doily images from the Flirtatious Specialy Designer Paper are repeated in the intricately detailed Hello Doily and Delicate Doilies stamp sets.  With the cheerful colors and feminine designs, the Flirtatious Suite is packed full of fun, coordinating details sure to bring out your flirty side!


Beach Bucket Survival

I have been trying to get ready for the NC Demos Quarterly meeting this weekend.  We will be meeting in Taylorsville which I think is less than an hour west of me.  Unfortunately, the town is really small and there are no hotels so I will be taking Marianne's air mattress and sleeping with everyone else in the church where we are meeting!  I don't usually get much sleep when I have to do that but it is only for one night so I guess I can handle it!  I have signed up for the Shoebox Card Swap on Friday night, 3D swap, 6x6 Punch Art swap, Bookmark Card swap and the Beach Bucket Survival swap.  The Beach Bucket swap is really cute.  Everything listed below has to fit in a beach bucket and be decorated.:

B:     use a sand bucket 
E:     eatable project (I put candy in a couple of sand molds)
A:     anything to take to the Beach (decorated flip flops)
C:     chap stick (picture below)
H:     head or hair accessory (sun visor - stamped)
P:     punch art project (fish card)
A:     animal project (fish card)
R:     rolling Wheel project (Hershey miniatures)
T:      thank you card project (picture below)
Y:      your favorite stamp set project (box for Hershey minis)
Fish Punch Art (uses Ornament Punch and Word Window Punch)


Chap Stick Holder - closed

Chap Stick Holder open

Flip Flops

Thank You Card - from Convention Swaps

Candy Box Project

Top of Box

Hershey Miniatures wrapped with paper that is wheeled with SU's Decor Wheel

Beach Bucket
 Tomorrow I will share the other swaps I have made for the weekend.  I had a lot of rejects today trying to decide what to do!

Monday, July 25, 2011

Convention Cards

Thought I'd share a few more of my convention pictures.  These are cards that I liked that were on the display boards.  Enjoy!

A lot of cutting out of the Fabulous Florets!  This was on the Hispanic display.

Another Fabulous Florets flower - this time paper pieced on DSP

A cute punch art frog!

Button Buddies - love this set!!

Friendly Mr Owl!

These roses are beautiful!!

These pennants are going to be popular this year.

Sunday, July 24, 2011

Keepsake Christmas Box


Isn't this keepsake box just gorgeous?  It can be yours simply by purchasing the $99.00 Stampin' Up! Starter Kit. Not only will you receive over $185 worth of product, you'll also receive the Christmas Keepsake Project Kit, a $40 value, for FREE.

Here's what is included with this project:

•Keepsake box
•Scallop borders (cut from Tasteful Trim Bigz XL Die)
•First Edition Specialty Designer Series Paper strip (2)
•Holly Berry Designer Series Paper piece
•Real Red Top Note (cut from Top Note Bigz Die)
•Real Red Decorative Label (cut from Matchbook Bigz XL Die)
•Wild Wasabi Card Stock strips (3)
•Naturals Ivory Card Stock piece
•Holly Berry Bouquet Designer Fabric
•Real Red 1-1/4" Striped Grosgrain Ribbon
•Real Red 5/8" Grosgrain Ribbon
•Victoria 5/8" Crochet Trim
•Linen Thread
•Champagne Fine Galaxy Stampin' Glitter
•Vanilla Pearl 1/2" Simply Adorned Bauble
•Pearl Basic Jewels (1 pkg.)
•Holly Berry Bouquet Designer Buttons
•Mini Vintage Tags

AND the Christmas Keepsake Project Kit includes the exclusive Stampin' Up! stamp set, Pines & Poinsettias. How great is this?


The $99 Starter Kit is a terrific deal which can be customized with the stamp sets and colors of your choice. It's friendly on the budget, while still garnering you ALL of the perks associated with Stampin' Up! through December 31st. If you happen to reach $300 in total sales, you will be able to "renew" for three more months....which would take you right into Sale-A-Bration time.  Plus, by purchasing the kit now, you will be able to take advantage of the Holiday Mini preorder on August 1st. There is no commitment to host workshops or get outside sales, and there is no penalty to drop.

So, if you want to take advantage of this great deal, let me know and I can help you sign up!

Saturday, July 23, 2011

Catching up with July Monday Mailers

I made two Monday Mailer cards for Laurie before I left for convention.  One I mailed when I left and the other one I left instructions for Sonny to mail (and he did!).  I didn't want to post them and spoil her surprise before I left.  I've finally have a few minutes and can post them now.  I've been trying to get my desk cleaned up this morning from the mess that I left it in when I went to Salt Lake City!  Think I can see the top now.

Remember our theme this month is to use colors that you don't usually use.  For some reason, one of those colors for me is River Rock.  I like the color and used it all the time back when it was an In Color.  But for some reason, I tend to grab the Crumb Cake instead of River Rock.  For this card, I used the new Postage Punch to punch out squares of the nautical DSP in the summer catalog and arranged them on the background of the River Rock cardstock. Then I ran the whole thing through the Big Shot and embossed it. (what would I do without this machine?)  I wrapped the Bakers Twine around it - tying it in a Sailor's Knot.  (I just googled Sailers Knot and found a tutorial for it.)  Then I adhered the whole thing to the Early Espresso card.  I used different circle punches to punch out the stamped world image and the compass image from the Open Sea set.  I also punched out circles in Cherry Cobbler and Marina Mist.

I'm really going to miss this stamp set!

Here are a few other colors I don't use much - More Mustard, Tangerine Tango and Cajun Craze.  The card base is Tangerine Tango; the next layer is Basic Gray that I distressed the edges; the next layer is More Mustard and I sponged it with Tangerine and Mustard.  The ribbon is SU's Vanilla ribbon that I dyed using a dauber and an ink pad.  I used the Fun Flowers Bigz Die to make a flower out of Cajun Craze and Newsprint DSP.  I used the Little Leaves die for my Basic Gray leaves and the Beautiful Butterflies Die for the More Mustard butterfly.  The sentiment is on a strip of Vanilla cardstock.  I hand cut the end BUT ...  I learned a neat trick  at convention.  Use your square punch to make this cut!


Hope you have enjoyed these cards and learned a little something today!  I aim to please!!

Monday is my Mom's 83rd birthday and since my sister is going to the beach again next week and it is Restaurant Week this week, we took her out to dinner last night.  We went to the Epic Chophouse.  It was very good.  I can't remember being that stuffed when I left a restaurant and I even brought half my steak home!  My only complaint about the restaurant is that it is a little loud.  But maybe during the week it wouldn't be so bad.  It is the type of restaurant that you would go to for a special occasion as it is a little pricey.  Sonny doesn't like to share meals but that is what I would suggest next time!

Friday, July 22, 2011

Stamp Club In July

I had stamp club this week.  Luckily, I had all the project made before I left for convention so I wasn't rushing around like a crazy person too bad!  I had a new club that started last Tuesday and my regular club on Thursday.  They made the same projects except for the nautical card.  My Thursday club had already done that one so I substituted the Triple Layer Card.

Open Sea Card
 Supplies: 
Cardstock:  Cherry Cobbler, Night of Navy, Nautical DSP (Summer Mini)
Stamp:  Open Sea
Access:  Markers, Circle Punches

Emboss Resist Card
 With this card, everyone did a different color using the In Color DSP stack found on page 186.  If you've never done Emboss Resist, it is a great technique!  First stamp the image with Versamark and emboss it with clear powder.  Next sponge ink around the embossed image.  When done, wipe the ink off the embossed image.

Recipe:  Stamp:  Curvy Verses, Friends Never Fade
Cardstock:  White, Pacific Point, In Color DSP
Ink:  Versamark, Pacific Point
Access:  clear embossing powder, sponge, brad

Summer Fun Card
 On this card everyone got their choice of which image they wanted from the Summer Fun set - the flip flops, popcicles or the little kids.  We colored the images with markers.

Supplies:  Stamp:  Summer Fun
Cardstock:  White, Tempting Turquoise, Calypso Coral, Lucky Limeade
Access:  Ribbon, Scallop Punch, Dotted Embossing Folder, Big Shot

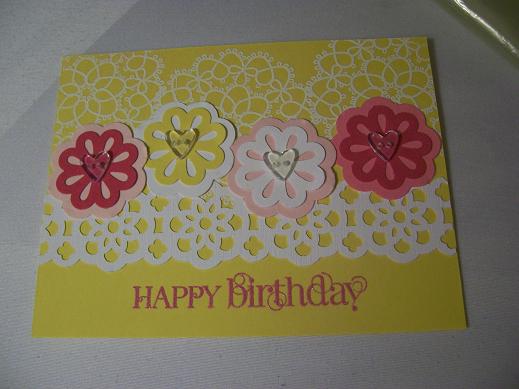
Triple Layer Birthday
Recipe:  Stamp:  Word Play, Decor Wheel
Cardstock:  Night of Navy, DSP from In Color stack, Poppy Parade. Peach Parfait, Pear Pizazz
Access:  Wheel, Triple Layer Punch (blossom). markers

Thursday, July 21, 2011

Ribbon Share

I have had several requests for RIBBON SHARES so this is what I have come up with.   Many of you, plus myself, hesitate to buy a whole spool of ribbon, as it's just  too much ribbon of one color.  Instead, you would like a little bit of all colors and different types of ribbons for different projects.  So a ribbon share, is just that, a share of a spool of ribbon of all the colors of one type of ribbon.  You can join one or both ribbon shares, and you can purchase as many shares as you would like.  Just let me know what ribbon share you would like to have and I will add you to the list.   As soon as I get enough people, I will place the order.
                                                     
Here are the ribbon shares I am offering  as of now.  

3/8" Ruffled Ribbon Share (*new ribbon!!*): Each share receives 2 yards of the 5 in-colors (10 yards total) - Calypso Coral, Island Indigo, Lucky Limeade, Pool Party, and Wisteria Wonder.  Cost: 14.00/share
 
3/8" Scallop Dots Ribbon Share (*new ribbon!!*): Each share receives 2 yards of 10 colors (20 yards total) - Basic Black, Cherry Cobbler, Chocolate Chip, Elegant Eggplant, Marina Mist, Melon Mambo, More Mustard, Old Olive, Pretty in Pink, Tangerine Tango.  Cost: $20.00/share

I will probably be offering other Ribbon Shares later.  If there is a particular one you would like, please let me know.

Wednesday, July 20, 2011

New Friends

I made a few new friends at convention.  That's what it is all about ... friends and fun!

This is me and Nancy (my roomie from Wilmington).  We hit it off great and had such a good time hanging out with each other.

This is Lee Conrey.  She lives in Florida and has a great blog.  She posted about me HERE.
Marianne's best girlfriend, Sharon R., lives in Jacksonville.  I introduced her to stamping a few years ago when she was here visiting.  When she asked me to find her a Stampin' Up demonstrator in Florida so she could go to some classes and workshops, I did a search and found Lee's blog.  So Sharon told Lee to find me at convention.  What a small world!  On Saturday after my Make and Take session, I ran back to the hotel to drop off my packet.  When I was getting on the elevator, there was Lee and Sandi MacIver.  We chatted for a bit and both gave our cameras to Sandi to snap our pictures.

Me on stage!  I hit my 5 year mark with Stampin' Up last year.  Since I didn't go to convention last year, I walked the stage this year.
On Friday, Nancy and I took the tour over to the home office.  It is always such a treat since it is decorated so great.  The "pick line" was closed since it was after working hours but we were able to go down and view it anyway.

This darling topiary was on someone's desk!

Yummy cupcakes .... made with paper!

No calorie chocolates!